Home Appliances / Cookers & Ranges
User Manual for GRAM 16KE 662 Electric Cooker
Comprehensive user manual for the GRAM 16KE 662 electric cooker. This guide covers installation, safety precautions, oven and hob operation, cleaning, maintenance, and troubleshooting.
Table of contents
Manual images
Click an image to enlargeQuick guide from the manual
This manual provides essential instructions for the safe and efficient operation of your GRAM 16KE 662 electric cooker. Before first use, ensure all packaging is removed, the oven is cleaned, and the unit is properly leveled. Always supervise children near the appliance and ensure the cooker is connected to a separate electrical circuit by an authorized electrician.
Safety information
- Hot surfaces: The oven and hob become very hot during use. Keep children away.
- Fire safety: Never leave oil or fat unattended on the hob. Never use water to extinguish grease fires; use a lid or fire blanket.
- Maintenance: Do not use abrasive cleaners or sharp metal objects on the glass surfaces.
- Damage: If the ceramic hob is cracked, disconnect the power immediately to avoid electric shock.
Installation
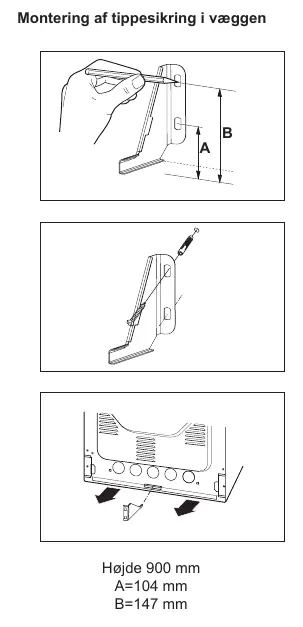
The cooker must be installed on a hard, level floor. It should not be placed on a plinth. Ensure the anti-tip bracket is correctly mounted to the wall to prevent the unit from tipping over. Electrical connection must be performed by an authorized electrician in accordance with local regulations.
Operation

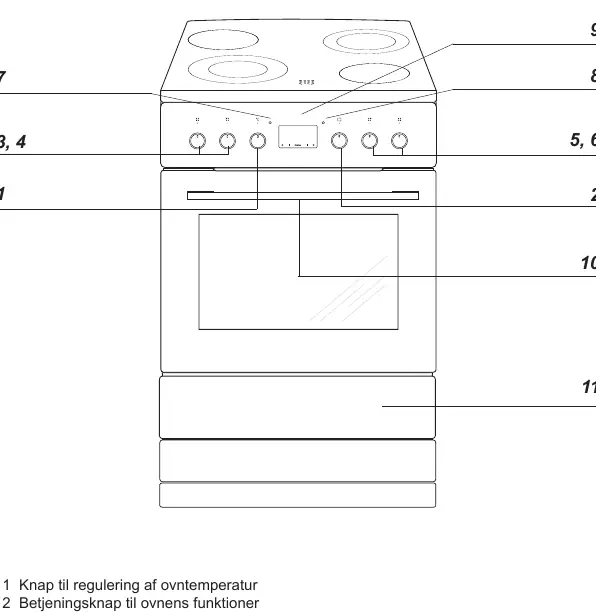
Hob
The ceramic hob is controlled by 7-step knobs. Use the appropriate heat setting for your cooking needs (0 for off, 1-3 for various cooking stages). Residual heat indicators show when a zone is still hot (above 50°C).
Oven
The oven features multiple functions, including fan-assisted cooking, grill, and conventional heating. Use the function selector and temperature knob to set your desired cooking mode. The oven includes a digital timer for setting cooking duration and a meat thermometer for precise roasting.
Cleaning and maintenance
- Steam Cleaning: Place 0.25L of water in a deep tray at the bottom level, set the oven to 50°C (top/bottom heat) for 30 minutes to loosen residue.
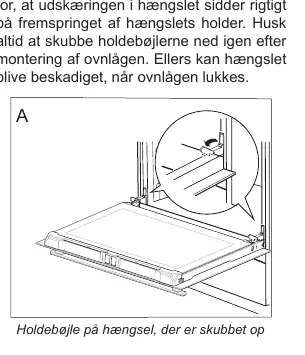
- Oven door: The door can be removed for easier cleaning by lifting the locking levers on the hinges.
- Halogen bulb: Disconnect power before replacing. Use a 230V/25W halogen bulb. Do not touch the bulb with bare fingers.
Troubleshooting
If the electrical equipment does not work, check the fuse in your home installation. If the oven light fails, check if the bulb is loose or damaged and tighten or replace it.
Manufacturer information
GRAM
Practical help
Common problems
Electrical equipment does not work
Check the fuse in your home installation; replace if blown.
Oven light does not work
Tighten the bulb or replace it (see Cleaning and Maintenance section).
Before use
- Remove all packaging materials and empty the storage drawer.
- Clean the oven interior to remove factory protective substances.
- Remove protective tape from the grill element.
- Heat the oven to 250°C for approximately 30 minutes to burn off residues.
- Ensure the cooker is level using the adjustable feet located in the drawer.
Specs in practice
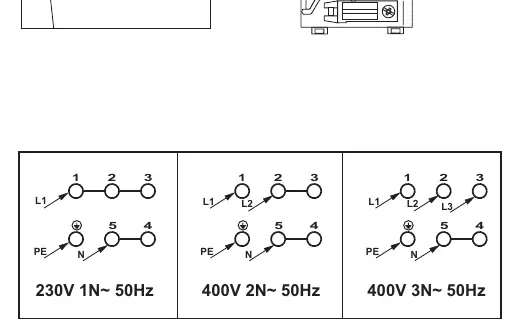
- Nominal voltage
- 230/400V~50 Hz
Images and diagrams
- Anti-tip bracket: Shows wall mounting measurements (A=104mm, B=147mm) to prevent tipping.
- Hob controls: Illustrates the 7-step control knobs for ceramic zones.
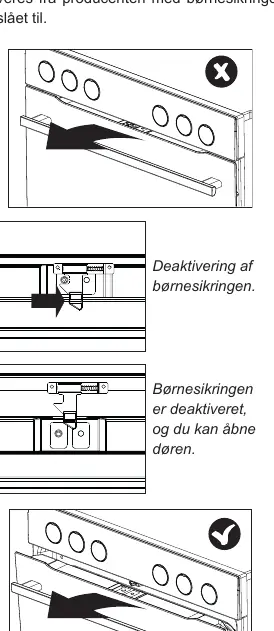
- Oven door removal: Shows the hinge locking levers for safe removal.
- Pot selection: Illustrates correct and incorrect pot sizes and bases for ceramic hobs.
Model compatibility
- Requires a separate electrical circuit.
- Use only the original meat thermometer provided with the appliance.
- Use pots with flat, clean, and dry bottoms to prevent damage to the ceramic hob.

Manual page author
Emily Carter
User documentation editor
Prepares concise manual descriptions and highlights the most useful setup, operation, and maintenance information for readers.