Garden / Brushcutters & Trimmers
Greenworks Pro 80V String Trimmer Quick Start Guide
Quick start guide for the Greenworks Pro 80V String Trimmer. Includes assembly instructions, operation tips, cutting line replacement, and maintenance procedures.
Quick answers from the manual
Quick answer
- The Greenworks Pro 80V String Trimmer is assembled by attaching the guard, edge guide, and auxiliary handle. It is operated by inserting the battery, pressing the lock-out button, and squeezing the trigger. Maintenance involves bump-feeding the line and replacing the spool when empty. p. 1, 2
Key actions
- Attach the guard and auxiliary handle before first use. p. 1
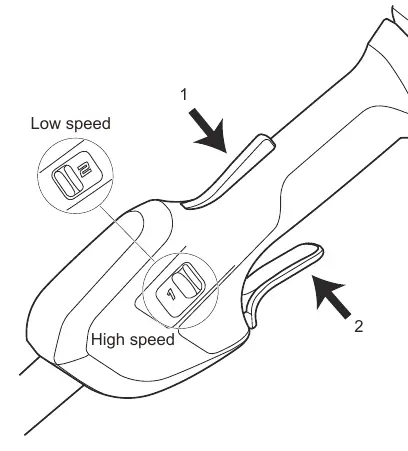
- Use the speed switch to select between low and high speed. p. 1
- Replace the spool and bump head when the line is depleted. p. 2
First start
- Install the battery, press the lock-out button, and squeeze the trigger. p. 1
Show 4 more answers Show less
Problems and fixes
Cutting tall grass
Cut from the top down.
p. 2Maintenance and reset
- Replace spool and bump head by pressing side tabs. p. 2
Technical specifications
| Parameter | Value | Meaning | Pages |
|---|---|---|---|
| Cutting Diameter | 14-16 inches | Adjustable cutting width | p. 2 |
| Line Diameter | 0.08/0.095 in | Compatible line thickness | p. 2 |
Where to find it in the PDF
- Assembly and Operation p. 1
- Maintenance and Tips p. 2
Table of contents
Manual images
Click an image to enlargeQuick guide from the manual
This guide provides essential instructions for the assembly, operation, and maintenance of the Greenworks Pro 80V String Trimmer. Always ensure the battery is removed before performing any maintenance or assembly tasks.
Know your machine
Familiarize yourself with the main components of the trimmer:
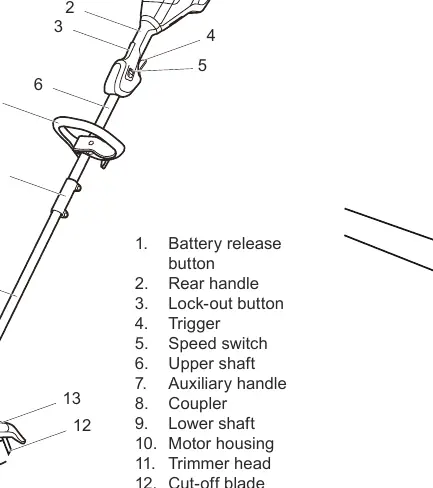
- Battery release button
- Rear handle and Trigger
- Lock-out button
- Speed switch
- Auxiliary handle
- Coupler and Shaft
- Trimmer head, Cut-off blade, and Guard
Assembly
Follow these steps to prepare the trimmer for use:
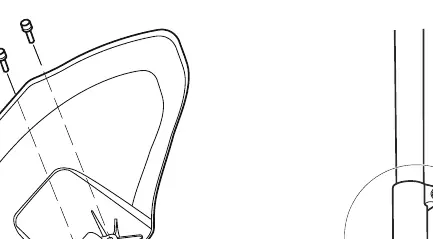
- Attach the guard: Secure the guard onto the trimmer head using the provided screws.
- Attach the edge guide: Snap the edge guide onto the trimmer head.
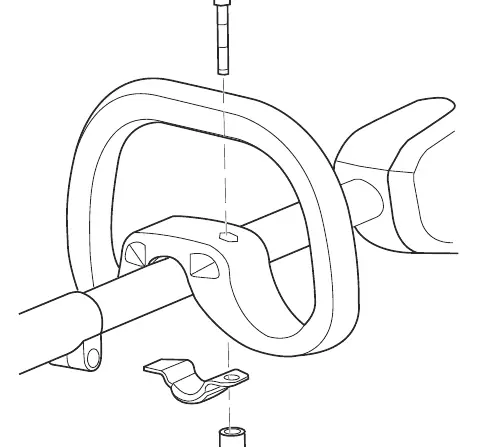
- Attach the auxiliary handle: Secure the handle onto the upper shaft using the provided hardware.
Operation
Starting the machine:
- Install the battery into the battery compartment.
- Press the lock-out button and squeeze the trigger to start.
- Use the speed switch to toggle between low and high speed settings.
Operation tips:
- Always keep a firm hold with both hands on the machine.
- When cutting tall grass, cut from the top down to prevent wrapping.
- Use the bump feed mechanism to adjust the length of the cutting line while the machine is running.
Maintenance
Adjusting cutting diameter: The cutting diameter can be adjusted between 14 inches (35.6 cm) and 16 inches (40.6 cm) by adjusting the cut-off blade position.
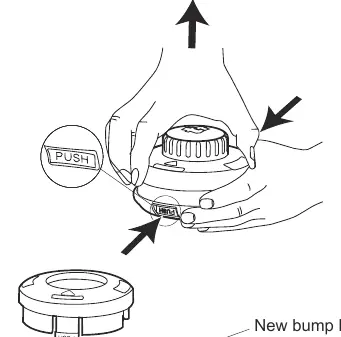
Replacing the spool and bump head:
- Press the tabs on the side of the bump head to remove the cover.
- Remove the old spool and bump head.
- Install the new spool and bump head.
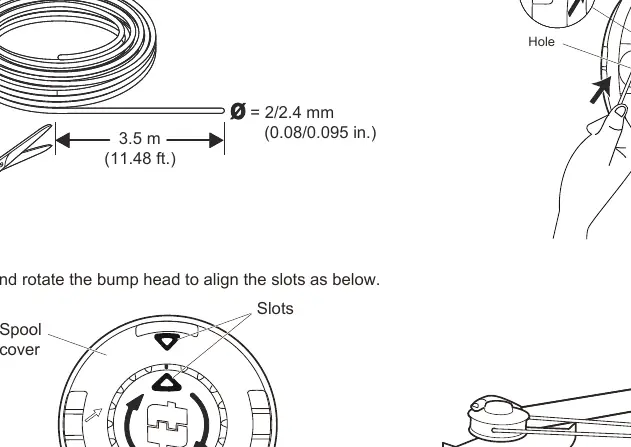
Installing the cutting line:
- Cut a length of line (approx. 3.5 m / 11.48 ft).
- Insert the line through the hole in the head.
- Push and rotate the bump head to align the slots and wind the line.
Practical help
Common problems
Tall grass wrapping around the head
Cut tall grass from the top down in small sections.
Cutting line too short
Use the bump feed mechanism while the machine is running to advance the line.
Before use
- Ensure the battery is fully charged and installed correctly.
- Verify the guard is securely attached.
- Check that the auxiliary handle is tightened.
- Ensure the cutting line is properly installed and not tangled.
Show more Show less
Specs in practice
- Cutting Diameter
- Adjustable between 14 inches (35.6 cm) and 16 inches (40.6 cm).
- Line Diameter
- Compatible with 0.08 inch (2 mm) or 0.095 inch (2.4 mm) line.
Images and diagrams
- The parts diagram identifies the trigger, speed switch, and battery release button locations.
- The maintenance section illustrates the bump head rotation and slot alignment for line installation.
Model compatibility
- Compatible with 80V Greenworks Pro batteries.

Manual page author
Emily Carter
User documentation editor