Garden / Snow Blowers
User Manual for Snow Joe SJ622E/SJ623E Electric Snow Thrower
Comprehensive user manual for the Snow Joe SJ622E and SJ623E 18-inch electric snow thrower. Includes assembly instructions, operation guide, maintenance procedures, and safety guidelines.
Quick answers from the manual
Quick answer
- To operate the Snow Joe SJ622E/SJ623E, connect a UL-rated outdoor extension cord, hold the safety switch button, and pull the ON/OFF switch lever. Release the lever to stop. p. 7, 8
Key actions
- Assemble the frame and chute p. 5, 6
- Power on the unit p. 8
- Replace rubber plates p. 10
First start
- Inspect the unit, clear the area of debris, connect the extension cord, and perform a test run. p. 2, 7
Problems and fixes
Unit won't start
Check power connection and ensure safety switch button is held before pulling the lever.
p. 8
Abnormal sounds or unstable operation
Stop the machine, disconnect power, and contact customer service.
p. 1, 2Maintenance and reset
- Automatic reset: If the auger is obstructed, unplug the unit, clear the obstruction, wait 60 seconds, and resume. p. 12
Technical specifications
| Parameter | Value | Meaning | Pages |
|---|---|---|---|
| Rated Voltage | 120 V ~ 60 Hz | Power requirement | p. 4 |
| Power | 15 A | Current draw | p. 4 |
| Clearing Width | 18 in. (46 cm) | Width of snow path | p. 4 |
Where to find it in the PDF
- Safety Instructions p. 1, 2, 3
- Assembly p. 5, 6
- Operation p. 7, 8, 9
- Maintenance p. 10, 11, 12
Table of contents
Manual images
Click an image to enlargeQuick guide from the manual
The Snow Joe SJ622E and SJ623E are 15-Amp electric snow throwers designed for clearing snow from paved surfaces. The SJ623E model includes an additional halogen light system. Before use, ensure the area is clear of debris, the extension cord is UL-rated for outdoor use, and all parts are secure. Always follow the safety instructions to prevent electric shock or injury.
Assembly
The unit comes partially assembled. Follow these steps to complete the setup:
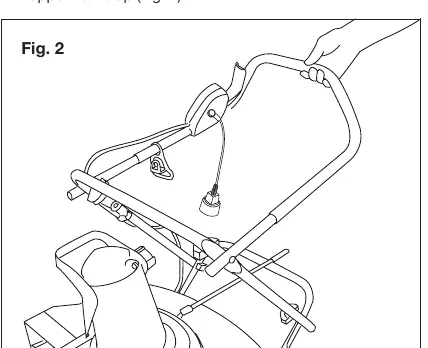
- Frame Assembly: Pull the middle frame back and the upper frame up. Secure the connections between the lower, middle, and upper frames using the provided T-bolts and knobs.
- Discharge Chute: Loosen the knob to lift the chute deflector. Lock it securely onto the discharge chute.
- Chute Crank: Slide the upper chute crank through the rubber ring on the middle frame. Connect it to the lower chute crank and secure it with the screw.
Operation
Powering On/Off:
- To start, depress and hold the safety switch button, then pull the ON/OFF switch lever toward you.
- Once the machine starts, release the safety switch button.
- To stop, release the ON/OFF switch lever.
Plowing Snow:
- Start near the electrical outlet and work outward.
- Use the wheels as a pivot point to turn the machine.
- Adjust the discharge chute direction using the crank and the height using the deflector knob.
- Do not force the machine; push gently and evenly.
Maintenance
General Tips:
- After each use, run the machine for a few minutes to prevent freezing, then wipe off residual ice and snow.
- Check bolts and screws frequently for tightness.
- The motor and auger are lubricated for lifetime use; do not add lubricant.
Replacing Parts:
- Rubber Plates: Remove the nuts and bolts securing the plate assembly to the auger. Replace the worn plates, ensuring the coarse side is inside and the smooth side is outside.
- Scraper Bar: Remove the two screws holding the bar at the base of the unit and install the new one.
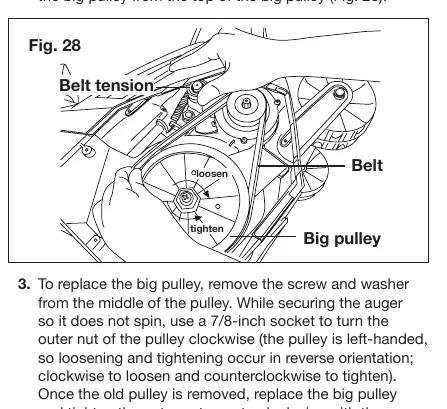
- Belt and Pulley: Remove the left panel. Lift the belt tension pulley to remove the old belt. Use a 7/8-inch socket to remove the big pulley if necessary. Install the new belt by rolling it onto the pulleys.
Storage
Allow the engine to cool completely before storing. Disconnect the extension cord and store the unit in a locked, dry place. Use a cover for added protection.
Practical help
Common problems
Unit will not start
Ensure the safety switch button is held down before pulling the ON/OFF switch lever. Check the power connection.
Unit runs unstably or makes abnormal sounds
Stop the machine immediately, disconnect power, and contact Snow Joe customer service.
Parts are frozen
Do not force controls. Unplug the unit, inspect for frozen parts, and free them before restarting.
Before use
- Inspect the unit for shipping damage.
- Ensure all parts are secure and installed correctly.
- Clear the area of rocks, glass, wires, and other debris.
- Verify the extension cord is UL-rated for outdoor use.
- Perform a test run to ensure the rotor turns freely.
Specs in practice
- Rated Voltage
- 120 V ~ 60 Hz
- Clearing Width
- 18 inches (46 cm)
- Clearing Depth
- 10 inches (25.4 cm)
- Throw Distance
- Max 25 feet (7.6 m)
Images and diagrams
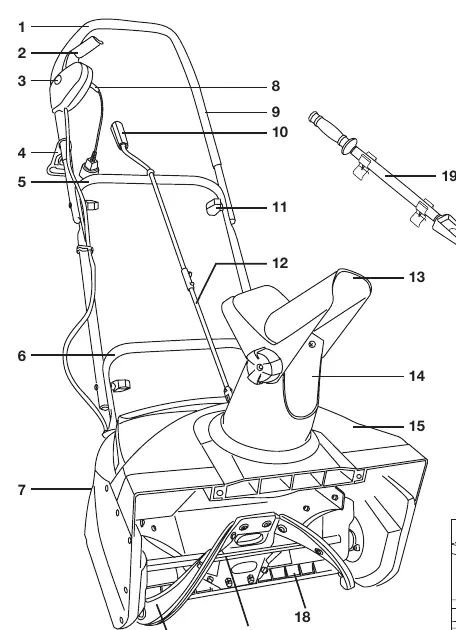
- Figure 1-1: Identifies all main controls and components including the handle bar, switch lever, and chute.
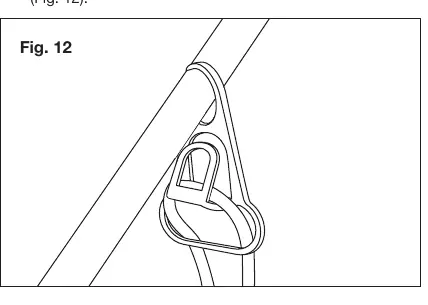
- Figure 12: Shows how to secure the extension cord using the restraint hook.
- Figure 28: Illustrates the belt and pulley replacement procedure.
Model compatibility
- The SJ622E and SJ623E models are identical in operation, with the only difference being the halogen light system on the SJ623E.

Manual page author
Emily Carter
User documentation editor
Prepares concise manual descriptions and highlights the most useful setup, operation, and maintenance information for readers.