Garden / Snow Blowers
User Manual for Snow Joe PRO SERIES 18-Inch Cordless Snow Blower iON18SB-PRO
Comprehensive user guide for the Snow Joe PRO SERIES 18-Inch Cordless Snow Blower (iON18SB-PRO). Includes assembly instructions, battery charging procedures, operation tips, maintenance, and safety guidelines.
Quick answers from the manual
Quick answer
- The Snow Joe iON18SB-PRO is a 40V cordless snow blower with an 18-inch clearing width. It requires assembly of the handle and discharge chute, and is powered by a lithium-ion battery that takes 3-3.5 hours to charge. p. 6, 7, 8
Key actions
- Start the machine p. 11
- Charge the battery p. 9
First start
- Charge battery fully p. 3, 9
- Assemble handle and chute p. 7, 8
Problems and fixes
Battery temperature abnormal
Battery is too hot or too cold; wait for it to reach normal range.
p. 9, 10Maintenance and reset
- Replace rubber plates p. 13
Technical specifications
| Parameter | Value | Meaning | Pages |
|---|---|---|---|
| Battery Voltage | 40 V D.C. | Initial no-load voltage. | p. 6 |
| Clearing Width | 18 in. (45.7 cm) | Width of snow path. | p. 6 |
Where to find it in the PDF
- Safety Instructions p. 1, 2, 3, 4
- Assembly p. 7, 8
- Operation p. 10, 11, 12
Table of contents
Manual images
Click an image to enlargeQuick Guide from the Manual
The Snow Joe iON18SB-PRO is a cordless snow blower designed for clearing snow from paved surfaces. Before first use, ensure the battery is fully charged. The unit requires assembly of the handle and discharge chute. Always inspect the area for foreign objects like rocks or wires before operation to prevent damage or injury.
Assembly
Assembling the Handles
The snow blower comes mostly assembled. To prepare for use:
- Pull up on the upper frame to engage the handle (Fig. 1).
- Secure the middle frame to the upper frame using the handle locks on each side (Fig. 2).
- Secure the lower frame to the middle frame using the handle knobs on each side (Figs. 3 & 4).
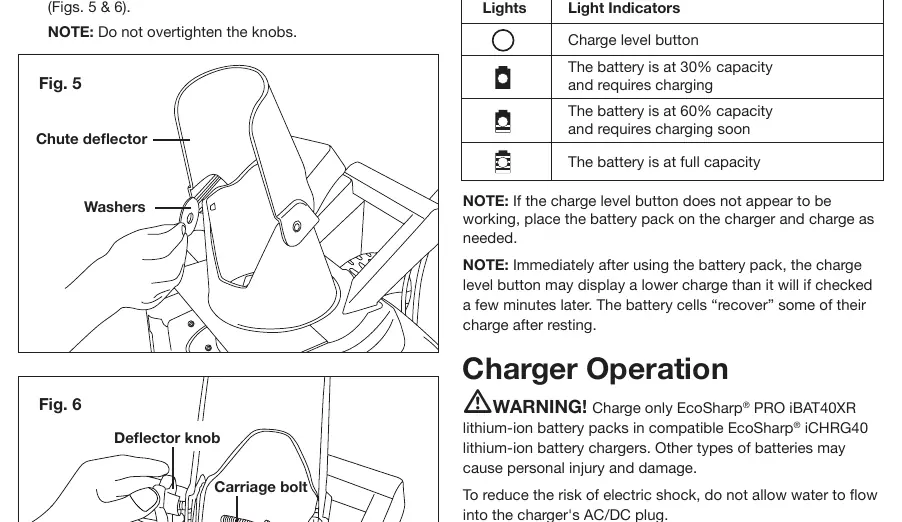
Discharge Chute Assembly
- Lift the chute deflector until it locks into place.
- Insert washers into the chute connection, pass carriage bolts through from the inside, and tighten with deflector knobs (Figs. 5 & 6). Do not overtighten.
Battery and Charging
The unit uses an EcoSharp PRO iBAT40XR lithium-ion battery. The battery pack is maintenance-free but must be charged before the first use.
- Charging: Remove the battery by pressing the push lock button. Insert the charger into a wall outlet, then slide the battery into the charger.
- Indicators: A red light indicates charging; a green light indicates the battery is fully charged.
- Temperature: Only charge in temperatures between 32°F (0°C) and 113°F (45°C).
Operation
Starting the Machine
- Open the battery compartment and slide the battery in until it clicks.
- Insert the safety key into the slot and close the compartment cover.
- Press the safety switch button located on the switch housing.
- While holding the safety switch button, pull the ON/OFF switch bar lever toward you to start the motor.
- Release the safety switch button once the machine is running.
- To stop, release the ON/OFF switch bar lever.
Operating Tips
- Clearing Path: Start outward and work in a back-and-forth motion. Overlap clearing paths.
- Wind Direction: If possible, move in the same direction as the wind to avoid snow blowing back at you.
- Chute Control: Use the remote switch to rotate the chute 180 degrees. Adjust the deflector knobs to change the throw height.
- LED Light: Use the switch on the handle harness to activate the LED light for nighttime operation.
Maintenance
- Lubrication: The motor and auger are lubricated for lifetime use at the factory; do not add lubrication.
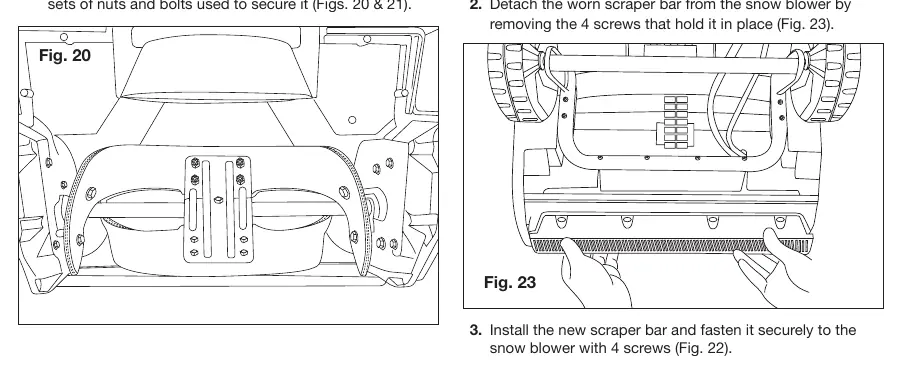
- Rubber Plates: If worn, detach the assembly by removing the 8 sets of nuts and bolts and install new plates in reverse order.
- Scraper Bar: Remove the 4 screws to detach the worn bar and install a new one.
- Storage: Clean the unit after use. Remove the battery and safety key before storing in a dry, locked place.
Practical help
Common problems
Battery not charging
Ensure the battery is fully seated in the charger. Check if the temperature is within the safe charging range (32°F-113°F). If the light flashes red/green, the temperature is abnormal; if it flashes red only, there is a battery fault.
Snow blower not starting
Ensure the safety key is fully inserted. Verify the battery is charged and properly seated. Ensure you are pressing the safety switch button before pulling the ON/OFF switch lever.
Parts frozen
Do not force controls. Stop the machine, remove the battery, and inspect for frozen parts. Free all parts before restarting.
Before use
- Inspect the unit for loose or damaged parts.
- Clear the area of rocks, glass, wires, and other debris.
- Ensure the battery is fully charged.
- Verify the safety key is inserted.
- Check that rubber plates and scraper bar are secure.
Specs in practice
- Battery Voltage
- 40 V D.C. (Initial no-load voltage peaks at 40V; nominal is 36V).
- Clearing Width
- 18 inches (45.7 cm) width per pass.
- Throw Distance
- Up to 20 feet (6 meters).
- Charging Time
- 3 to 3.5 hours for a full charge.
Images and diagrams
- Fig 1-4: Handle assembly steps.
- Fig 5-6: Discharge chute assembly.
- Fig 7-10: Battery removal and charging process.
- Fig 11-13: Battery and safety key installation.
- Fig 14-15: Starting procedure using safety switch and lever.
Model compatibility
- Compatible with EcoSharp PRO iBAT40XR and EcoSharp iBAT40 battery packs.
- Use only authorized Snow Joe replacement parts.

Manual page author
Michael Turner
Technical manual editor
Reviews PDF manuals for structure, safety notes, and practical product details so readers can find the right information quickly.