Electronics / Microphones
User Manual for HamiltonBuhl RMTK 2.4GHz Wireless Microphone System
Get started with your HamiltonBuhl RMTK 2.4GHz Wireless Microphone System. This guide covers setup, automatic pairing, volume control, charging, and troubleshooting tips.
Quick answers from the manual
Quick answer
- The HamiltonBuhl RMTK is a 2.4GHz wireless microphone system that pairs automatically. It features a built-in battery (up to 4 hours), adjustable volume, and is compatible with devices having a 3.5mm input. p. 1
Key actions
- Pairing the devices p. 2
- Charging the units p. 2
First start
- Turn on both the transmitter and receiver. They will pair automatically, indicated by rapidly flashing LED lights. p. 2
Problems and fixes
No sound during recording
Check power switch, phone case interference, or try a third-party camera app.
p. 2Technical specifications
| Parameter | Value | Meaning | Pages |
|---|---|---|---|
| Transmission Technology | 2.4G | Wireless transmission standard | p. 1 |
| Battery | 650mAh | Built-in Li-ion battery capacity | p. 1 |
Where to find it in the PDF
- Product Introduction and Specifications p. 1
- Operation and Troubleshooting p. 2
Table of contents
Manual images
Click an image to enlargeQuick Guide
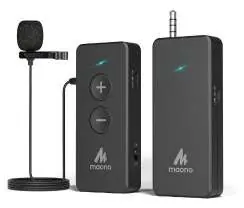
The HamiltonBuhl RMTK is a compact 2.4GHz wireless microphone system designed for remote teaching, podcasting, and live streaming. The system consists of a transmitter and a receiver that pair automatically upon power-up.
Product Overview
The system includes a transmitter and a receiver. The transmitter features a built-in microphone and an external microphone jack. The receiver features a 3.5mm AUX output for connection to computers, smartphones, speakers, and cameras.

Operation
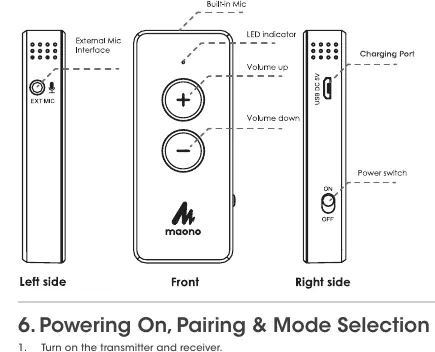
Powering On and Pairing: Turn on both the transmitter and the receiver. The LED indicators on both units will flash slowly. The devices will pair automatically, indicated by the LED lights flashing rapidly. Once pairing is complete, the LED light will remain solid.
Volume Control: Use the (+) or (-) buttons on the transmitter to adjust the microphone volume.
Using an External Lavalier Microphone: Insert the included lavalier microphone into the external microphone jack on the transmitter. The built-in microphone will be automatically disabled when an external mic is connected and re-enabled when it is removed.
Charging
Connect the USB ports of both the transmitter and the receiver to a power source using the provided Micro-USB cable. Ensure the device is charged before use.
Troubleshooting
If you experience issues, check the following:
- No power: Ensure the power switch is in the ON position.
- No sound during recording: Verify the power switch is on, check that your phone case is not obstructing the input jack, or try using a third-party camera app if the native app does not support external microphones.
- Feedback noise: Use the device in a quiet environment away from other 2.4GHz devices.
- Poor transmission: Remove any obstacles between the transmitter and receiver and restart both units.
Precautions
- Keep the units dry and away from extreme temperatures or humidity.
- Do not disassemble or modify the microphone.
- Avoid using the device near medical equipment or in areas where radio interference is prohibited.
- Handle with care; this is a precision instrument.
Practical help
Common problems
No power
Ensure the power switch is in the ON position.
No sound during recording
Check that the power switch is on, ensure your phone case is not blocking the input jack, or try a third-party camera app.
Feedback noise
Use in a quiet environment away from other 2.4G devices.
Poor transmission
Remove obstacles between the transmitter and receiver and restart both units.
Before use
- Charge both the transmitter and receiver using the provided Micro-USB cable.
- Ensure the power switch is set to ON.
- If using the lavalier microphone, ensure it is securely plugged into the transmitter.
- Verify the receiver is connected to your recording device via the 3.5mm output.
Specs in practice
- Transmission Range
- Approximately 98 feet (30 meters)
- Charging Port
- Micro USB, DC 5V=1A Max
Images and diagrams
- Transmitter: Features power switch, volume (+/-) buttons, external mic interface, and LED indicator.
- Receiver: Features power switch, 3.5mm audio jack, and LED indicator.
Model compatibility
- Compatible with computers, smartphones, speakers, and cameras with a 3.5mm input.
- Some Android camera apps may require a third-party app to support external microphones.

Manual page author
Emily Carter
User documentation editor
Prepares concise manual descriptions and highlights the most useful setup, operation, and maintenance information for readers.