Electronics / Microphones
User Manual for Saramonic Blink500 ProX B8 Wireless Microphone System
Comprehensive user guide for the Saramonic Blink500 ProX B8 wireless microphone system. Learn how to pair transmitters, adjust gain, manage onboard recording, and troubleshoot connection issues.
Quick answers from the manual
Quick answer
- The Blink500 ProX B8 is a 4-channel wireless microphone system. To pair, enter the 'Pair Setting' menu on the receiver, select 'Yes', and hold the transmitter power button for 5 seconds. p. 11
Key actions
- Pairing Transmitters p. 11
- Adjusting Gain p. 5, 6
- Switching Input Mode p. 5
First start
- Charge all devices in the case, power on, and ensure they are paired. p. 7, 11
Problems and fixes
No sound
Check connections, gain, mute status, and input mode.
p. 14Maintenance and reset
- Restore Default Settings via the receiver menu. p. 10
Technical specifications
| Parameter | Value | Meaning | Pages |
|---|---|---|---|
| Operating Range | 280m | Maximum range in open environment. | p. 16 |
| Recording Time | 14 hours | Max recording time on 8GB memory. | p. 16 |
Where to find it in the PDF
- Transmitter Structure p. 4
- Receiver Structure p. 6
- Charging Case p. 8
Table of contents
Manual images
Click an image to enlargeQuick Guide from the Manual
The Saramonic Blink500 ProX B8 is a 4-channel wireless microphone system designed for multi-source recording. It features onboard recording, noise cancellation, and a charging case. Ensure all devices are charged before use. The system is pre-paired at the factory, but if connection is lost, use the pairing menu on the receiver to re-sync.
Product Overview
The system consists of four Blink500 ProX TXR-WP transmitters, one Blink500 ProX 4RX receiver, and a charging case.
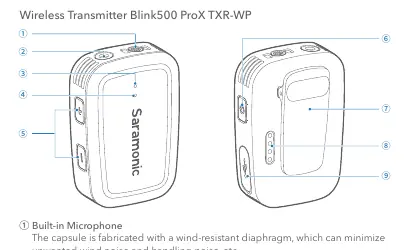
Transmitter (TXR-WP)
- Built-in Microphone: Features a wind-resistant diaphragm.
- Mic/Line Input: 3.5mm jack for external microphones or line-in devices.
- Controls: +/- buttons for gain adjustment and input mode switching; Power button for power, mute, and pairing.
- Features: Onboard recording (8GB), noise cancellation, and IP66 water/dust resistance.
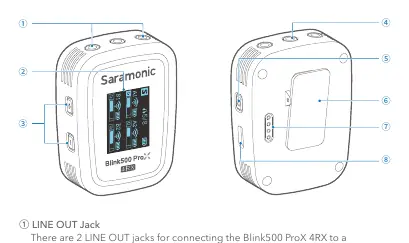
Receiver (4RX)
- Display: OLED screen for monitoring levels, battery, and settings.
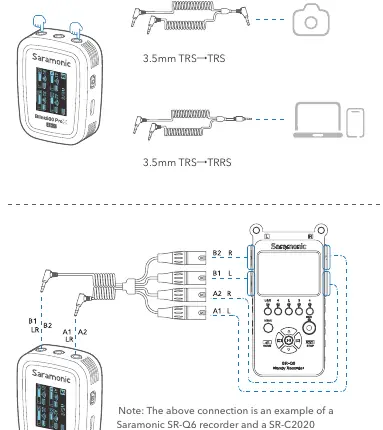
- Outputs: Dual 3.5mm TRS jacks for connecting to cameras, mixers, or smartphones.
- Controls: +/- buttons for volume/gain and menu navigation; Power/Mute button.
Setup and Pairing
The transmitters and receiver are pre-paired. If they become disconnected:
- Power on the receiver and transmitters.
- On the receiver, long press the '+' button to enter the menu.
- Navigate to 'Pair Setting' and select 'Yes'.
- The receiver will enter pairing mode (RF indicator flashes).
- On the transmitter, hold the power button for 5 seconds in shutdown mode to enter pairing mode.
- The devices will pair automatically within 10 seconds.
Operation
Gain and Input Modes
Adjust mic gain (0-6) using the +/- buttons. To switch between Mic and Line input, hold the '+' and '-' buttons on the transmitter simultaneously for 2 seconds. The status indicator lights up yellow in Line input mode.
Onboard Recording
Hold the '-' button on the transmitter for 2 seconds to enable/disable recording. Files are saved to the 8GB internal memory (up to 14 hours). Connect the transmitter to a computer via USB-C to access files.
Output Modes
The receiver supports Mono and Stereo output modes. In Stereo mode, audio from transmitters is separated to left and right channels.
Charging
Place the transmitters and receiver into the charging case. Ensure the charging contacts are clean and in full contact. The case indicators show charging status (Low battery, Charging, Full charged).
Troubleshooting
- No Sound: Check connections, ensure gain is not at minimum, verify transmitter is not muted, and check input mode.
- Noise/Interference: Ensure no obstacles between units and change position if necessary.
- Failed to Charge: Clean charging contacts and ensure units are seated correctly in the case.
- Failed to Load Files: Ensure onboard recording is disabled before connecting to a computer.
Practical help
Common problems
No sound from the unit
Check that the receiver is properly connected, gain/volume is not at minimum, the transmitter is not muted, and the input mode is correct.
Intermittent sound or limited range
Ensure there are no obstacles or interference between the transmitter and receiver. Change the position of the units.
Failed to charge
Clean the charging contacts on the devices and the case with a soft cloth. Ensure the devices are magnetically snapped into place.
Cannot load recording files
Ensure the onboard recording is disabled on the transmitter before connecting it to a computer.
Before use
- Charge all transmitters and the receiver using the charging case.
- Ensure the receiver is connected to your recording device using the correct cable.
- Check that the transmitter is not muted.
- Verify the input mode (Mic or Line) matches your audio source.
- Set the desired output mode (Mono or Stereo) on the receiver.
Specs in practice
- Operating Range
- Up to 280 meters in an open environment without obstacles.
- Onboard Recording
- 8GB memory, supports up to 14 hours of recording at 48kHz/24bit.
- Battery Life
- Approx. 11 hours for the transmitter (recording disabled).
Images and diagrams
- Transmitter: Mic/Line input, +/- buttons, power button, status indicators.
- Receiver: OLED display, +/- buttons, power/mute button, line out jacks.
- Charging Case: Magnetic slots for transmitters and receiver, USB-C charging port.
Model compatibility
- Compatible with cameras, mixers, smartphones, tablets, and laptops.
- Requires specific Y-cables (included) for different device types.

Manual page author
David Miller
Documentation analyst
Organizes user manual content into clear summaries, with attention to model details, product context, and everyday usability.