Lighting / Outdoor Lighting
User Manual for Hampton Bay Wickford 1-Light Outdoor Pendant
Quick guide for the Hampton Bay Wickford 1-Light Outdoor Pendant. Includes installation steps, wiring instructions, bulb requirements, and troubleshooting tips.
Table of contents
Manual images
Click an image to enlargeQuick guide from the manual
This guide provides instructions for the Hampton Bay Wickford 1-Light Outdoor Pendant. Before beginning, ensure you have all necessary tools and that the power is disconnected at the circuit breaker. Inspect all wires for damage before installation. This fixture requires one E26 100-watt bulb (not included).

Tools required
To install this fixture, you will need the following tools:

- Ladder
- Safety glasses
- Electrical tape
- Phillips screwdriver
- Flat blade screwdriver
- Pliers
- Wire strippers
Installation
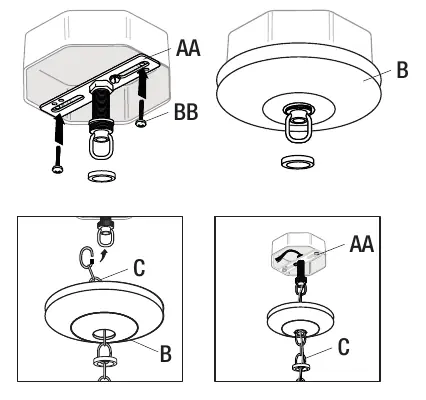
1. Secure the light fixture: Attach the mounting unit (AA) to your junction box using the mounting screws (BB). Remove the pre-installed screw collar ring. Place the canopy (B) over the screw collar loop on the mounting unit. Turn the screw collar ring until half of the threads are exposed. Secure the chain (C) to the screw collar loop. Weave the electrical and ground wires through the chain, canopy, and the center of the mounting unit.
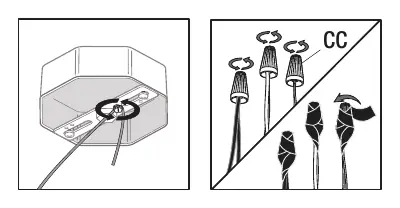
2. Making the electrical connections: Connect the copper wire from the light fixture to the mounting unit using the preinstalled ground screw. Connect the black wire to the black (power) wire and the white wire to the white (neutral) wire using the provided wire nuts (CC). Secure these connections with electrical tape. If wires are the same color, attach the smooth wire with H markings to the black wire and the ribbed wire with N markings to the white wire.
3. Final assembly: Secure the canopy to the mounting unit using the screw collar ring. Install one E26 100-watt bulb (not included).
Operation and Maintenance
To turn the light on, simply use the wall switch. To clean the fixture, use a soft, dry cloth. Do not use any cleaners containing chemicals, solvents, or harsh abrasives.
Troubleshooting
If the bulb will not light, ensure the power supply is on, the circuit breaker is in the 'On' position, and check the wiring connections. If the fuse blows or the circuit breaker trips when the light is turned on, check for crossed wires or a power wire that is grounding out. If issues persist, contact Hampton Bay Customer Service at 1-855-HD-HAMPTON.
Manufacturer information
Hampton Bay
Practical help
Common problems
The bulb will not light
Ensure the power supply is on, the circuit breaker is in the 'On' position, check the wiring connections, or replace the bulb if it is burned out.
Fuse blows or circuit breaker trips
Check for crossed wires or a power wire that is grounding out. Contact a qualified electrician if the issue persists.
Before use
- Turn off power at the circuit breaker before starting installation.
- Inspect wire insulation for any cuts, abrasions, or exposed copper.
- Ensure you have a ladder, safety glasses, and required screwdrivers/pliers.
- Verify the junction box is compatible and securely mounted.
- Ensure you have an E26 100-watt bulb available.
Images and diagrams
- The wiring diagram illustrates connecting the black fixture wire to the black power wire, the white fixture wire to the white neutral wire, and the copper wire to the ground screw on the mounting unit.
Model compatibility
- Requires a standard junction box (not included).

Manual page author
Emily Carter
User documentation editor
Prepares concise manual descriptions and highlights the most useful setup, operation, and maintenance information for readers.