Lighting / Controllers & Dimmers
Hinkley Yale Outdoor Wall Mount Lantern Assembly Instructions
Assembly guide for Hinkley Yale outdoor wall lanterns (models 13300, 13304, 13303). Learn how to install glass panels, secure the cage, and assemble the fixture.
Table of contents
Manual images
Click an image to enlargeQuick guide from the manual
This document provides assembly instructions for the Hinkley Yale outdoor wall lantern series (models 13300, 13304, 13303). The primary focus is the installation of the glass panels into the fixture cage.
Preparation
Before beginning the assembly, ensure you have a clear, clean workspace. Unpack the fixture and glass components from the carton. Review all instructions carefully before starting.
Glass Installation
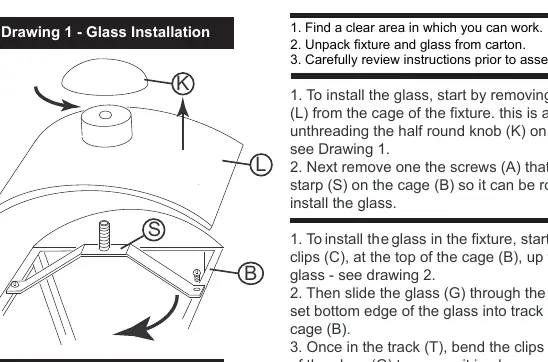
- Remove the roof: Unthread the half-round knob (K) located on the top of the roof (L) to remove the roof from the fixture cage (B).
- Clear the path: Remove one of the screws (A) holding the cross strap (S) on the cage (B) so the strap can be rotated out of the way.
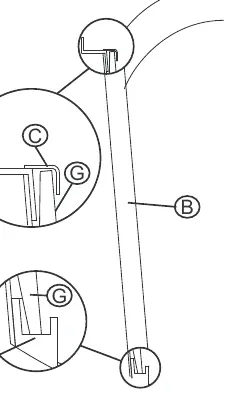
- Prepare clips: Bend the glass clips (C) at the top of the cage (B) upward to create a clear path for the glass.
- Insert glass: Slide the glass panel (G) through the top of the cage (B) and set the bottom edge of the glass into the track (T) at the bottom of the cage.
- Secure glass: Once the glass is in the track, bend the clips (C) back over the top of the glass to secure it in place. Repeat for all panels.
Final Assembly
Once all four glass panels are in place and the fixture has been lamped:
- Reattach the cross strap (S) to the cage (B) using the screw (A) removed earlier.
- Place the roof (L) back onto the cage (B).
- Secure the roof by threading the half-round knob (K) onto the stem (P).
Manufacturer information
Hinkley Lighting
Practical help
Common problems
Glass panel will not slide into the cage
Ensure the glass clips (C) at the top of the cage are bent sufficiently upward to clear the path for the glass panel.
Cannot access the cage interior to insert glass
Remove one of the screws (A) holding the cross strap (S) on the cage (B) so the strap can be rotated out of the way.
Before use
- Clear a workspace for assembly
- Unpack fixture and glass from carton
- Review all instructions prior to assembly
- Verify all parts are present
Images and diagrams
- Drawing 1 illustrates the removal of the roof (L) and the half-round knob (K).
- Drawing 2 illustrates the glass (G) insertion into the track (T) and the positioning of the glass clips (C).
Model compatibility
- Instructions apply to models 13300, 13304, and 13303.

Manual page author
Michael Turner
Technical manual editor
Reviews PDF manuals for structure, safety notes, and practical product details so readers can find the right information quickly.