Plumbing / Showers & Tubs
User Manual for LIVARNO HOME LSLB 100 A2 100W LED Outdoor Light
Quick guide for the LIVARNO HOME LSLB 100 A2 100W LED outdoor light. Includes installation steps, sensor adjustment, technical specifications, and troubleshooting.
Table of contents
Manual images
Click an image to enlargeQuick guide from the manual
This LED outdoor light is designed for private, non-commercial use. It is not suitable for indoor room lighting. The device features an adjustable motion sensor for light duration, sensitivity, and light sensitivity (day/night threshold). Installation must be performed by an authorized electrical engineer.
Intended use
The LED emitter is suitable for outdoor use only. It is not designed for commercial applications or for providing room lighting within the home. Do not use in tough conditions.
Technical specifications
- Operating voltage: 230 V~ (AC), 50 Hz
- Power consumption: approx. 100 W
- Degree of protection: IP44 (splashproof)
- Luminous flux: approx. 10000 lm
- Colour temperature: approx. 6500 K (neutral white)
- Beam angle: 120°
- Sensor range: approx. 8 m
- Light time: 5 sec. to 5 min.
Safety instructions
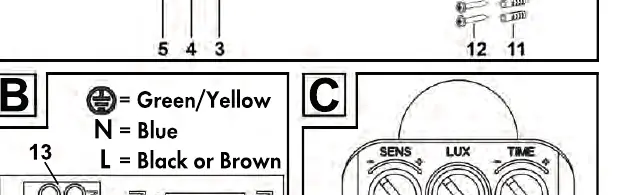
- Grounding: The device must be connected to a ground wire (yellow/green).
- Dimming: The LED emitter cannot be dimmed.
- Maintenance: Do not open the housing; it contains no user-serviceable parts.
- Damage: If the housing is damaged, do not use the device.
- Optical safety: Do not look directly into the beam using optical instruments.
Installation
Warning: The power must be switched off at the fusebox before starting installation. Use a voltage tester to ensure the cable is not live.
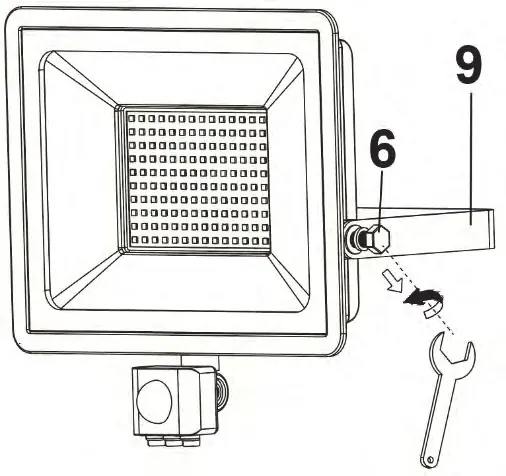

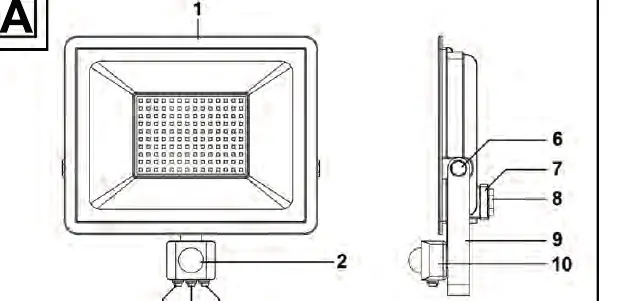
- Remove the mounting bracket (9) by undoing the screws (6).
- Use the bracket as a template to mark and drill holes in the wall.
- Insert rawlplugs (11) and screw the bracket to the wall.
- Open the terminal box (7) and remove the power cable fitting (8).
- Guide the power cable through the fitting and connect it to the screw terminal (13) according to the wiring diagram.
- Secure the cable with the strain relief clamping bracket.
- Reassemble the terminal box and secure the emitter to the mounting bracket.
Sensor settings
The sensor housing (10) can be twisted to access the controllers:

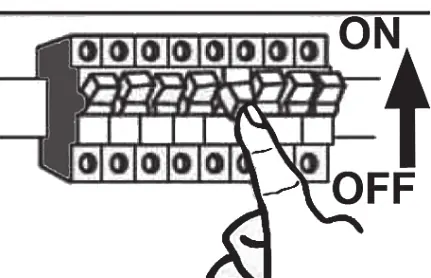
- TIME (3): Adjusts light duration (5 seconds to 5 minutes). Turn '+' to increase, '-' to decrease.
- SENS (5): Adjusts motion sensitivity. Turn '+' to increase range (max 8m), '-' to decrease.
- LUX (4): Adjusts light sensitivity. Turn towards the sun icon for brighter conditions, or towards the moon icon for darker conditions.
Troubleshooting
- Light does not come on: Check sensor alignment or electrical connection.
- Light switches on/off quickly: Interference from other light sources or reflective surfaces.
- Light does not switch off: Objects or people in the detection range, or the emitter is moving in the wind.
Maintenance and cleaning
Switch off the power before cleaning. Use a dry or slightly damp cloth. Do not use solvents or abrasive cleaners.
Practical help
Common problems
Light does not come on
Check if the motion sensor is aimed correctly or if the electrical connection is faulty.
Light switches on and off quickly
Remove external light sources or reflective surfaces causing interference.
Light does not switch off
Remove moving objects from the detection range or ensure the emitter is mounted on a stable surface to prevent wind-induced movement.
Before use
- Check the device for damage before installation.
- Ensure the power supply is switched off at the fusebox.
- Verify the mounting surface is stable.
- Use an installation cable with a diameter of at least 8.2 mm (e.g., NYM-J 3x1.5mm²).
Images and diagrams
- A: Components overview (1-13)
- B: Wiring terminal connections
- C: Sensor adjustment knobs (TIME, LUX, SENS)
- D: Mounting height (1.8m - 2.5m)
- E: Sensor detection range (120° angle, 8m distance)
Model compatibility
- Not dimmable.
- Not suitable for indoor room lighting.
- Not for commercial use.

Manual page author
Emily Carter
User documentation editor
Prepares concise manual descriptions and highlights the most useful setup, operation, and maintenance information for readers.