Plumbing / Sinks Faucets
Hansgrohe Locarno 04818XX0 Roman Tub Faucet
Quick guide for the Hansgrohe Locarno 04818XX0 Roman Tub Faucet. Includes installation steps, hot water limiter adjustment, cleaning procedures, and technical specifications.
Table of contents
Manual images
Jump to the sectionQuick guide from the manual
This document provides installation and maintenance instructions for the Hansgrohe Locarno 04818XX0 Roman Tub Faucet. Key requirements include the use of rough #10452181 (not included) and installation by a licensed professional plumber. The unit is not anti-scald; if required by local code, install an approved remote pressure balance valve.
Technical Information
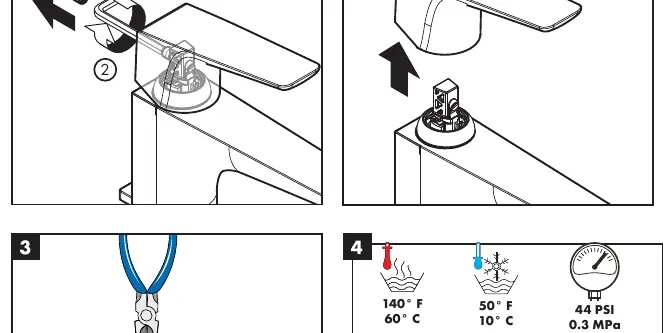
- Water pressure: Recommended 15 - 75 PSI (0.1 - 0.5 MPa); Maximum 145 PSI (1 MPa).
- Hot water temperature: Recommended 120° - 140° F (48° - 60° C); Maximum 158° F (70° C).
- Flow rate: Handshower 1.75 GPM (6.6 L/min); Tub filler 5.3 GPM (20 L/min).
Installation Considerations
- Inspect the product for shipping damage before installation.
- The rough #10452181 must be installed and the finished floor surface completed and made watertight before installing the trim.
- The handshower must be used with an automatically compensating valve rated at 1.3 GPM (4.9 L/min) or less.
- Maximum output temperature of the shower mixing valve must not exceed 120°F (49°C).
Installation Steps
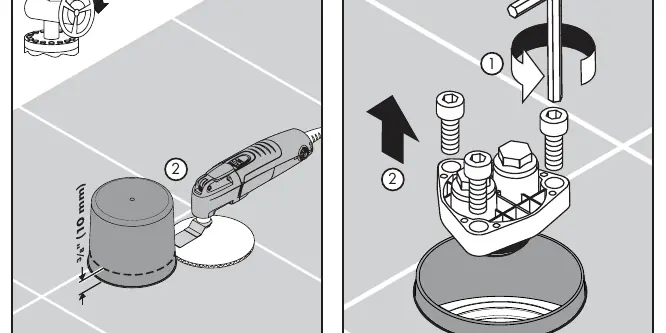
- Prepare the floor: Turn off the main water supply. Cut the plaster shield so it extends 3/8 inch (10 mm) above the finished floor surface. Remove the flush housing screws and the housing.
- Position the faucet: Place the tub filler on the rough. Pivot it to the correct direction and ensure it is level. Install the screws.
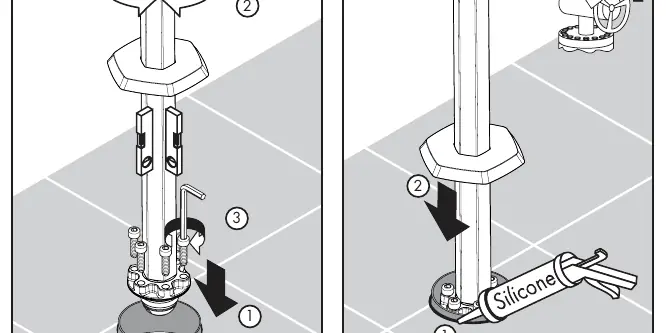
- Seal: Seal the floor around the plaster shield with waterproof sealant. Lower the escutcheon to the floor and turn the water supply back on.
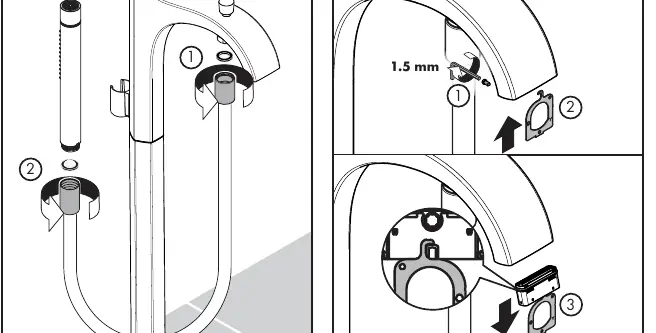
- Connect handshower: Place the black rubber hose washer in the short end of the hose and screw it to the handshower port on the valve. Place the screen washer in the long end of the hose and screw it to the handshower. Place the handshower in the holder.
- Flush: Remove the aerator and flush the faucet for at least two minutes, then reinstall the aerator.
Hot Water Limiter Adjustment
To adjust the hot water limiter:
- Remove the handle screw cover and loosen the screw using a 3 mm hex key.
- Remove the handle.
- Use pliers to remove the limiter ring.
- Adjust the ring to the desired temperature setting based on the markings (e.g., 122°F/50°C, 131°F/55°C, 140°F/60°C).
- Reinstall the ring and the handle.
Cleaning and Maintenance
Cleaning: Clean the product when mineral scale or soap residue builds up. Do not use abrasive cleaners, steam cleaners, or cleaning agents containing hydrochloric, formic, or acetic acid. Spray cleaners should be applied to a soft cloth, not directly on the product.
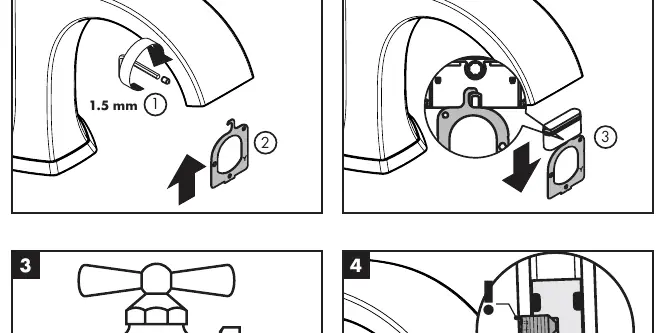

Aerator Cleaning: Remove the aerator using a 1.5 mm hex key, clean it, and reinstall.
Check Valve Maintenance: If flow is restricted, check valves may need maintenance. Ensure the water is off, remove the handshower hose, and inspect/clean the check valve components.
Warranty
Hansgrohe, Inc. offers a limited warranty on its products. For warranty service, contact Hansgrohe, Inc. at 1492 Bluegrass Lakes Parkway, Alpharetta, GA 30004, or call 800-334-0455. You will need your sales receipt and a description of the problem.
Manufacturer information
Hansgrohe SE
Practical help
Common problems
Low water flow
Check the aerator for mineral buildup and clean it. Also, inspect the check valves for debris.
Mineral scale buildup
Clean the product using a mild, non-abrasive cleaner or scale remover. Do not use abrasive pads or brushes.
Before use
- Inspect product for shipping damage before installation.
- Ensure rough #10452181 is installed and floor is watertight.
- Verify water pressure is between 15-75 PSI.
- Ensure a licensed plumber performs the installation.
- Check that the handshower valve is rated for 1.3 GPM or less.
Images and diagrams
- Installation steps illustrate cutting the plaster shield, positioning the faucet on the rough, sealing the floor, and connecting the handshower hose.
- The hot water limiter diagram shows how to remove the handle and adjust the limiter ring position.
Model compatibility
- Requires rough #10452181 (not included).
- Not anti-scald; install remote pressure balance valve if required by local code.
- Handshower requires an automatically compensating valve rated at 1.3 GPM or less.

Manual page author
David Miller
Documentation analyst
Organizes user manual content into clear summaries, with attention to model details, product context, and everyday usability.