Tools / Power Tools
User Manual for HiKOKI M 12V2 Router
Quick guide for the HiKOKI M 12V2 Router. Includes setup, bit installation, depth adjustment, operation, and maintenance instructions.
Table of contents
Manual images
Click an image to enlargeQuick guide from the manual
This manual provides essential instructions for the safe and efficient operation of the HiKOKI M 12V2 Router. Always wear eye and hearing protection when operating this tool. Ensure the power switch is in the OFF position before connecting to a power source. Use a residual current device (RCD) with a rated residual current of 30 mA or less.
Safety Warnings
Read all safety warnings and instructions provided. Failure to follow them may result in electric shock, fire, or serious injury. Always hold the tool by insulated gripping surfaces, as the cutter may contact its own cord. Use clamps to secure the workpiece to a stable platform. Never operate the tool with one hand; always grip both handles firmly.
Description of Numbered Items
The manual references numbered items from Fig. 1 to Fig. 24, including components like the lock pin, wrench, quick adjustment lever, depth indicator, and various guides.
Standard Accessories
The router comes with a straight guide, bar holder, guide bar, feed screw, wing bolt, dust guide, dust guide adapter, template guide, template guide adapter, centering gauge, knob, wrench, 8 mm or 1/4" collet chuck, wing bolt (A), and lock spring.
Specifications
The M 12V2 features a 2000 W power input, a collet chuck capacity of 12 mm or 1/2", a no-load speed of 8000–22000 min-1, and a main body stroke of 65 mm. The weight is 6.9 kg.
Prior to Operation
- Ensure the power source matches the nameplate requirements.
- Verify the power switch is in the OFF position.
- Use an extension cord of sufficient thickness and rated capacity if needed.
- Use an RCD with a rated residual current of 30 mA or less.
Installing and Removing Bits
Installing: Clean and insert the bit shank into the collet chuck until it bottoms, then back it out approximately 2 mm. Press the lock pin to hold the armature shaft and use the 23 mm wrench to tighten the collet chuck clockwise.
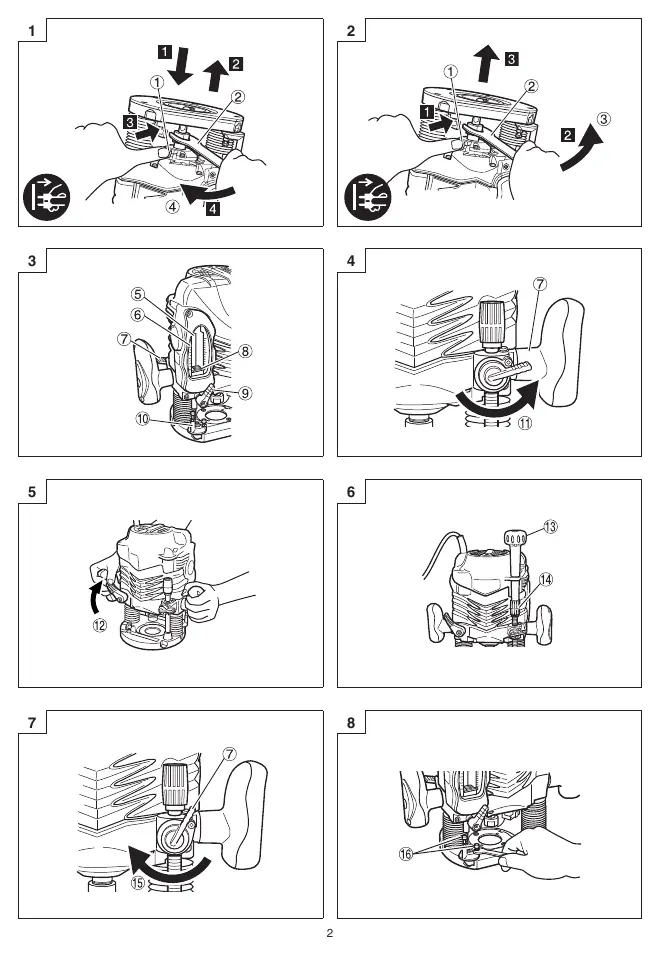
Removing: Follow the installation steps in reverse order.
How to Use the Router
Adjusting depth of cut: Place the tool on a flat surface. Use the quick adjustment lever and stopper block to set the desired cutting depth. Fine adjustments can be made using the fine adjustment knob.

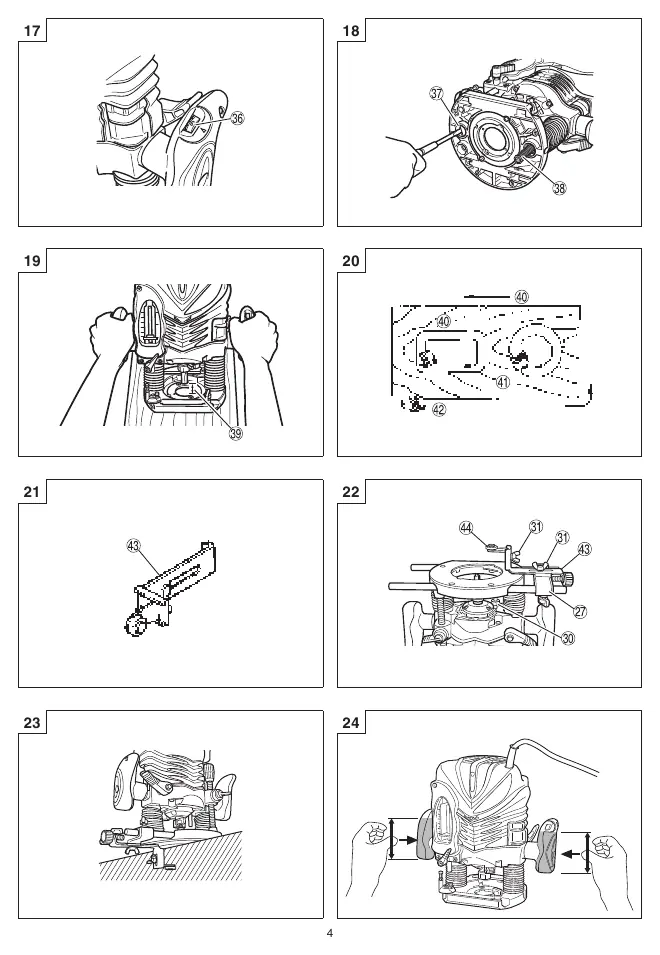
Guiding the router: Use the template guide for repetitive shapes. Use the straight guide for chamfering and groove cutting along the side of materials. The dust guide and adapter can be used to connect a dust extractor.
Maintenance and Inspection
- Oiling: Occasionally apply machine oil to the sliding portions of the columns and end bracket.
- Mounting screws: Regularly inspect and tighten all mounting screws.
- Motor maintenance: Ensure the motor winding is not damaged or wet.
- Carbon brushes: Inspection and replacement must be performed by a HiKOKI Authorized Service Center.
- Supply cord: If damaged, return the tool to a HiKOKI Authorized Service Center for replacement.
Manufacturer information
HiKOKI
Practical help
Common problems
High pitched cutting noise
Replace the worn bit with a new one.
Quick adjustment lever does not stop with the stopper screw
The bolt screw is not properly fitted. Loosen the lock lever, press down on the unit, and re-fit the bolt screw.
Before use
- Ensure power source matches the product nameplate.
- Verify the power switch is in the OFF position.
- Use an extension cord of sufficient thickness and rated capacity.
- Use an RCD with a rated residual current of 30 mA or less.
- Wear eye and hearing protection.
Specs in practice
- Collet Chuck Capacity
- 12 mm or 1/2"
- No-load speed
- 8000–22000 min-1
- Main Body Stroke
- 65 mm
Images and diagrams
- Fig 1: Installing bits using the lock pin and wrench.
- Fig 3-7: Adjusting the depth of cut using the quick adjustment lever and fine adjustment knob.
- Fig 14: Using the straight guide for chamfering and groove cutting.
- Fig 17: Adjusting the rotation speed using the dial.
- Fig 24: Proper two-handed operation of the router.
Model compatibility
- Supports 12 mm or 1/2" collet chucks.
- Includes 8 mm collet chuck as a standard accessory.

Manual page author
Michael Turner
Technical manual editor
Reviews PDF manuals for structure, safety notes, and practical product details so readers can find the right information quickly.