Tools / Saws
User Manual for HiKOKI C 12RSH3 Slide Compound Miter Saw
Quick guide for the HiKOKI C 12RSH3 Slide Compound Miter Saw. Includes setup, safety instructions, cutting procedures, maintenance, and troubleshooting.
Table of contents
Manual images
Click an image to enlargeQuick guide from the manual
This manual provides essential instructions for the safe operation and maintenance of the HiKOKI C 12RSH3 Slide Compound Miter Saw. Before operating the tool, ensure it is securely mounted to a level, horizontal work bench. Always verify that the power source matches the nameplate specifications and that the switch is in the OFF position before plugging in the tool. Wear appropriate personal protective equipment, including eye and hearing protection. Never cross your hands over the cutting line, and always keep hands at least 100 mm away from the saw blade.
Product description
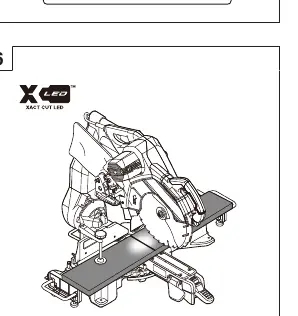
The C 12RSH3 is a slide compound miter saw designed for cutting wood and aluminum sash. It features an integrated XACT CUT LED lighting system that projects a shadow of the blade onto the workpiece for accurate cutting. The tool includes a slide carriage system for wider cuts, miter and bevel angle adjustments, and a dust collection port.
Installation
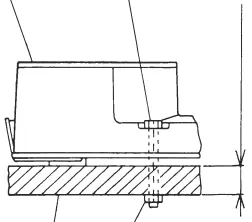
Bench Mounting: The machine must be fixed to a level, horizontal work bench. Use 8 mm diameter bolts of appropriate length (at least 40 mm plus the thickness of the bench). Ensure the base holder is adjusted so its bottom surface contacts the bench or floor.
Dust Bag: Install the dust bag onto the dust port. Empty the bag frequently to prevent clogging. For heavy dust, connect a dust extractor to the duct using the appropriate adapter.
Sub-table and Fences: Use the sub-table and adjustable fences to support long workpieces. Ensure the sub-fences are correctly positioned and secured with wing bolts before cutting, especially when performing bevel cuts.
Operation
Miter and Bevel Cuts: Unlock the miter lock handle to rotate the turntable to the desired angle. Use the positive stops for common angles (0°, 15°, 22.5°, 31.6°, 45°). For bevel cuts, loosen the bevel lock handle, pull the set pin (A) if necessary, and tilt the motor head to the desired angle.
Slide Cutting: For wide workpieces, loosen the slide securing knob. Pull the saw head forward, start the motor, press down, and push the saw head backward to complete the cut. Always return the carriage to the full rear position after each cut.
LED Lighting: Turn on the LED light switch to project the blade shadow onto the workpiece, allowing for precise alignment before starting the cut.
Maintenance and inspection
Blade Replacement: Always disconnect the power plug before changing the blade. Press the spindle lock, loosen the 10 mm bolt (left-hand thread), lift the lower guard, and replace the blade. Ensure the rotation indicator on the blade matches the gear case direction.
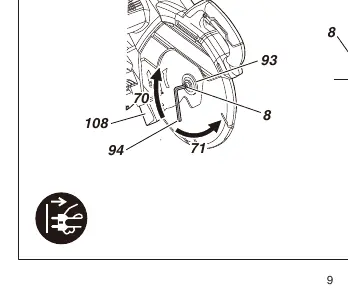
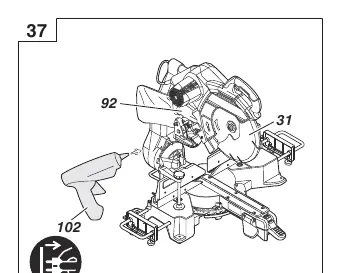
Carbon Brushes: Inspect carbon brushes regularly. Replace them when they reach the wear limit line. Keep brushes clean and ensure they slide freely in the holders.
Cleaning and Lubrication: Clean the machine, duct, and lower guard with dry air. Periodically remove chips with a damp, soapy cloth. Lubricate the rotary portions of the hinge, holder (A), and vise assembly once a month with machine oil.
Troubleshooting
If the tool does not operate normally, check the following:
- Tool suddenly stopped: The tool may be overburdened or the motor thermal protection triggered. Wait 5 minutes before restarting.
- Cannot be tilted: Ensure the bevel lock handle is fully loosened.
- Cannot be tilted to the right: Ensure set pin (A) has been pulled out.
- Cannot cut with precision: Ensure all operation parts are fully fixed and the material is flat against the fence or turntable.
- Switch cannot be pulled: Ensure the switch lock is pressed in completely.
Manufacturer information
HiKOKI
Practical help
Common problems
Tool suddenly stopped
Tool was overburdened or thermal protection triggered. Wait 5 minutes before restarting.
Cannot be tilted
Loosen the bevel lock handle completely.
Cannot be tilted to the right
Pull out set pin (A) before tilting.
Cannot cut with precision
Ensure all locking handles are tightened and the material is flat against the fence/turntable.
Before use
- Ensure power source matches the product nameplate.
- Check that the switch is in the OFF position before plugging in.
- Remove all packing materials.
- Ensure the machine is fixed to a level, horizontal bench.
- Check that the lower guard moves smoothly.
- Ensure the saw blade is sharp and correctly installed.
Specs in practice
- Miter Cutting Angle
- Right 0°–57°, Left 0°–45°.
- Bevel Cutting Angle
- Right 0°–45°, Left 0°–45°.
- Saw Blade Dimensions
- 305 mm (outer diameter) x 25.4 mm (inner diameter) x 2.3 mm (thickness).
Images and diagrams
- Fig 1: Parts identification diagram.
- Fig 3: Bench mounting dimensions and bolt installation.
- Fig 33: Blade replacement procedure.
- Fig 36: Carbon brush inspection and replacement.
Model compatibility
- Use only 305 mm diameter saw blades.
- Do not use to cut ferrous metals or masonry.
- Use only original HiKOKI replacement parts.

Manual page author
David Miller
Documentation analyst
Organizes user manual content into clear summaries, with attention to model details, product context, and everyday usability.