General / Other Manuals
Operating Instructions for Hilti AG 125-20SE Angle Grinder
Quick guide for the Hilti AG 125-20SE angle grinder. Includes setup, accessory mounting, safety warnings, and troubleshooting.
Table of contents
Manual images
Jump to the sectionQuick guide from the manual
This guide provides essential information for operating the Hilti AG 125-20SE angle grinder. Always refer to the full manual for complete safety instructions and technical specifications.
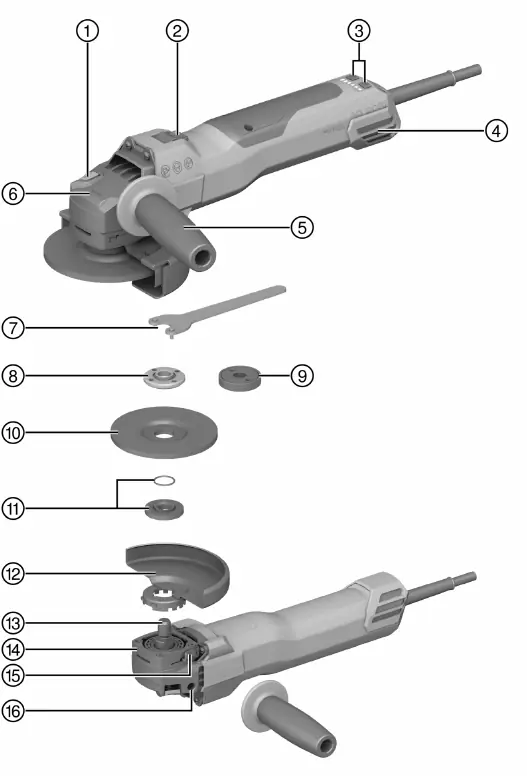
Product Overview
The Hilti AG 125-20SE is a hand-held electric angle grinder designed for cutting, grinding, brushing, sanding, and hole cutting in metal and mineral materials without the use of water.
Assembly and Setup

Mounting the Side Handle
Screw the side handle into one of the threaded bushings provided on the tool.
Installing the Guard
- Align the triangular marks on the guard and the product.
- Press the guard onto the spindle collar.
- Press the guard release button and turn the guard until it engages in the desired position.
Fitting the Front Cover
Position the front cover with the closed side on the standard guard and push it on until it engages.
Mounting Accessory Tools
Caution: Accessory tools may be hot. Wear protective gloves when changing them.
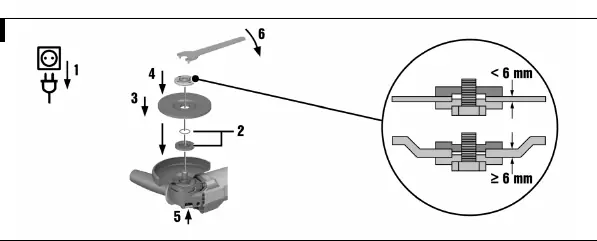
Fitting a Grinding Wheel
- Check that the O-ring is present in the clamping flange and is undamaged.
- Fit the clamping flange onto the drive spindle.
- Fit the grinding wheel.
- Screw on the clamping nut corresponding to the accessory tool.
- Press and hold the spindle lock button.
- Tighten the clamping nut with the pin wrench, then release the spindle lock button.
Fitting with Kwik Lock Nut
The optional Kwik lock nut allows for tool-free accessory changes. Ensure the Kwik lock nut does not contact the working surface during operation.
Operation
Switching On
- Plug the supply cord into the power outlet.
- Press the rear section of the on/off switch.
- Slide the on/off switch forward and lock it.
Speed Control
The product features 6 speed stages (3000 to 9400 rpm), adjustable via the + and - buttons. The current speed stage is indicated by LEDs.
Maintenance
Regularly clean the air vents with a dry brush. Clean the dust filter at regular intervals and replace it if damaged.
Troubleshooting
If the product does not start, check the power supply and the cable/plug. If the speed control LEDs flash, the product may be overloaded or the 3D ATC system may have been activated due to sudden movement. Switch the product off and on again to reset.
Manufacturer information
Hilti Corporation
Practical help
Common problems
Product does not start
Check power supply, check cable/plug for defects.
Product switches off, speed LEDs flash quickly
Product is overloaded. Release switch, press again, and run at no load for approx. 30 seconds.
Product switches off, speed LEDs flash slowly
3D ATC activated due to sudden movement. Switch off and on again.
Angle grinder gets very hot
Electrical fault or clogged air vents. Switch off immediately, let cool, clean vents, and contact Hilti Service.
Before use
- Check power supply voltage and frequency.
- Ensure correct guard is installed for the application.
- Check accessory tool for damage.
- Ensure side handle is securely attached.
- Wear personal protective equipment (eye protection, etc.).
Specs in practice
- Max. wheel diameter
- 150 mm (with appropriate guard) or 125 mm (with supplied guard).
- Spindle thread
- M14.
Images and diagrams
- Page 2 shows the product overview with numbered parts.
- Pages 4-6 show assembly and accessory mounting steps.
Model compatibility
- Use only synthetic-resin-bonded, fiber-reinforced wheels approved for at least 11,000/min and 80 m/s.
- Working on metal is prohibited with dust hoods DG-EX, DC-EX 125/5"M, and DC-EX 125/5"C.

Manual page author
David Miller
Documentation analyst
Organizes user manual content into clear summaries, with attention to model details, product context, and everyday usability.