General / Accessories
Operating Instructions for Hilti NCR 060C-A22 Crimping Tool
Quick guide for the Hilti NCR 060C-A22 cordless crimping tool. Includes setup, operation, safety warnings, maintenance, and troubleshooting.
Table of contents
Manual images
Jump to the sectionQuick guide from the manual
The Hilti NCR 060C-A22 is a cordless, electro-hydraulic crimping tool designed for crimping copper (Cu) or aluminum (Al) connectors. Before using the tool, ensure you have read the safety instructions and that the tool is in technically faultless condition. Always use the tool with both hands on the designated grips.
Product Overview
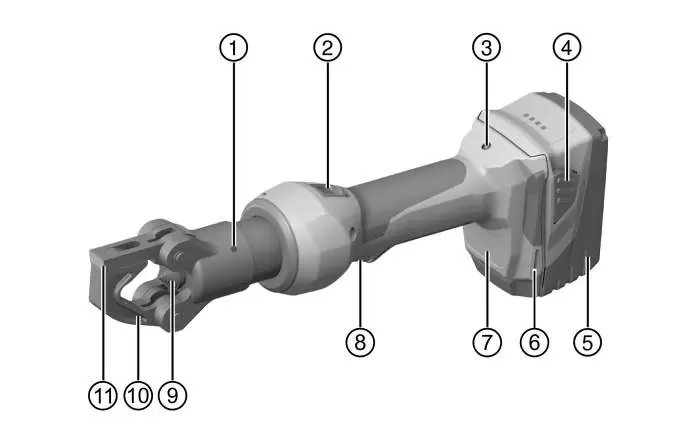
The tool features a crimping head, a piston reset slider for emergencies, a servicing/fault indicator (red LED), and a control switch. The battery status is indicated by LEDs on the battery pack.
Safety
General Safety: Always keep the work area clean and well-lit. Do not operate in explosive atmospheres. Keep children and bystanders away.
Electrical Safety: The tool is not insulated. When working near live parts, use appropriate personal protective equipment (gloves, footwear, clothing) and maintain adequate insulation or air gaps. Before use, ensure no concealed electric cables, gas, or water pipes are in the working area.
Battery Safety: Use only Hilti B 22 series Li-ion batteries. Do not expose batteries to high temperatures, fire, or mechanical impact. If a battery is too hot to touch, it may be defective.
Operation
Preparation: Ensure the tool is switched off before inserting the battery. Remove the battery before making adjustments or changing accessories.
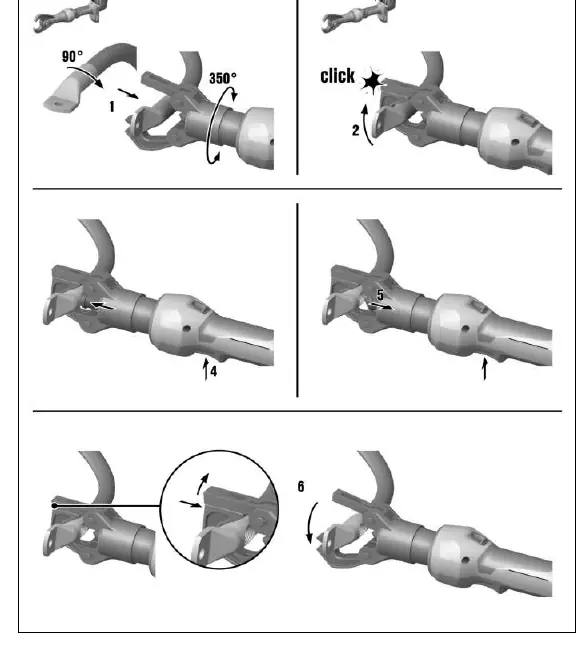
Crimping Procedure:
- Open the lever and pivoting bar.
- Insert the connector into the die.
- Close the pivoting bar and the lever.
- Insert the battery.
- Press and hold the control switch until the piston has retracted.
- Open the lever and pivoting bar to remove the connector.
Fall Arrest: When working at heights, use only the Hilti retaining strap and Hilti tool tether #2261970. Secure the strap to the tool and the tether to a load-bearing structure.
Care and Maintenance
Always remove the battery before performing maintenance. Clean the housing with a slightly damp cloth; do not use silicone-based cleaning agents. Keep air vents clean using a dry, soft brush. Regularly inspect all visible parts for damage.
Troubleshooting
If the tool is not working, check the battery charge and ensure it is correctly inserted. If the red LED lights continuously with a warning tone, a technical problem exists; contact Hilti Service. If the tool overheats, allow it to cool down.
Manufacturer information
Hilti Corporation
Practical help
Common problems
Battery LEDs do not light up
Ensure the battery is inserted correctly until it engages with a double click, or charge the battery if it is discharged.
Red LED lights continuously with a warning tone
Technical problem. Contact Hilti Service.
Red LED blinks with a warning tone
Battery charge is too low to complete the operating cycle. Change and charge the battery.
Battery runs down faster than usual
Very low ambient temperature. Allow the battery to warm up slowly to room temperature.
Before use
- Inspect the black coating on the tool head for damage or aging.
- Ensure the battery is fully charged.
- Check that the crimping jaws are correctly positioned.
- Ensure the work area is free of concealed cables or pipes.
- Wear appropriate personal protective equipment (eye protection, gloves).
Specs in practice
- Max. crimping force
- 30 kN to 60 kN.
- Crimping time
- Approximately 5 seconds.
- Rated voltage
- 21.6 V.
Images and diagrams
- 1: Crimping/pressing head
- 2: Piston reset slider
- 3: Servicing and fault indicator (red LED)
- 4: Battery release button
- 8: Control switch
Model compatibility
- Use only Hilti B 22 series Li-ion batteries.
- Use only Hilti-approved battery chargers.

Manual page author
David Miller
Documentation analyst
Organizes user manual content into clear summaries, with attention to model details, product context, and everyday usability.