Tools / Power Tools
User Manual for Hilti AG 150-20D 01 Angle Grinder
Quick guide for the Hilti AG 150-20D 01 angle grinder. Includes setup, operation, safety instructions, maintenance, and troubleshooting.
Table of contents
Manual images
Jump to the sectionQuick guide from the manual
This angle grinder is designed for professional use in cutting, grinding, brushing, and sanding metal and mineral materials. Before use, ensure you have read all safety warnings and instructions. Always use the auxiliary handle and wear appropriate personal protective equipment, including eye protection. Ensure the tool is switched off before connecting to power.
Product description
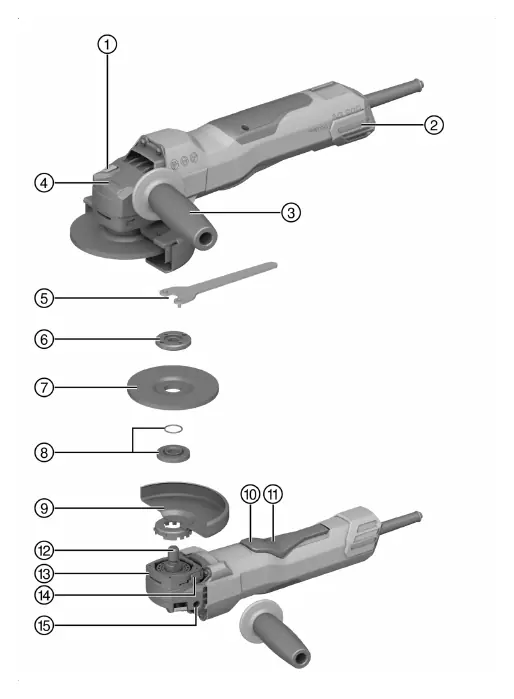
The Hilti AG 150-20D 01 is a hand-held electric angle grinder. Key features include a spindle lock button, vibration-absorbing side handle, and a quick locking system for accessories. It is equipped with 3D Active Torque Control (3DATC) to shut down the tool in case of sudden, unforeseen movement.
Installation
Fitting the side handle: Screw the side handle into one of the threaded bushings provided on the tool.
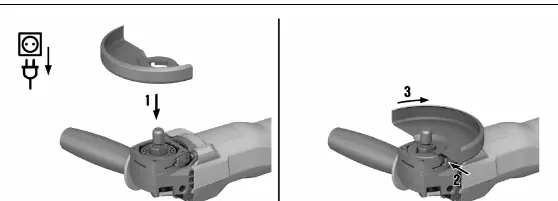
Installing the guard: Fit the guard onto the arbor collar, aligning the triangular marks on the guard and the product. Press the guard release button and turn the guard until it engages in the desired position.
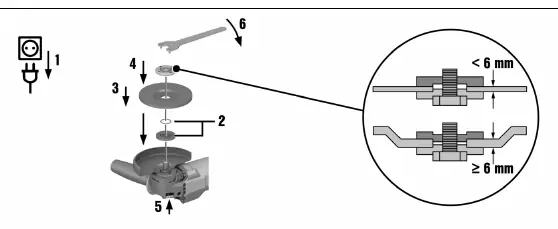
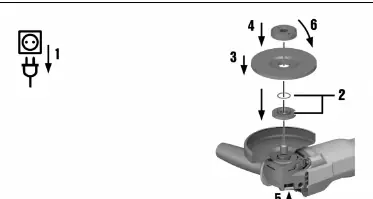
Installing wheels: Ensure the O-ring is in the clamping flange and is undamaged. Fit the clamping flange onto the drive spindle, then fit the grinding wheel. Screw on the clamping nut or Kwik lock nut. Press the spindle lock button and tighten the nut securely using the pin wrench or by hand for the Kwik lock nut.
Operation
Switching on: Plug the power cord into the outlet. Push the switch-on interlock forward to unlock the on/off switch, then fully depress the switch.
Grinding: Do not allow the accessory to jam and avoid excessive pressure.
Cutting: Work with moderate advance and do not tilt the product or the cut-off wheel. The working position should be approximately 90° to the cutting plane.
Rough grinding: Move the product to and fro while maintaining a 5° to 30° angle of attack and applying moderate pressure.
Maintenance
Care: Keep the product, especially the grips, dry, clean, and free from oil and grease. Clean the air vents regularly using a dry brush.
Dust filter: Clean the dust filter at regular intervals. If damaged, it must be replaced. Use a screwdriver to pry the dust filter off for cleaning.
Troubleshooting
If the product does not start, check the power supply or have the cord/plug checked by a qualified specialist. If the product is overloaded, release the on/off switch and allow the product to run under no load for approximately 30 seconds.
Manufacturer information
Hilti Corporation
Practical help
Common problems
Product does not start
Check power supply or have the cord/plug checked by a qualified specialist.
Product does not develop full power
Check if the extension cord conductor cross-section is adequate.
Angle grinder gets very hot
Clean air vents regularly; if the issue persists, contact Hilti Service.
Motor has no braking effect
The product may be momentarily overloaded; switch off and on again.
Before use
- Ensure the guard is correctly installed and adjusted.
- Check that the side handle is securely attached.
- Verify the accessory tool is compatible and undamaged.
- Check that the O-ring in the clamping flange is present and undamaged.
- Ensure the power cord is not damaged.
Specs in practice
- Max wheel diameter
- 150 mm
- Drive spindle thread
- M14
Images and diagrams
- Page 2 provides a detailed product overview with numbered components.
- Pages 3-5 illustrate the installation of guards, wheels, and accessories.
Model compatibility
- Use only synthetic-resin-bonded, fiber-reinforced wheels approved for at least 11,000 rpm.
- Use specific guards for different applications (e.g., grinding vs cutting).
- Do not use cut-off wheels for grinding.

Manual page author
David Miller
Documentation analyst
Organizes user manual content into clear summaries, with attention to model details, product context, and everyday usability.