Tools / Power Tools
User Manual for Hilti AG 150-20SE Angle Grinder
Comprehensive user guide for the Hilti AG 150-20SE angle grinder. Includes safety instructions, assembly, operation, speed settings, maintenance, and troubleshooting.
Table of contents
Manual images
Jump to the sectionQuick guide from the manual
This manual provides essential information for the safe and efficient operation of the Hilti AG 150-20SE angle grinder. Before use, ensure you have read and understood all safety warnings and instructions. This tool is designed for professional users and should only be operated by trained, authorized personnel.

Product Description
The Hilti AG 150-20SE is a hand-held electric angle grinder designed for cutting, grinding, brushing, sanding, and hole cutting in metal and mineral materials without the use of water. Key features include:
- 3D Active Torque Control (3DATC): Automatically shuts down the tool if it detects sudden, unforeseen movement.
- Speed Control: Adjustable speed settings from 3000 to 9400 rpm.
- Restart Interlock: Prevents the tool from starting automatically after a power interruption.
- Temperature-dependent motor protection: Monitors current draw and motor temperature to prevent overheating.
- Integrated brake: Reduces the time it takes for the accessory to stop rotating.
Assembly and Setup


Mounting the Side Handle
Screw the side handle into one of the threaded bushings provided on the tool.
Installing the Guard
- Align the two triangular marks on the guard and the product.
- Press the guard onto the drive spindle collar.
- Press the guard release button and turn the guard until it engages in the desired position.
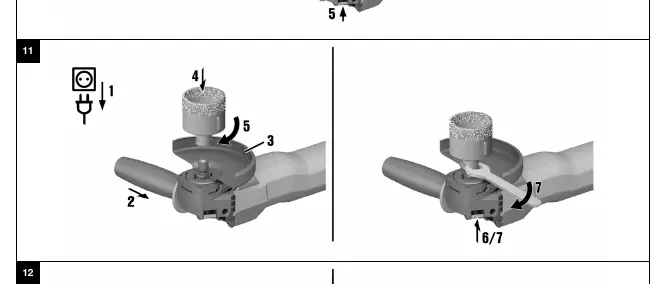
Mounting Accessories
Always wear protective gloves when changing accessories. Ensure the O-ring in the clamping flange is present and undamaged.
- Grinding Wheel: Place the clamping flange on the spindle, fit the wheel, and screw on the clamping nut. Tighten securely using the pin wrench while holding the spindle lock button.
- Kwik lock Nut: An optional quick-release nut can be used for tool-free accessory changes. Ensure the "Kwik lock" label is visible when screwed on.
Operation
Always hold the product with both hands using the provided grips. To switch on, press the rear section of the on/off switch and slide it forward. Lock the switch to keep the motor running. To switch off, press the rear section of the switch.
Maintenance and Care
Regularly clean the air vents with a dry brush. The dust filter should be cleaned regularly and replaced if damaged. Do not use spray, steam pressure cleaning equipment, or running water for cleaning. Keep the product, especially the grips, dry, clean, and free from oil and grease.
Manufacturer information
Hilti Corporation
Practical help
Common problems
Product does not start
Check power supply, check power cord/plug.
Product switches off, LEDs flash quickly
Product is overloaded. Release switch, press again, run at no load for 30s.
Product switches off, LEDs flash slowly
3D ATC activated due to sudden movement. Switch off and on again.
Product does not develop full power
Extension cord cross-section is inadequate.
Angle grinder gets very hot
Check for clogged air vents or electrical fault.
Before use
- Check that the guard is correctly installed.
- Ensure the accessory tool is in good condition.
- Check that the O-ring in the clamping flange is present and undamaged.
- Ensure the side handle is securely attached.
- Wear appropriate personal protective equipment (eye protection, etc.).
Specs in practice
- Max. wheel diameter
- 150 mm.
- Restart interlock
- Prevents the tool from starting automatically after a power interruption.
Images and diagrams
- Page 2: Overview of components (spindle lock, switch, speed control, dust filter, side handle, etc.).
- Page 4: Guard installation and adjustment.
- Page 4: Grinding wheel mounting.
- Page 5: Mounting accessories (core bit, wire brush, fiber disc).
Model compatibility
- Use only 150 mm guard for 150 mm accessories.
- Do not use cut-off wheels for grinding.
- Use dust hood for mineral materials.

Manual page author
Michael Turner
Technical manual editor
Reviews PDF manuals for structure, safety notes, and practical product details so readers can find the right information quickly.