Tools / Power Tools
Hilti AG 125-20D Angle Grinder User Manual
Quick guide for the Hilti AG 125-20D angle grinder. Includes assembly, operation, safety instructions, maintenance, and troubleshooting.
Table of contents
Manual images
Jump to the sectionQuick guide from the manual
This guide provides essential information for the safe and efficient operation of the Hilti AG 125-20D angle grinder. Always read the full safety instructions provided in the original manual before use.
Product Overview
The angle grinder features a spindle lock button, dust filter, vibration-absorbing side handle, and an on/off switch with a switch-on interlock. It is designed for cutting, grinding, brushing, and sanding metal and mineral materials.
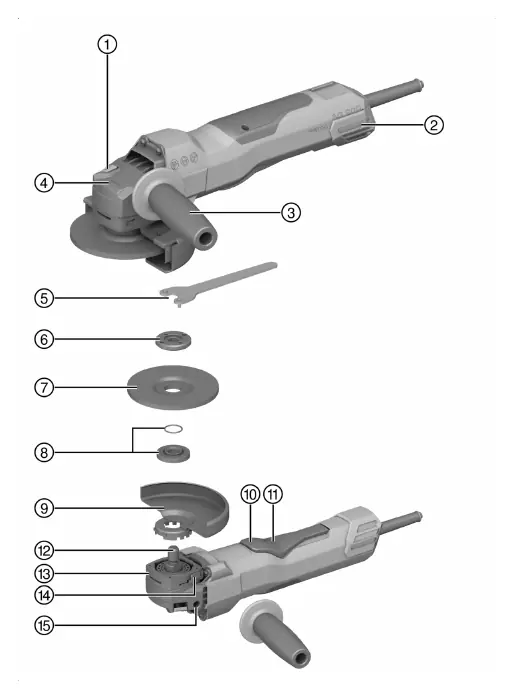
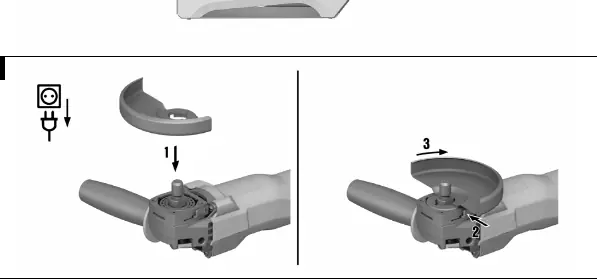
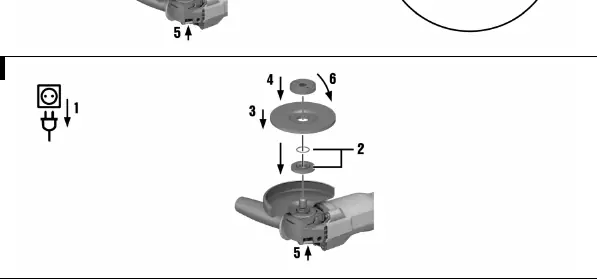
Assembly and Installation
- Side Handle: Screw the side handle into one of the threaded bushings on the tool.
- Guard: Align the triangular marks on the guard and the tool. Press the guard onto the spindle collar and rotate until it engages.
- Front Cover: For grinding or cutting, attach the front cover to the standard guard until it clicks into place.
- Wheel Mounting: Ensure the O-ring is present and undamaged on the clamping flange. Place the flange on the spindle, mount the wheel, and secure it with the clamping nut or the optional Kwik lock nut.
Operation
Switching On: Plug the tool into a power outlet. Push the switch-on interlock forward and fully depress the on/off switch.
Switching Off: Release the on/off switch. The interlock will automatically return to the locked position.
Grinding and Cutting: Maintain a moderate feed rate. For cutting, keep the tool at approximately 90° to the cutting plane. For rough grinding, move the tool back and forth at a 5° to 30° angle.
Care and Maintenance
- Cleaning: Keep the air vents clear at all times. Use a dry brush for cleaning.
- Dust Filter: Clean the dust filter regularly. If damaged, it must be replaced.
- Maintenance: Check all visible parts and controls for damage regularly. If parts are damaged or malfunction, have the tool repaired by Hilti Service.
Troubleshooting
If the tool does not start, check the power supply and the cord/plug. If the tool is overloaded, release the switch and allow it to run at no load for 30 seconds. If the tool overheats, clean the air vents and contact Hilti Service.
Manufacturer information
Hilti Corporation
Practical help
Common problems
Product does not start
Check power supply, check cord/plug, or contact Hilti Service.
Product does not develop full power
Check if the extension cord gauge is adequate.
Angle grinder gets very hot
Clean air vents or contact Hilti Service.
Before use
- Check for concealed electric cables or gas/water pipes in the work area
- Ensure the guard is properly installed
- Check accessory tool for damage or cracks
- Wear eye protection, hard hat, and ear protection
- Ensure air vents are clear
Specs in practice
- Max wheel diameter
- 125 mm (standard), 150 mm (with optional guard)
Images and diagrams
- Page 2: Product overview showing spindle lock, dust filter, and handle locations
- Page 3: Guard installation and adjustment steps
- Page 4: Wheel mounting and Kwik lock nut usage
Model compatibility
- Use only approved guards for specific wheels
- 150 mm accessories require a 150 mm guard

Manual page author
Michael Turner
Technical manual editor
Reviews PDF manuals for structure, safety notes, and practical product details so readers can find the right information quickly.