Tools / Measuring Tools
Operating Instructions for Hilti PM 2-LG Line Laser
Quick guide for the Hilti PM 2-LG Line Laser. Includes setup, operation, accuracy checks, maintenance, and troubleshooting.
Quick answers from the manual
Quick answer
- The Hilti PM 2-LG is a self-leveling line laser for indoor leveling and alignment. It projects two green lines (horizontal and vertical) and a cross point. It is operated by a single person and has a range of approximately 20 meters. p. 13, 24
Key actions
- Switching on the laser p. 15, 26
- Activating receiver mode p. 16, 27
First start
- Insert 4x AA batteries into the battery compartment, ensuring correct polarity. p. 14, 26
Problems and fixes
Product cannot be switched on
Replace batteries, check polarity, or close battery compartment.
p. 18, 30Maintenance and reset
- Regularly check all visible parts for damage and ensure controls function correctly. p. 17, 29
Technical specifications
| Parameter | Value | Meaning | Pages |
|---|---|---|---|
| Range | 20 m | Range without receiver | p. 14, 25 |
Where to find it in the PDF
- Product Overview p. 2, 13, 24
- Technical Data p. 14, 25
Table of contents
Manual images
Click an image to enlargeQuick guide from the manual
The Hilti PM 2-LG is a self-leveling line laser designed for professional indoor leveling and alignment tasks. It projects two green lines (horizontal and vertical) and a line intersection point. The device is intended for use by trained, authorized personnel.
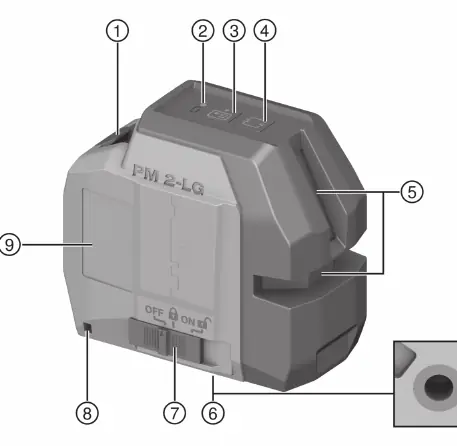
Product Overview
The device features a battery compartment, charge state indicator, receiver mode button, line mode button, laser exit window, mounting thread, and a selector switch for ON/OFF and pendulum lock/unlock.
Operation
- Batteries: Insert 4x AA batteries, ensuring correct polarity. Always replace all batteries at the same time.
- Switching On: Set the selector switch to the ON/unlocked position to activate all laser lines and points.
- Line Modes: Press the line mode button repeatedly to cycle through operating modes: all lines, horizontal line, vertical line.
- Inclined Line Function: Set the selector switch to the ON/locked position. The pendulum is locked, and the laser is not leveled.
- Receiver Mode: Press the receiver mode button to activate/deactivate. The laser beam flashes five times to confirm activation.
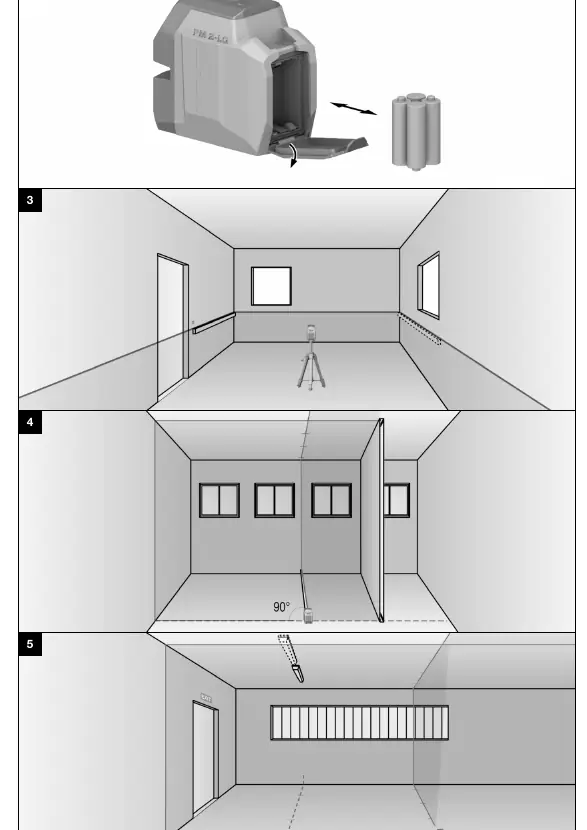
Checking Accuracy
Regularly check the accuracy of the laser, especially before important measurements or after the device has been subjected to mechanical stress (e.g., a fall).
- Leveling Check: Follow the procedure on page 16/27 to check the leveling of the laser beam between two walls.
- Horizontal Line Accuracy: Follow the procedure on page 16/28 to check the horizontal line accuracy.
- Vertical Line Accuracy: Follow the procedure on page 17/28 to check the vertical line accuracy using a doorway.
Care and Maintenance
Carefully remove stubborn dirt. Blow dust off the laser exit window; do not touch it with fingers. Clean the housing with a slightly damp cloth. Do not use silicone-based cleaning agents.
Troubleshooting
If the device does not switch on, check the battery level, polarity, and ensure the battery compartment is closed. If automatic leveling fails, ensure the device is on a flat, horizontal surface and the pendulum is unlocked.
Manufacturer information
Hilti Corporation
Practical help
Common problems
Product cannot be switched on
Check if batteries are empty, inserted with correct polarity, or if the battery compartment is properly closed.
Automatic leveling does not work
Ensure the device is placed on a flat, horizontal surface and the pendulum lock is disengaged.
Individual laser beams do not function
Contact Hilti Service as the laser source or control unit may be faulty.
Before use
- Check the device for any external damage.
- Ensure batteries are fresh and inserted with correct polarity.
- Verify the pendulum lock is disengaged for normal operation.
- Ensure the device is placed on a stable, flat surface.
- Check the anti-fall cable if working at heights.
Images and diagrams
- Page 2: Product overview showing all controls and components.
- Page 5: Diagrams for checking leveling and line accuracy.
- Page 6: Diagrams for checking vertical line accuracy.
Model compatibility
- Compatible with Hilti PMA 92 anti-fall cable.
- Compatible with standard UNC 1/4" tripods.

Manual page author
Emily Carter
User documentation editor
Prepares concise manual descriptions and highlights the most useful setup, operation, and maintenance information for readers.