Industrial / Vacuum Cleaners
User Manual for Hilti PR 2-HS A12 Rotating Laser
Quick guide and user manual for the Hilti PR 2-HS A12 Rotating Laser. Includes setup, operation, maintenance, troubleshooting, and technical specifications.
Quick answers from the manual
Quick answer
- The Hilti PR 2-HS A12 is a rotating laser designed for determining, transferring, and checking references in horizontal and inclined planes. p. 16, 22
Key actions
- Switching on p. 14, 25
- Inserting battery p. 13, 25
First start
- Mount the laser on a suitable holder, press the On/off button, and wait for the auto-leveling LED to stop blinking. p. 14, 25
Problems and fixes
Tool doesn't work
Check battery insertion or charge.
p. 17, 29Technical specifications
| Parameter | Value | Meaning | Pages |
|---|---|---|---|
| Rated voltage | 10.8 V | Operating voltage of the laser. | p. 12, 24 |
| Speed of rotation | 300 /min | Rotation speed of the laser head. | p. 12, 24 |
Where to find it in the PDF
- Product Overview p. 10, 22
- Technical Data p. 12, 24
Table of contents
Manual images
Click an image to enlargeQuick guide from the manual
The Hilti PR 2-HS A12 is a professional rotating laser designed for determining, transferring, and checking references in horizontal and inclined planes. This guide provides essential information for safe and efficient operation.
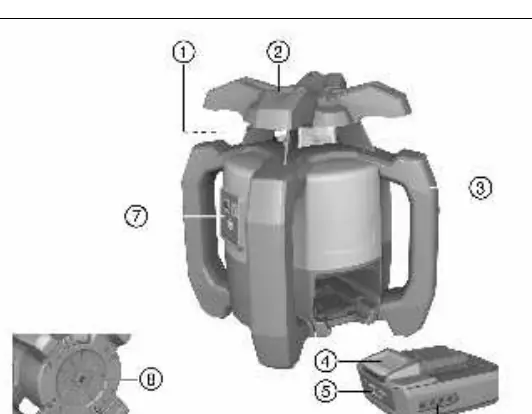
Product Overview
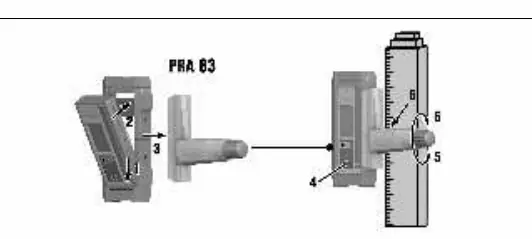
The system consists of the rotating laser, the PRA 20 laser receiver, and the PRA 83 receiver holder. The laser features a rotary head, control panel, and battery compartment. The receiver includes a display, volume control, and detection field.
Operation
Inserting the Battery: Slide the battery into the compartment until it engages securely. Ensure contacts are clean before insertion.
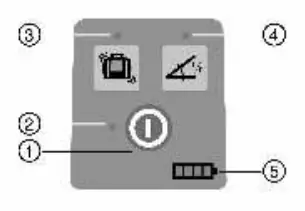
Switching On and Horizontal Operation: Mount the laser on a suitable holder or tripod. Press the On/off button. The auto-leveling LED will blink green. Once leveled, the laser beam will switch on and begin to rotate.
Inclined Plane Mode: Mount the laser on a slope adapter. Ensure the control panel faces away from the direction of inclination. Use the target notch to align the laser parallel to the inclined plane. Press the inclination mode button on the laser.
Shock Warning: If the laser is knocked off level during operation, it switches to warning mode (all LEDs blink, rotation stops). This function can be deactivated if working on a vibrating surface.
Laser Receiver Operation
The PRA 20 receiver detects the laser beam at distances up to 600m. Press the On/off button to activate. Hold the receiver with the detection window facing the laser. The receiver provides visual and audible signals to indicate the distance to the laser plane.
Maintenance
Always remove the battery before performing maintenance. Clean the casing with a slightly damp cloth; do not use silicone-based cleaning agents. Keep the laser exit window clean and free of dust. Have the tool checked regularly by Hilti Measuring Systems Service.
Troubleshooting
If the tool does not function, check if the battery is fully inserted or discharged. If the tool or battery becomes excessively hot, switch off immediately, remove the battery, and contact Hilti Service.
Manufacturer information
Hilti Corporation
Practical help
Common problems
Tool does not work
Ensure the battery is fully inserted until it clicks, or charge the battery.
Battery discharges faster than usual
Very low ambient temperature; warm the battery slowly to room temperature.
Battery does not engage with a click
Clean the retaining lugs on the battery and reinsert.
Tool or battery gets very hot
Electrical fault; switch off immediately, remove battery, let it cool, and contact Hilti Service.
Before use
- Check battery charge level
- Ensure laser exit window is clean
- Check tool for damage
- Ensure stable, vibration-free setup
Specs in practice
- Laser Class 2
- Visible laser, safe for use without additional protective measures.
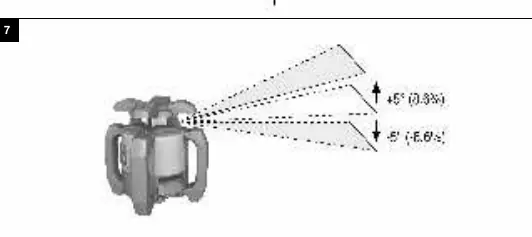
- Self-leveling range ±5°
- The tool automatically levels itself within this range.
- Protection class IP66
- Dust-tight and protected against powerful water jets.
Images and diagrams
- Figure 1: Overview of the rotating laser components.
- Figure 2: Control panel layout.
- Figure 3: Laser receiver control panel.
- Figure 7: Switching on and horizontal operation.
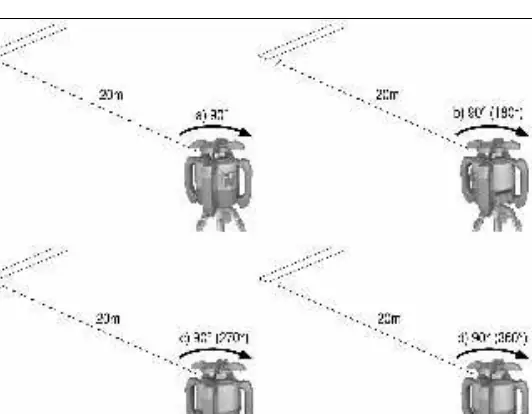
- Figure 8: Checking main and transverse axes.
Model compatibility
- Use only Hilti B12/2.6 or B 12-30 Li-ion batteries.
- Use only Hilti C 4/12-50 charger.

Manual page author
Michael Turner
Technical manual editor
Reviews PDF manuals for structure, safety notes, and practical product details so readers can find the right information quickly.