Tools / Measuring Tools
Hilti PM 2-PE Point Laser Operating Instructions
A comprehensive guide for the Hilti PM 2-PE point laser, covering setup, operation, maintenance, and troubleshooting.
Quick answers from the manual
Quick answer
- The Hilti PM 2-PE is a self-leveling point laser designed for vertical alignment. It features two coincident laser beams with a 30m range and is intended for interior use. p. 10, 19
Key actions
- Switching on/off p. 12, 20
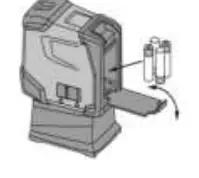
- Inserting batteries p. 12, 20
First start
- Insert 4 AA batteries into the compartment, ensuring correct polarity. p. 12, 20
Problems and fixes
Tool won't switch on
Check batteries, polarity, and battery compartment closure.
p. 14, 22Maintenance and reset
- Clean with a soft cloth. Store in a dry place. Remove batteries for long-term storage. p. 13, 21
Technical specifications
| Parameter | Value | Meaning | Pages |
|---|---|---|---|
| Range | 30 m | Maximum operating distance | p. 11, 20 |
| Accuracy | ±1.5 mm | Accuracy at 10 m | p. 11, 20 |
Where to find it in the PDF
- Product Overview p. 10, 18
- Technical Data p. 11, 20
Table of contents
Manual images
Click an image to enlargeQuick guide from the manual
The Hilti PM 2-PE is a self-leveling point laser designed for professional users to perform vertical alignment tasks quickly and accurately. It features two coincident laser beams originating from the same point, with a range of 30 meters.
Product description
The device is primarily intended for marking plumb points in interior applications. It features a robust plastic casing, compact dimensions, and is self-leveling within approximately 4° in all directions. The leveling time is about 3 seconds.

Operation
Inserting batteries: Open the battery compartment and insert 4 AA alkaline batteries. Ensure the terminals are positioned correctly as shown on the underside of the tool.
Switching on/off: Slide the on/off switch backwards to switch the laser beams on. Slide the switch forwards to switch the tool and laser beams off. The tool automatically switches off after approximately 15 minutes.
Deactivating automatic power-off: Switch the tool on, then off, and on again within 3 seconds. The laser beam will flash five times to confirm the deactivation.
Applications
The tool is suitable for tasks such as transferring points marked on the floor to the ceiling, setting up drywall tracks for partition walls, and aligning lighting elements.
Checking the plumb point
To check the accuracy of the plumb point:
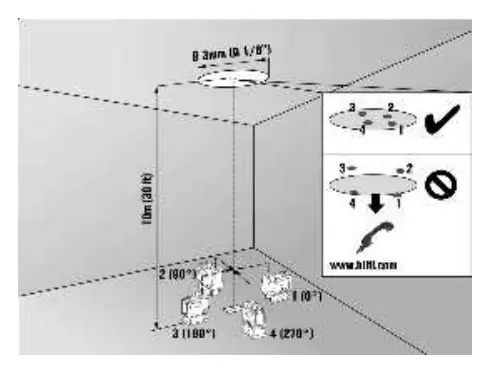
- Make a cross mark on the floor in a high room (5-10 m).
- Place the tool on a level surface and switch it on.
- Position the tool so the lower beam is on the center of the cross.
- Mark the position of the vertical beam on the ceiling.
- Pivot the tool through 90°, 180°, and 270°, marking the vertical beam position on the ceiling each time.
- The resulting marks define a circle; the intersection of the diagonals marks the exact center of the plumb point.
Care and maintenance
Cleaning: Blow dust off the glass. Do not touch the glass with fingers. Use a clean, soft cloth, moistened with pure alcohol or water if necessary.
Storage: If the tool becomes wet, dry it and its accessories before repacking. Remove batteries if the tool will not be used for a long period.
Troubleshooting
If the tool does not switch on, check the batteries, their polarity, and ensure the battery compartment is closed. If the laser beam is not visible, check the battery status and ensure the tool is within the operating temperature range. If automatic leveling fails, ensure the tool is on a level surface and the pendulum is released.
Manufacturer information
Hilti Corporation
Practical help
Common problems
Tool cannot be switched on
Check if batteries are empty, inserted with correct polarity, or if the battery compartment is properly closed.
No laser beam visible
Check if the tool is switched on, batteries are fresh, or if the tool is within the operating temperature range.
Automatic leveling does not work
Ensure the tool is on a level surface, the pendulum is released, and ambient light is not too bright.
Before use
- Check battery levels
- Ensure the tool is placed on a stable, level surface
- Verify the pendulum is unlocked
- Check for magnetic interference
- Verify accuracy before critical measurements
Specs in practice
- Self-leveling range
- ±4°
Images and diagrams
- 1: Product overview (On/off switch, LED, Laser exit window, Battery compartment)
- 2: Battery insertion
- 3: Drywall track setup
- 4: Lighting element setup
- 5: Plumb point check
Model compatibility
- Compatible with Hilti PMA 20 tripod, PMA 54/55 target plate, PUA 10 telescopic brace, and PMA 93 clamp holder.

Manual page author
David Miller
Documentation analyst
Organizes user manual content into clear summaries, with attention to model details, product context, and everyday usability.