Tools / Drills
Operating Instructions for Hilti SFE 2-A12 Multi-Head Drill Driver
Quick guide for the Hilti SFE 2-A12 multi-head drill driver. Includes setup, adapter installation, operation, maintenance, and troubleshooting steps.
Quick answers from the manual
Quick answer
- The Hilti SFE 2-A12 is a cordless multi-head drill/driver. It uses 10.8V B 12 series batteries and features interchangeable adapters for various drilling and screwdriving tasks. p. 12, 13
Key actions
- Insert battery p. 15
- Fit adapter p. 15
- Select gear p. 16
First start
- Charge the battery fully before using it for the first time. p. 15
Problems and fixes
The battery doesn't engage with an audible click
Clean the retaining lugs on the battery.
p. 19Maintenance and reset
- Always remove the battery before carrying out care and maintenance tasks. p. 17
Technical specifications
| Parameter | Value | Meaning | Pages |
|---|---|---|---|
| Rated voltage | 10.8 V | Operating voltage | p. 13 |
| Weight | 1.1 kg | Tool weight | p. 13 |
Where to find it in the PDF
- Product Overview p. 12
- Technical Data p. 13
Table of contents
Manual images
Click an image to enlargeQuick guide from the manual
The Hilti SFE 2-A12 is a professional cordless drill/driver designed for driving screws and drilling in metal, wood, and plastic. Before using the tool, ensure the battery is fully charged and the correct adapter is fitted. Always remove the battery before performing maintenance or changing accessories to prevent accidental starting.
Product overview
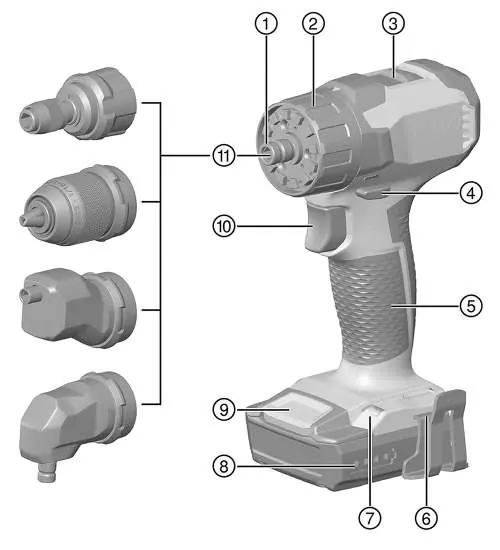
- 1/4" hex socket
- Torque and drilling mode selector ring
- Gear speed selection switch
- Forward/reverse selector switch with safety lock
- Grip
- Fitting slot for accessories (e.g., belt hook)
- Lamp
- Charge status display
- Battery release button
- Control switch (with electronic speed control)
- Adapter
Preparation and battery
Use only Hilti B 12 series Li-ion batteries. To insert the battery, push it into the tool until it engages with an audible click. To remove, press the battery release buttons. The charge state can be checked by pressing the release buttons lightly; 4 LEDs indicate 75-100% charge, while 1 blinking LED indicates less than 10%.
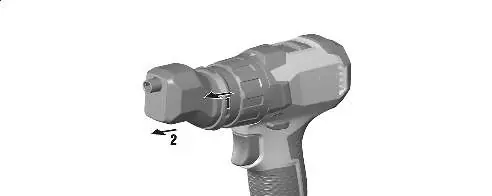
Using adapters
The SFE 2-A12 features an interchangeable chuck system. Available adapters include:
- Hex bit holder: For bits with mechanical clamping.
- Keyless chuck: For drill bits (1.5 mm to 13 mm).
- Right-angle adapter: For cramped conditions; includes magnetic hex bit holder.
- Eccentric adapter: For working close to walls; includes magnetic hex bit holder.
To fit an adapter, insert it into the chuck until it snaps into place. To remove, pull the locking sleeve and hold it while removing the adapter.
Operation
- Selecting the gear: Use the gear selector switch to choose between 1st gear (400/min) or 2nd gear (1600/min).
- Setting the torque: Turn the adjusting ring to the desired setting. Torque is only limited in screwdriving mode.
- Rotation direction: Use the forward/reverse switch. The switch is locked in the middle position (switch-on interlock).
- Switching on/off: Press the control switch to start. Speed is controlled steplessly by how far the switch is pressed.
Care and maintenance
Always remove the battery before cleaning. Clean air vents with a dry, soft brush. Use a slightly damp cloth for the housing; do not use silicone-based cleaning agents. Keep battery contacts clean and free of oil or grease. If the tool or battery becomes damaged, contact Hilti Service.
Troubleshooting
If the tool does not work, ensure the battery is fully inserted. If the control switch is stuck, check that the forward/reverse switch is not in the middle position. If the tool or battery becomes very warm, stop use, remove the battery, and allow it to cool down.
Manufacturer information
Hilti Corporation
Practical help
Common problems
The power tool does not work
Ensure the battery is fully inserted until it engages with an audible click.
The control switch cannot be pressed
Check that the forward/reverse switch is not in the middle position (switch-on interlock).
Running speed drops considerably
The battery is discharged; replace with a charged battery.
The power tool or battery becomes very warm
Switch off immediately, remove the battery, allow to cool, and contact Hilti Service.
Before use
- Charge the battery fully before first use.
- Ensure battery contacts are clean and dry.
- Select the appropriate adapter for your task.
- Set the gear selector switch to the desired speed.
- Check that the forward/reverse switch is set correctly.
- Ensure the workpiece is secured with clamps or a vice.
Specs in practice
- Rated voltage
- 10.8 V (Operating voltage of the tool).
- Max torque (Screwdriving)
- 0.5 Nm to 5 Nm adjustable range.
Images and diagrams
- Overview of the tool showing the chuck, torque ring, gear switch, and battery release.
- Illustration of adapter installation and removal using the locking sleeve.
- Diagram of gear selection switch positions (1 and 2).
- Diagram of forward/reverse switch positions (L and R).
Model compatibility
- Use only Hilti Li-ion batteries of the B 12 series.
- Use only Hilti-approved battery chargers.

Manual page author
Michael Turner
Technical manual editor
Reviews PDF manuals for structure, safety notes, and practical product details so readers can find the right information quickly.