Lighting / Fixtures
Hinkley 17467 Beacon Hill Lighting Fixture Installation Manual
Quick installation and assembly guide for the Hinkley 17467 Beacon Hill lighting fixture. Includes step-by-step instructions for glass assembly, mounting options, wiring, and weatherproofing.
Table of contents
Manual images
Click an image to enlargeQuick guide from the manual
This document provides installation instructions for the Hinkley 17467 Beacon Hill lighting fixture. Before beginning, ensure the power supply is turned off. You will need appropriate mounting hardware for your specific surface (e.g., masonry fasteners for concrete). Weatherproofing is essential; use silicone sealant to seal gaps between the fixture and the mounting surface.
Assembly instructions
To install the glass panels, follow these steps:
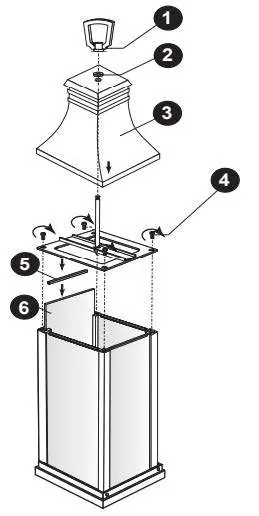

- Remove the top loop (1) and rubber washer (2) to take off the fixture roof (3).
- Remove the silastical bar (5) and center plate (8) by unscrewing the screws (4) located in the fixture cage. Keep these screws.
- Slide the glass panels (6) into the fixture cage (7).
- Secure the silastical bar (5) to the glass (6).
- Re-secure the center plate (8) using the previously removed screws.
- Place the roof (3) over the center rod (9).
- Place the washer (2) on top of the roof and secure the roof (3) by screwing on the finial (1).
Mounting instructions
Flat surface mounting:
- Remove the mounting bracket (1) from the base by removing the two screws (2).
- Use the long slotted holes (H) in the bracket as a guide to mark the location for mounting screws (S).
- Install the bracket using appropriate fasteners for your surface.
- Connect wires following the IS-18 instructions.
- Attach the fixture to the bracket by sliding the base over the bracket and re-securing the screws.
Pyramid pier top mounting:
- Reverse the mounting bracket (1) so the tabs point down.
- Ensure the center hole of the bracket does not touch the top of the pier.
- Use a spacer (not provided) between the bracket and the slanted surface to prevent the bracket from bending when tightened.
Wiring and grounding
Refer to the IS-18 wiring instructions provided in the manual for specific connections:
- Connect the positive supply wire (A) to the positive fixture lead (B) using a twist-on connector.
- Connect the negative supply wire (C) to the negative fixture lead (D) using a twist-on connector.
- Fasten the fixture ground wire (E) to the mounting strap (M) using the ground screw (S).
Weatherproofing
After securing the fixture, it is recommended to seal gaps to prevent water entry:

- Seal the gap between the wall and the fixture backplate on the top and both sides using a good quality waterproof caulk or silicone sealant.
- Apply a small bead of caulk or sealant under the ball knobs used to mount the fixture.
Manufacturer information
Hinkley Lighting
Practical help
Common problems
Fixture not sitting flush against the wall
Use a good quality waterproof caulk or silicone sealant to seal the gap between the fixture backplate and the wall on the top and both sides.
Mounting bracket bending on pyramid pier
Use a spacer (not provided) between the bracket and the slanted surface of the pier top to prevent bending when tightening hardware.
Before use
- Turn off the power supply before starting installation.
- Ensure you have appropriate mounting hardware for your specific surface (e.g., masonry fasteners for concrete).
- Verify you have silicone sealant for weatherproofing.
- Review the IS-18 wiring instructions included in the manual.
Images and diagrams
- Drawing 3: Exploded view of the fixture assembly showing the order of parts.
- Drawing 1: Mounting instructions for flat surfaces.
- Drawing 2: Mounting instructions for pyramid-style pier tops.
- IS-18 Wiring Diagrams: Standard connections for indoor and outdoor fixtures.
Model compatibility
- Suitable for flat surfaces and pyramid-style pier tops.
- Requires specific fasteners for masonry or concrete surfaces (not provided).

Manual page author
David Miller
Documentation analyst
Organizes user manual content into clear summaries, with attention to model details, product context, and everyday usability.