Lighting / Outdoor Lighting
Hinkley 13200BU Outdoor Wall Light Installation Guide
Quick installation and wiring guide for the Hinkley 13200BU outdoor wall light. Includes step-by-step assembly, electrical connection instructions, and essential weatherproofing tips.
Table of contents
Manual images
Click an image to enlargeQuick guide from the manual
This document provides installation and wiring instructions for the Hinkley 13200BU outdoor wall light. Before beginning, ensure the power supply is turned off at the circuit breaker. If you are unfamiliar with electrical wiring, consult a qualified electrician. For outdoor installations, weatherproofing with silicone sealant is required to prevent water ingress.
Assembly instructions
Follow these steps to mount the fixture:
- Find a clear area to work.
- Secure the threaded rod (B) to the mounting strap (A).
- Thread one hex nut (F) onto the threaded rod (B).
- Thread the other two hex nuts (F) onto the threaded rod (B) on the opposite side of the mounting strap (A).
- Secure the mounting strap (A) to the junction box (J) using the provided screws (C).
- Use the knob (D) to secure the backplate (E) to the threaded rod (B).
Wiring instructions
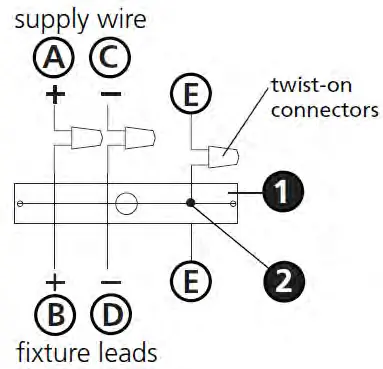
Make electrical connections from the supply wire to the fixture lead wires:
- Positive wire: Connect the positive supply wire (typically black or the smooth, unmarked side of the cord) to the positive fixture lead (B) using an appropriately sized twist-on connector.
- Negative wire: Connect the negative supply wire (typically white or the ribbed, marked side of the cord) to the negative fixture lead (D).
- Grounding: Fasten the fixture ground wire (E) (typically copper or green plastic coated) to the mounting strap (M) using the ground screw (S).
Glass installation
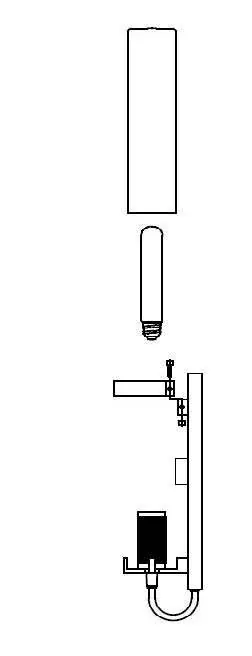
- Install a medium base bulb (G) into the fixture.
- Place the glass (F) over the bulb (G).
- Secure the glass ring (K) using the knobs (L).
- The fixture can now be powered on.
Weatherproofing
To ensure the fixture remains weather-tight for outdoor use:
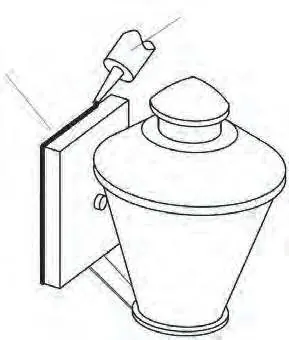
- After securing the fixture to the wall, seal the gap between the wall and the fixture backplate on the top and both sides using a good quality waterproof caulk or silicone sealant.
- Apply a small bead of caulk or sealant under the ball knobs used to mount the fixture.
Manufacturer information
Hinkley Lighting
Practical help
Common problems
Water entering the junction box
Use waterproof caulk or silicone sealant to seal the gaps between the fixture backplate and the wall.
Fixture is loose on the wall
Ensure the threaded rod is properly secured to the mounting strap and the backplate is tightened firmly with the knob.
Before use
- Turn off the power supply at the circuit breaker.
- Ensure you have waterproof caulk or silicone sealant (not included).
- Verify the junction box is compatible with the mounting strap.
- Identify positive (black/smooth), negative (white/ribbed), and ground (copper/green) wires.
Specs in practice
- Positive wire
- Typically black or the smooth, unmarked side of the cord.
- Negative wire
- Typically white or the ribbed, marked side of the cord.
Images and diagrams
- Drawing 1: Illustrates the mounting strap assembly and threaded rod configuration.
- Drawing 2: Shows the glass installation and bulb placement.
- Wiring Diagram: Details the connection of supply wires to fixture leads using twist-on connectors.
Model compatibility
- Outdoor installation requires silicone sealant for weatherproofing.
- Requires a medium base bulb.

Manual page author
Michael Turner
Technical manual editor
Reviews PDF manuals for structure, safety notes, and practical product details so readers can find the right information quickly.