Lighting / Outdoor Landscape
Installation Instructions for Hinkley Atlantis 1518CD-LL Landscape Light
Quick installation guide for the Hinkley Atlantis 1518CD-LL landscape light. Includes step-by-step instructions for bulb installation, ground spike mounting, wiring connections, and cedar finish maintenance.
Table of contents
Manual images
Click an image to enlargeQuick Guide from the Manual
This document provides installation and maintenance instructions for the Hinkley Atlantis 1518CD-LL landscape light. Key safety requirements include disconnecting the transformer from the electrical supply before performing any installation or service. Wiring must be protected by routing in close proximity to the fixture or a building structure and buried a maximum of 6 inches (15.2 cm).
Glass and Bulb Installation
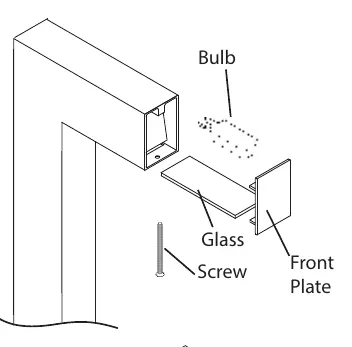
- Using a Phillips screwdriver, remove the flat head screw located on the underside of the fixture.
- Remove the front plate.
- Insert the bulb into the socket.
- Slide the glass into the glass track at the back of the fixture.
- Re-assemble the front plate and secure it with the screw.
Luminaire Mounting
These steps apply to typical ground spike mounting:
- Ensure the transformer is disconnected from the electrical supply.
- Run the wire from the luminaire through the mounting hole in the top of the ground spike.
- Attach the luminaire to the ground spike by threading it into the mounting hole and locking it in place.
- Place the spike in the desired position and insert it into the ground until the flange of the spike is flush with the ground.
- Strip the two wire leads from the luminaire and connect them to the main supply wire using the provided silicone-filled wire nut.
Cedar Maintenance
The CD finish features a thin, clear, non-UV inhibiting lacquer applied at the factory to minimize natural color changes before installation. You may maintain the wood using methods typical for a cedar deck.
To perform maintenance, remove the cedar component:
- Unscrew the two hex screws from the back of the fixture.
- Slide the cedar up and off the metal fixture.
Manufacturer information
Hinkley Lighting
Practical help
Common problems
Natural color change of cedar finish
The factory-applied lacquer is non-UV inhibiting. Maintain the wood using standard methods for a cedar deck.
Risk of electrical shock
Always disconnect the transformer from the electrical supply before starting installation or service.
Before use
- Disconnect the transformer from the power supply.
- Verify you have the provided silicone-filled wire nut.
- Ensure the ground spike is positioned so the flange is flush with the ground.
- Check that the main supply wire is cut within 6 inches of the building structure or fixture.
Images and diagrams
- Exploded view showing the assembly of the bulb, glass, and front plate.
- Mounting diagram illustrating the connection of the fixture wire to the supply wire using the silicone-filled wire nut.
Model compatibility
- Designed for ground spike mounting.
- Wiring must be buried a maximum of 6 inches (15.2 cm).

Manual page author
David Miller
Documentation analyst
Organizes user manual content into clear summaries, with attention to model details, product context, and everyday usability.