Lighting / Outdoor Landscape
Installation Manual for Hinkley 15030OZ-LL LED Path Light
Quick installation guide for the Hinkley 15030OZ-LL LED Path Light. Includes mounting instructions, wiring diagrams for single and multiple fixtures, safety warnings, and voltage drop guidelines for 12V landscape systems.
Table of contents
Manual images
Click an image to enlargeQuick guide from the manual
This document provides installation instructions for the Hinkley 15030OZ-LL LED Path Light. The luminaire is designed exclusively for use with Hinkley-approved 12V landscape systems. Connection to other systems may cause premature failure or unintended operation.
Safety Instructions
- Hot Surface: The lamp gets hot quickly. Do not touch the lens, guard, or enclosure while the light is on.
- Flammable Materials: Keep the lamp away from materials that may burn.
- Shielding: Do not operate the luminaire with a missing or damaged shield.
- Grounding: Do not connect the ground wire.
Luminaire Mounting
- Disconnect the transformer from the electrical supply before installation or service.
- Run the wire from the luminaire through the mounting hole in the top of the ground stake.
- Attach the luminaire to the ground stake by threading it into the mounting hole until it fits snugly against the bottom of the stem.
- Place the stake in the desired position and insert it into the ground until the flange is flush with the ground.
- Strip the two wire leads from the luminaire and connect them to the main supply wire using the provided silicone-filled wire nut.
- To attach the cage, use the provided screws and secure them to the holes in the top of the fixture.
Wiring Instructions
The main secondary wire is intended for shallow burial (less than 6 inches/15.2cm) to connect to the main low-voltage cable.
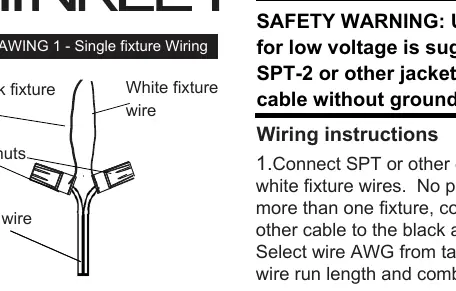
- Cable Type: Use SPT-1, SPT-2, or other jacketed two-conductor cable without a ground wire.
- Polarity: No polarity applies.
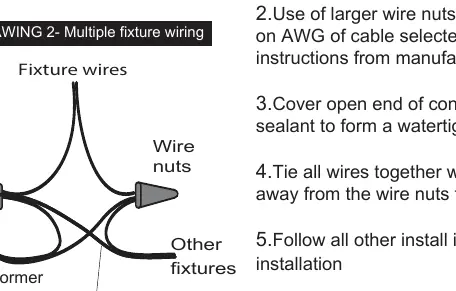
- Multiple Fixtures: Connect two sets of SPT or other cable to the black and white fixture wires.
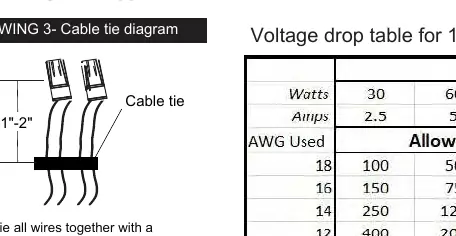
- Strain Relief: Tie all wires together with a cable tie 1 to 2 inches away from the wire nuts to act as a strain relief.
- Waterproofing: Cover the open end of connectors with silicone sealant to form a watertight seal.
Voltage Drop Guidelines
Select the appropriate wire gauge (AWG) from the voltage drop table based on the total wire run length and the combined load of the lamps. Using larger wire nuts may be required depending on the AWG selected.
Manufacturer information
Hinkley Lighting
Practical help
Common problems
Premature failure or unintended operation
Ensure the luminaire is connected only to Hinkley-approved 12V landscape systems.
Water ingress in connectors
Cover the open end of connectors with silicone sealant to form a watertight seal.
Wire strain
Tie all wires together with a cable tie 1 to 2 inches away from the wire nuts.
Before use
- Disconnect the transformer from the power supply.
- Verify the system is a 12V landscape system.
- Ensure you have SPT-1 or SPT-2 jacketed two-conductor cable.
- Check wire nut capacity (2 pcs 18 AWG + 2 pcs 12 AWG).
- Ensure the ground wire is not connected.
Specs in practice
- 18 AWG / 12 AWG
- Wire gauge capacity for the provided silicone-filled wire nuts.
Images and diagrams
- Mounting diagram shows the assembly of the fixture to the ground stake.
- Wiring diagrams illustrate connections for single and multiple fixtures.
- Cable tie diagram shows the required strain relief method.
Model compatibility
- Designed for Hinkley approved 12V landscape systems only.
- Do not connect ground wire.

Manual page author
Michael Turner
Technical manual editor
Reviews PDF manuals for structure, safety notes, and practical product details so readers can find the right information quickly.