Lighting / Outdoor Landscape
Hinkley 1535MZ-12W3K Hardy Island LED Long Cowl Spot Light Installation Instructions
Quick installation guide for the Hinkley 1535MZ-12W3K Hardy Island LED Long Cowl Spot Light. Learn how to mount the fixture, install the MR16 bulb, and safely connect the 12V wiring.
Table of contents
Quick guide from the manual
This document provides installation instructions for the Hinkley 1535MZ-12W3K Hardy Island LED Long Cowl Spot Light. The fixture is designed for use with Hinkley-approved 12V landscape systems. Ensure all electrical power is disconnected before beginning installation.
Safety warnings
- Electrical Safety: Disconnect the transformer from the electrical supply before installation or service.
- Heat Hazard: The lamp gets hot quickly. Do not touch the lens, guard, or enclosure while in operation.
- Fire Safety: Keep the lamp away from flammable materials. Do not operate the fixture with a missing or damaged shield.
- Water Proximity: Do not install the luminaire within 10 feet (3m) of a pool, spa, or fountain.
Luminaire mounting
For typical ground stake mounting:
- Find a clear area to work.
- Run the wire from the luminaire through the mounting hole in the top of the ground stake.
- Attach the luminaire to the ground stake by threading it into the mounting hole until it fits snugly against the bottom of the stem.
Wiring instructions
The luminaire uses silicone-filled wirenuts for connection to the main supply wire. Note that these wirenuts are intended for one-time use only.
- Strip the two wire leads from the luminaire.
- Connect them to the main supply wire using the provided silicone-filled wirenut.
- The wire nut capacity is 2 pieces of 18 AWG and 2 pieces of 12 AWG.
Cable Burial: The main secondary wire is intended for shallow burial (less than 6 inches / 15.2cm). Ensure the wire is cut to length so that it connects to a connector within 6 inches of a building structure, luminaire, or fitting.
Bulb installation (MR16)
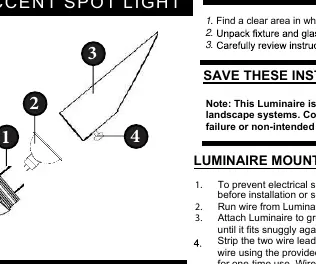
- Release the cowl (3) and remove the knob (4).
- Place the MR16 bulb (not included) (2) inside the socket. The snaps (1) will engage and lock the bulb in place.
- Replace the cowl and knob.
- The fixture can now be powered on.
Manufacturer information
Hinkley Lighting
Practical help
Common problems
Premature failure or non-intended operation
Ensure the luminaire is connected only to Hinkley-approved 12V landscape systems.
Electrical shock risk
Always disconnect the transformer from the electrical supply before performing installation or maintenance.
Before use
- Verify you have a Hinkley-approved 12V landscape system.
- Ensure the installation area is clear.
- Obtain a compatible MR16 bulb (not included).
- Check that the ground stake is available for mounting.
Specs in practice
- Silicone-filled wirenut
- A waterproof connector for outdoor wiring; intended for one-time use only.
- Wire Nut Capacity
- Supports up to 2 pieces of 18 AWG and 2 pieces of 12 AWG wire.
Model compatibility
- Must be used with Hinkley-approved 12V landscape systems.
- Do not install within 10 feet (3m) of pools, spas, or fountains.

Manual page author
Michael Turner
Technical manual editor
Reviews PDF manuals for structure, safety notes, and practical product details so readers can find the right information quickly.