Lighting / Fixtures
Installation Manual for Hinkley 2322 Lighting Fixture
A comprehensive installation guide for the Hinkley 2322 lighting fixture, covering assembly, wiring, grounding, and mounting procedures.
Quick answers from the manual
Quick answer
- This document provides installation instructions for the Hinkley 2322 lighting fixture, covering assembly, wiring, grounding, and mounting. p. 1, 2, 3
Key actions
- Turn off power supply p. 1, 2, 3
- Install glass p. 1
- Connect wiring p. 2
Problems and fixes
Water entering outlet box
Use caulk to seal gaps between the fixture mounting plate and the wall.
p. 2Show 2 more answers Show less
Technical specifications
| Parameter | Value | Meaning | Pages |
|---|---|---|---|
| Mounting screws | 8-32 | Size of screws for mounting strap | p. 3 |
Where to find it in the PDF
- Assembly Instructions p. 1
- Wiring and Grounding p. 2
- Hanging Instructions p. 3
Table of contents
Manual images
Click an image to enlargeQuick guide from the manual
This document provides essential installation instructions for the Hinkley 2322 lighting fixture. Before beginning, ensure the power supply is turned off at the circuit breaker. If you are replacing an existing fixture, ensure the power is completely disconnected. Consult a qualified electrician if new wiring is required.
Assembly
To assemble the fixture:
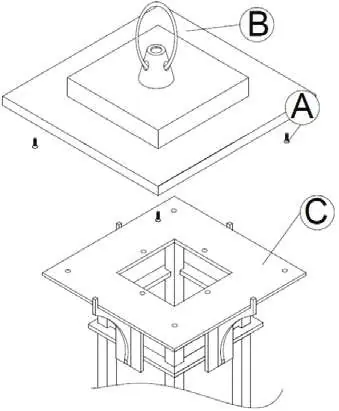
- Remove the top (B) by unscrewing the four screws (A).
- Align the screw hole on the top of the fixture (B) with the screw holes on the top of the cage (C) and set into place.
- Thread the screws (A) into the underside of the top of the cage (C) until tight to secure the cage to the top of the fixture.
- Install the glass (G) into the fixture cage before mounting. Insert the glass down into the top opening of the cage (1).
- Place the glass clip (3) over the glass (G), align the screw hole in the clip with the screw hole in the top of the cage (1), and thread the screw (2) into the top of the cage.
Wiring and Grounding
Follow these steps to connect the fixture:
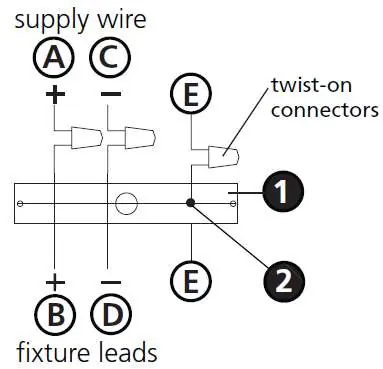
- Positive supply wire (A): Typically black or the smooth, unmarked side of the two-conductor cord. Connect to the positive fixture lead (B) using an appropriately sized twist-on connector.
- Negative supply wire (C): Typically white or the ribbed, marked side of the two-conductor cord. Connect to the negative fixture lead (D).
- Grounding: For flush mount fixtures, fasten the fixture ground wire (E) to the mounting strap (M) with the ground screw (S). For chain hung fixtures, loop the ground wire under the head of the ground screw (S) and connect to the building system ground wire. For post-mount fixtures, connect the fixture ground wire to the power supply ground inside the post.
- Outdoor Fixtures: Cover open ends of connectors with silicone sealant to form a watertight seal. For wall-mounted fixtures, use caulk to seal gaps between the mounting plate and the wall.
Hanging Instructions
To hang the fixture:
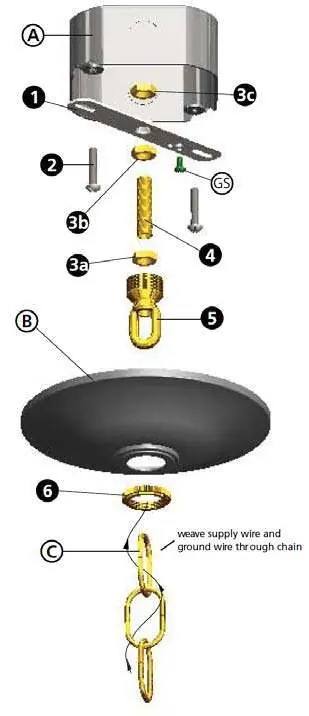
- Fasten the mounting strap (1) to the outlet box (A) using the two 8-32 screws (2).
- Thread the hex nuts (3a) and (3b) onto the threaded tubing (4).
- Thread one end of the threaded tubing (4) into the loop (5) (minimum 1/2" to 3/4"). Tighten the hex nut (3a) against the loop to lock it.
- Thread the other end of the tube (4) into the mounting strap approximately 1/2".
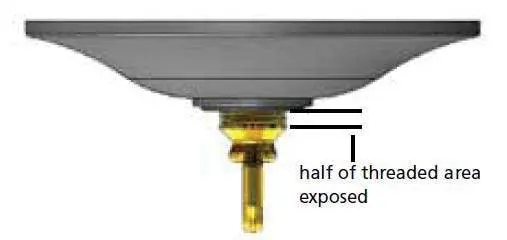
- Slip the canopy (B) over the loop (5) and adjust the loop height so half of the threaded area is exposed. Tighten the hex nut (3b) against the mounting strap to lock the assembly.
- Remove the mounting strap (1) from the junction box, thread the third hex nut (3c) onto the end of the tube (4) above the strap, and tighten to lock the assembly. Remount the strap to the junction box.
- Attach the chain to the top loop of the fixture and the loop (5). Weave the fixture lead and ground wires through the chain and loop (5).
- Make electrical connections and secure the canopy against the ceiling by turning the threaded collar (6) on the loop (5) until tight.
Manufacturer information
Hinkley Lighting
Practical help
Common problems
Fixture not working after installation
Verify that the power supply is turned on at the circuit breaker and that all wiring connections are secure and properly connected.
Water entering the outlet box
For wall-mounted outdoor fixtures, use caulk to seal gaps between the fixture mounting plate (backplate) and the wall to prevent water ingress.
Before use
- Turn off power supply at the circuit breaker
- Ensure you have a clear workspace
- Verify all parts are present
- Consult a qualified electrician if new wiring is required
- Ensure the fixture is properly grounded
Show more Show less
Specs in practice
- Positive supply wire
- Typically black or the smooth, unmarked side of the two-conductor cord.
- Negative supply wire
- Typically white or the ribbed, marked side of the two-conductor cord.
Images and diagrams
- Drawing 1 (Page 1): Fixture mounting and cage assembly.
- Drawing 2 (Page 1): Glass installation detail.
- Drawing 1 (Page 2): Flush mount wiring diagram.
- Drawing 2 (Page 2): Chain hung wiring diagram.
- Drawing 3 (Page 2): Post-mount wiring diagram.
Model compatibility
- Suitable for indoor and outdoor use (check specific fixture rating).
- Requires a 3-wire electrical system for proper grounding.

Manual page author
Emily Carter
User documentation editor