Furniture / Home Furnishing
Hinkley 0150WLC Smart Landscape Control Instruction Manual
Quick guide for the Hinkley 0150WLC Smart Landscape Control, covering installation steps, wiring, and Hinkley app setup for remote control and scheduling.
Table of contents
Quick guide from the manual
This document provides essential instructions for installing and configuring the Hinkley 0150WLC Smart Landscape Control. It covers the physical installation of the dimmer box to the transformer, wiring connections for lighting zones, and the setup process for the Hinkley mobile application.
Installation and Wiring
- Ensure you have a clear workspace.
- Plug in the photocell jumper (3) if required for your setup.
- Create an opening for the dimmer box (1) by removing the conduit knockout on the transformer.
- Secure the dimmer box (1) to the transformer using the lock ring (2), ensuring wires pass through the opening.
- Connect the key connectors from the dimmer box (5) to the daughter board (6).
- Connect the free wires from the dimmer box into the COM and 12V terminal block connectors (8).
- Connect light fixture wires to the positive and negative terminals on the daughter board (7).
- Use the wall plug (4) to power on the transformer.
Important Wiring Notes:
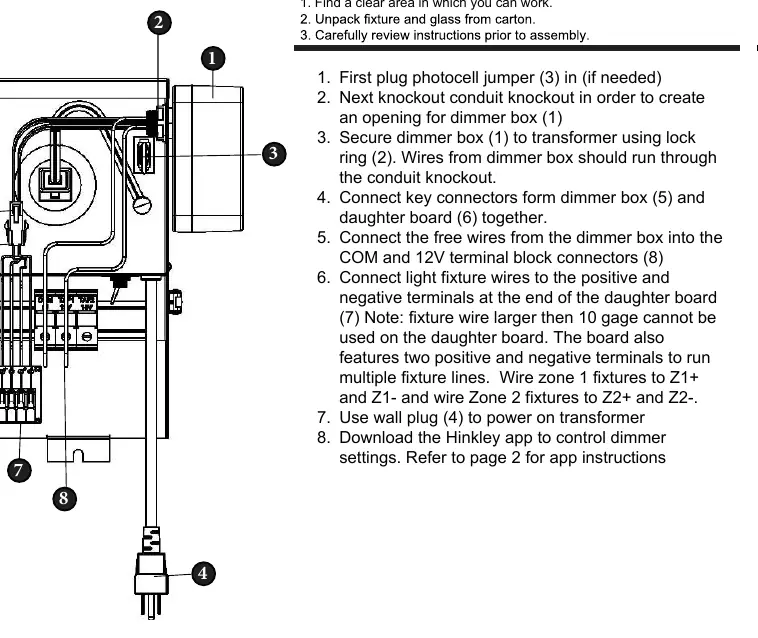
- Fixture wires larger than 10 gauge cannot be used on the daughter board.
- The board features two sets of positive and negative terminals for multiple fixture lines.
- Wire Zone 1 fixtures to Z1+ and Z1-.
- Wire Zone 2 fixtures to Z2+ and Z2-.
App Setup
The Hinkley app allows for remote control of dimmer settings, full device functions, and automated timers/schedules.
- Download the Hinkley app from the App Store or Google Play.
- Create an account and verify it via the email code provided (check spam folder if necessary).
- Ensure Bluetooth is enabled on your mobile device.
- On the app home screen, select 'Add a device' and choose your unit.
- Enter your Wi-Fi network name and password to complete the connection.
Manufacturer information
Hinkley Lighting
Practical help
Common problems
Verification email not received during account setup
Check your email spam or junk folder.
App cannot connect to the device
Ensure Bluetooth is enabled on your smartphone and that you have entered the correct Wi-Fi credentials.
Before use
- Ensure the photocell jumper is installed if your application requires it.
- Verify that fixture wires are not larger than 10 gauge.
- Confirm Bluetooth is enabled on your mobile device before starting app pairing.
- Have your Wi-Fi network name and password ready.
Specs in practice
- 10 gauge wire limit
- The daughter board terminals cannot accommodate wires thicker than 10 gauge.
- Z1+/Z1- and Z2+/Z2-
- Dedicated terminals for two separate lighting zones, allowing independent control.
Images and diagrams
- The transformer diagram identifies the dimmer box (1), lock ring (2), photocell jumper (3), wall plug (4), key connectors (5), daughter board (6), fixture terminals (7), and terminal block connectors (8).
Model compatibility
- Compatible with Hinkley smart landscape lighting systems.
- Requires 2.4GHz Wi-Fi network for app connectivity.

Manual page author
Michael Turner
Technical manual editor
Reviews PDF manuals for structure, safety notes, and practical product details so readers can find the right information quickly.