Lighting / Fixtures
Hinkley 10W Mini Pendant Installation Manual
Installation and wiring guide for the Hinkley 10W Mini Pendant, including mounting instructions, shade adjustment, and electrical grounding procedures.
Table of contents
Product Overview
The Hinkley 10W Mini Pendant is a versatile lighting fixture designed for indoor use. It features an adjustable stem system for height customization and a flexible shade assembly that allows for precise light direction.
Installation and Mounting
Before beginning, ensure the power supply is turned off. Select a clear workspace and unpack all components. The fixture uses a mounting strap (B) attached to the junction box (J). Secure the mounting plate to the junction box, then adjust the mounting screws (A) so they extend past the canopy. Once the fixture is positioned, secure it using the barrel knobs (D).
Shade Adjustment
The fixture is designed for flexibility. The shades and socket assembly at the end of the arm can rotate 330 degrees and tilt up and down 180 degrees, allowing you to focus light exactly where needed.
Wiring and Grounding
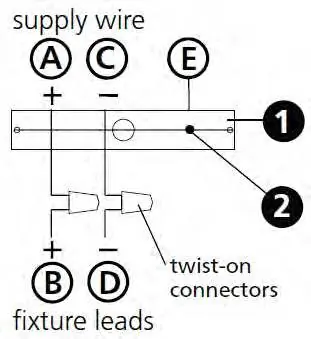
Proper electrical connection is critical for safety. Connect the positive supply wire (A) to the positive fixture lead (B) and the negative supply wire (C) to the negative fixture lead (D) using appropriately sized twist-on connectors. For grounding, connect the fixture ground wire (E) to the mounting strap (M) using the provided ground screw (S). If installing in a 3-wire system, ensure the ground wire is securely fastened to the building's grounding system.
Safety Information
Always turn off the power supply before starting any installation work. If you are unfamiliar with electrical wiring or local code requirements, consult a qualified electrician. For outdoor installations, ensure all connectors are sealed with silicone sealant to maintain a watertight connection.
Manufacturer information
Hinkley Lighting
Practical help
Common problems
Water entering the outlet box during outdoor installation.
Use caulk to seal gaps between the mounting plate and the wall. For lap siding, use a specialized mounting platform.
Fixture not grounding properly.
Ensure the fixture ground wire (E) is securely fastened to the mounting strap (M) using the ground screw (S) or connected directly to the building's ground wire.
Before use
- Turn off the main power supply at the circuit breaker.
- Verify all parts are unpacked and accounted for.
- Determine the desired hanging height and select the appropriate stem combination.
- Ensure the junction box is properly installed and capable of supporting the fixture weight.
- Have appropriate twist-on connectors and tools ready.
Specs in practice
- Shade Rotation
- The assembly can rotate 330 degrees horizontally.
Images and diagrams
- Drawing 1: Shows the stem assembly process and wire threading.
- Drawing 2: Illustrates the mounting plate and canopy attachment.
- Wiring Diagrams: Detail the connection of positive, negative, and ground wires for different mounting types (Flush, Chain, Post).
Model compatibility
- Suitable for 3-wire electrical systems.
- Requires silicone sealant for outdoor installations to ensure a watertight seal.

Manual page author
Michael Turner
Technical manual editor
Reviews PDF manuals for structure, safety notes, and practical product details so readers can find the right information quickly.