Toys / RC Components
User Manual for Hobbywing QUICRUN 10BL60/10BL120 Sensored ESC
Comprehensive user guide for the Hobbywing QUICRUN 10BL60 and 10BL120 Sensored ESC. Includes detailed instructions for wiring, throttle range calibration, programming settings, troubleshooting, and technical specifications.
Table of contents
Quick Guide from the Manual
The Hobbywing QUICRUN 10BL60/10BL120 is a high-performance sensored/sensorless brushless ESC. Before first use, you must calibrate the throttle range to ensure proper operation. Always disable the ABS brake function on your transmitter and set throttle trim to 0, with D/R, EPA, and ATL at 100%.
Connections
Proper wiring is essential for performance and safety:
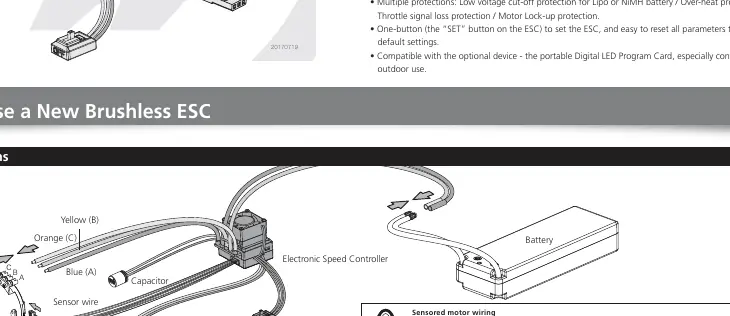
- Sensored Motor: Connect the ESC 'SENSOR' port to the motor 'SENSOR' port using the sensor wire. Connect wires #A, #B, and #C to the corresponding motor terminals. Do not swap these.
- Sensorless Motor: Wires #A, #B, and #C can be connected freely. If the motor runs in reverse, swap any two wire connections.
- Battery/Receiver: Ensure the battery polarity is correct. Plug the signal wire into the throttle channel (usually Channel 2) of the receiver.
Throttle Range Calibration
Calibration is required for new ESCs or if transmitter settings (Trim, D/R, EPA) are changed:
- Turn on the transmitter and set throttle parameters to 100% (or max) and trim to 0.
- Hold the SET button while switching the ESC to ON. Release the button when the Red LED starts to blink.
- Neutral Point: With the throttle stick at neutral, press the SET button. The Green LED flashes once and the motor beeps once.
- Full Forward: Move the throttle stick to the full forward position and press the SET button. The Green LED flashes twice and the motor beeps twice.
- Full Backward: Move the throttle stick to the full backward position and press the SET button. The Green LED flashes three times and the motor beeps three times.
- The motor can be started 3 seconds after calibration is finished.
Programming the ESC
You can program the ESC using the SET button on the unit:
- Turn off the ESC, turn on the transmitter.
- Hold the SET button for 3 seconds while switching the ESC ON.
- Release the SET button when the Red LED blinks.
- Press the SET button to cycle through items (Red LED flashes indicate the item number).
- Press and hold the SET button to enter the item, then press SET to select the value (Red LED flashes indicate the option number).
- Switch off the ESC to save settings.
Programmable Items
The ESC features several adjustable parameters:
- Running Mode: Choose between Forward/Brake, Forward/Reverse with Brake, or Forward/Reverse.
- Drag Brake Force: Simulates brushed motor braking when coasting.
- Low Voltage Cut-off: Prevents LiPo battery over-discharge.
- Punch (Start Mode): Adjusts acceleration from soft (Level 1) to aggressive (Level 9).
- Max Brake/Reverse Force: Adjusts the maximum power applied during braking or reversing.
- Timing: Fine-tunes motor output power and speed.
Troubleshooting
If you encounter issues, check the following:
- Motor doesn't start, emits beep-beep: Check battery voltage, switch, or connections.
- Red LED solid, motor doesn't work: Check throttle signal wire/channel.
- Car runs backwards: Swap two motor wires (sensorless) or check radio settings (sensored).
- Motor stutters under heavy acceleration: Check sensor wire, battery discharge rate, or gear ratio.
Specifications
The 10BL60 supports 60A continuous current, while the 10BL120 supports 120A. Both support sensored/sensorless brushless motors and feature built-in BEC (6V@2A for 10BL60, 6V@3A for 10BL120).
Manufacturer information
Hobbywing
Practical help
Common problems
Motor doesn't start, emits 'beep-beep' alert tone
Check battery voltage, ensure the switch is functional, and verify battery connections.
Red LED solid, motor doesn't work
Verify the throttle signal wire is plugged into the correct receiver channel (usually CH2).
Car runs backwards when accelerating forward
For sensorless motors, swap any two motor wires. For sensored motors, check transmitter radio settings.
Motor stutters under heavy acceleration
Check sensor wire connection, use a battery with better discharge ability, or increase the gear ratio.
Before use
- Calibrate throttle range before first use.
- Ensure battery voltage is within the normal range.
- Check sensor wire connection for sensored motors.
- Set transmitter throttle trim to 0.
- Set transmitter D/R, EPA, and ATL to 100%.
- Disable ABS brake function on the transmitter.
Specs in practice
- Running Mode
- Determines if the car can reverse (Forward/Brake vs Forward/Reverse/Brake).
- Drag Brake Force
- Simulates the slight braking effect of a brushed motor when coasting.
- Low Voltage Cut-off
- Prevents LiPo battery over-discharge by reducing or cutting power.
- Punch (Start Mode)
- Adjusts acceleration from soft (Level 1) to very aggressive (Level 9).
Images and diagrams
- Wiring Diagram: Shows connections for Battery, Receiver, Switch, and Motor (A, B, C phases).
- Throttle Calibration: Shows the 3-point setup (Neutral, Full Forward, Full Backward).
Model compatibility
- Compatible with sensored and sensorless brushless motors.
- 10BL60 supports 1/10th scale cars.
- 10BL120 supports 1/10th and 1/12th scale cars.

Manual page author
Michael Turner
Technical manual editor
Reviews PDF manuals for structure, safety notes, and practical product details so readers can find the right information quickly.