Electronics / Microphones
Hollyland LARK M1 Wireless Microphone System User Manual
Quick guide for the Hollyland LARK M1 wireless microphone system. Learn how to set up, pair, adjust volume, and understand indicator lights for your 2-person microphone setup.
Quick answers from the manual
Quick answer
- The Hollyland LARK M1 is a 2-person wireless microphone system. It pairs automatically out of the box. TX and RX units are charged via the included charging case. p. 5, 8
Key actions
- Pairing manually p. 8
- Adjusting volume p. 9
First start
- Remove TX/RX from the charging case to automatically turn on and pair. p. 5, 8
Problems and fixes
Device disconnected
Check if blue indicator light is flashing; re-pair if necessary.
p. 6Maintenance and reset
- Charge the TX, RX, and Charging Case via the Type-C port. p. 8
Technical specifications
| Parameter | Value | Meaning | Pages |
|---|---|---|---|
| Wireless Transmission | 2.4GHz Adaptive Frequency Hopping (AFH) | Frequency standard | p. 10 |
| Runtime | 8H | Battery life for TX and RX | p. 10 |
Where to find it in the PDF
- Product Introduction p. 4
- Indicator Lights Guide p. 6, 7
Table of contents
Manual images
Click an image to enlargeQuick Guide
The Hollyland LARK M1 is a 2-person wireless microphone system designed for ease of use. Out of the box, the Transmitter (TX) and Receiver (RX) units automatically power on and pair with each other when removed from the charging case. To use, simply clip the TX to a shirt collar and connect the RX to your recording device using the appropriate cable.
Product Overview
The system consists of two Transmitters, one Receiver, and a Charging Case.
Transmitter (TX)
- Status Indicator: Shows connection and battery status.
- Built-in Microphone: Captures audio.
- Power Button: Hold for 3 seconds to power on/off.
- Pair/HearClear Noise-Cancelling Button: Used for pairing and toggling noise cancellation.
- Mounting Clip: For attaching to clothing.
Receiver (RX)
- Pair/Volume Up/Down Buttons: Adjusts volume and pairing.
- Power Button: Hold for 3 seconds to power on/off.
- Interface Port: 3.5mm port for connecting to cameras or phones.
Installation and Connection
The system supports various devices using the included cables:

- Camera: Connect the RX to the camera using the 3.5mm TRS Patch Cable. Note: Set camera recording volume to the lowest level and RX output volume to the middle level for best results.
- Android Phones: Connect the RX to the phone using the 3.5mm TRS to USB Type-C Cable.
- iPhones: Connect the RX to the phone using the 3.5mm TRS to Lightning Cable.
- TRRS Compatible Devices: Connect using the 3.5mm TRS to TRRS Patch Cable.
Operating Instructions
Pairing
The devices pair automatically when removed from the charging case. To pair manually, hold the Pair/HearClear Noise-Cancelling Button on the TX for 3 seconds, then hold the Pair Button on the RX for 3 seconds.
Charging
Place the TX and RX units back into the charging case to initiate auto-charging. You can also charge the units individually via their Type-C ports.
Volume and Noise Cancellation
- Volume Gain: There are three levels (Low, Middle, High). Use the Pair/Volume Up/Down buttons on the RX to adjust. The default is Middle.
- Noise Cancellation: Press the Pair/HearClear Noise-Cancelling Button on the TX to turn the function on or off.
Indicator Lights Guide
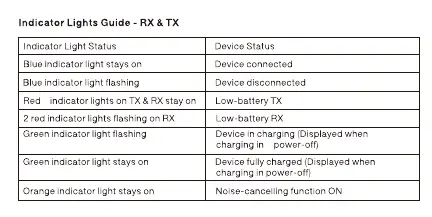
RX & TX Status
- Blue light stays on: Device connected.
- Blue light flashing: Device disconnected.
- Red light stays on (TX/RX): Low battery.
- Orange light stays on: Noise-cancelling function ON.
Charging Case
- Indicator lights inside breathing: TX/RX in charging.
- Indicator lights inside stay on: TX/RX fully charged.
- Indicator lights outside: Show charging case battery level (1 light = 25%, 4 lights = 100%).
Technical Specifications
- Wireless Transmission: 2.4GHz Adaptive Frequency Hopping (AFH).
- Transmission Range: 30M (free movement), 150M (LOS).
- Battery Runtime: 8 hours for TX and RX.
- Charging Time: 1.5 hours for TX, RX, and Charging Case.
Safety Precautions
Do not place the product near heating devices (e.g., microwave ovens, induction cookers, electric heaters) to prevent battery overheating or explosion. Never use non-original charging cases, cables, or batteries, as this may cause electric shock, fire, or explosion.
Practical help
Common problems
Blue indicator light flashing
The device is disconnected. Ensure the TX and RX are paired.
Red indicator light on TX/RX
The device has a low battery. Place it in the charging case.
Audio quality issues with camera
Set camera recording volume to the lowest level and RX output volume to the middle level.
Before use
- Ensure all cables (TRS, TRRS, USB-C, Lightning) are available for your specific device.
- Charge the TX, RX, and Charging Case fully before first use.
- Check that the TX is clipped securely to the user's clothing.
- Verify the connection cable matches the input device (Camera vs. Phone).
Specs in practice
- Wireless Transmission
- 2.4GHz Adaptive Frequency Hopping (AFH) for stable connection.
- Transmission Range
- Up to 30 meters with free movement, 150 meters line-of-sight.
- Battery Runtime
- 8 hours of continuous use for both TX and RX.
Images and diagrams
- TX features: Status indicator, built-in mic, power button, noise-cancelling button, mounting clip, charging contacts.
- RX features: Pair/Volume buttons, power button, interface port, mounting clip, charging contacts.
- Charging Case: Indicators inside for TX/RX status, indicators outside for case battery level.
Model compatibility
- Compatible with cameras using 3.5mm TRS cable.
- Compatible with Android phones using 3.5mm TRS to USB-C cable.
- Compatible with iPhones using 3.5mm TRS to Lightning cable.
- Compatible with TRRS devices using 3.5mm TRS to TRRS cable.

Manual page author
David Miller
Documentation analyst
Organizes user manual content into clear summaries, with attention to model details, product context, and everyday usability.