Electronics / Microphones
User Manual for Hollyland LARK 150 Wireless Microphone System
Quick guide for the Hollyland LARK 150 wireless microphone system. Learn how to pair, charge, switch recording modes, and understand the interface indicators.
Quick answers from the manual
Quick answer
- The Hollyland LARK 150 is a wireless microphone system. To pair, place the TX and RX in the charging case. To switch recording modes, long-press the left button on the receiver for 3 seconds. p. 2, 8, 9
Key actions
- Pairing devices p. 8
- Switching recording modes p. 8, 9
First start
- Power on p. 6
Problems and fixes
Pairing failed
Place devices in the charging case to re-pair.
p. 8Maintenance and reset
- Resetting devices p. 3, 4, 5
Technical specifications
| Parameter | Value | Meaning | Pages |
|---|---|---|---|
| Latency | 5ms | Transmission delay | p. 10 |
| Battery Life (TX) | 4.5h | Operating time | p. 10 |
Where to find it in the PDF
- Product Interfaces p. 3, 4, 5
- Parameters p. 10
Table of contents
Manual images
Click an image to enlargeQuick Guide
The Hollyland LARK 150 is a compact wireless microphone system. To begin, ensure the devices are charged in the provided charging case. Pairing occurs automatically when both the transmitter (TX) and receiver (RX) are placed in the case. You can switch between recording modes (Mono, Safety Track, Stereo) by long-pressing the left button on the receiver for 3 seconds.
Product Overview
The system consists of two transmitters, one receiver, and a charging case.

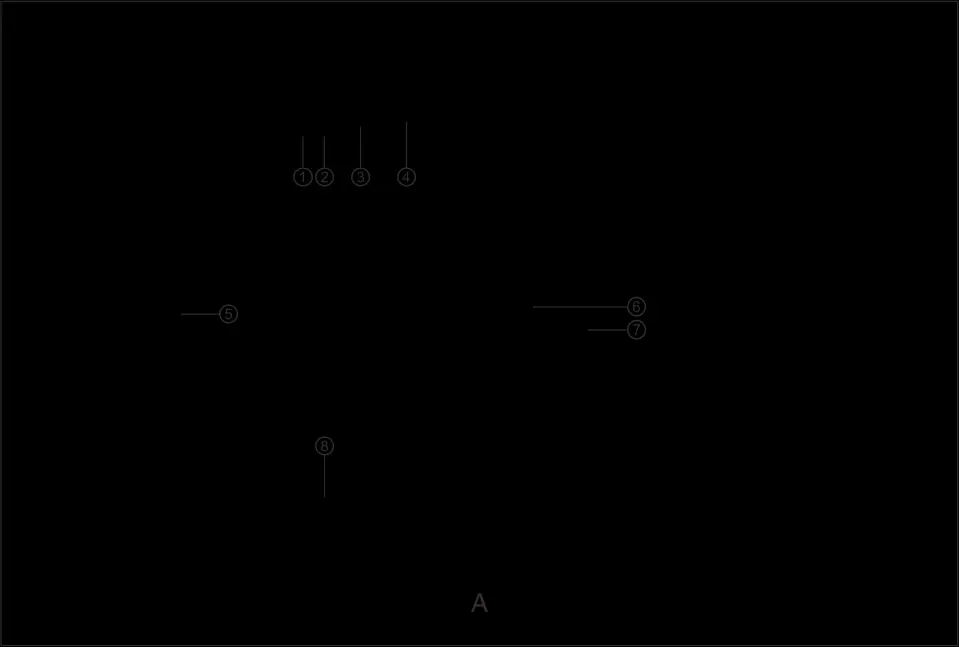


Transmitter (TX)
- Power/Mute Button: Press for 3s to power on/off; click to mute.
- Indicators: Power (Red/Green/Orange) and Link (Blue/Cyan).
- Inputs: Built-in microphone and 3.5mm audio input port.
Receiver (RX)
- Volume Knobs: Adjust volume for left/right channels; also function as mode/channel switches.
- Display Screen: Shows battery status, signal strength, and recording mode.
- Outputs: 3.5mm headphone monitoring port and 3.5mm audio output port.
Product Installation
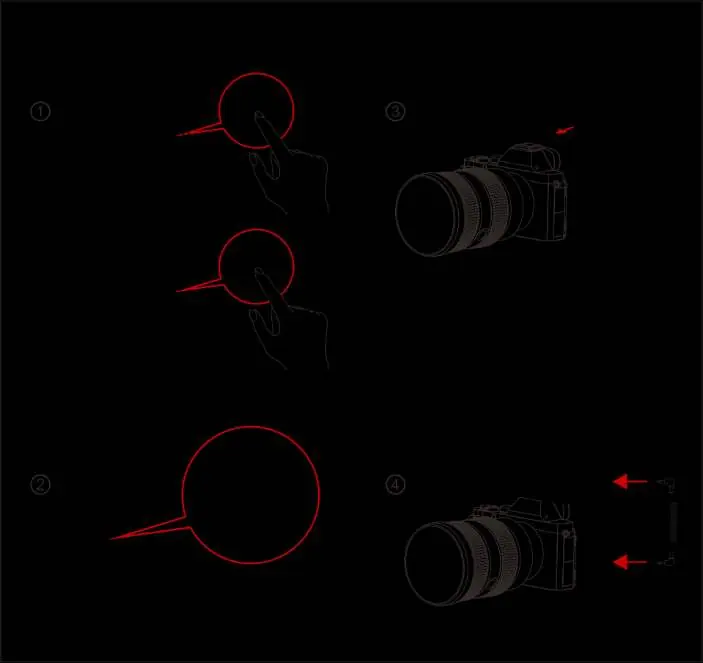
- Press the power button on the TX and RX for 3 seconds to switch them on.
- Attach the TX to the user (e.g., using the belt clip).
- Install the RX on the camera.
- Connect the RX 3.5mm audio output port to the camera's audio input port using the provided 3.5mm TRS cable.
Operating Instructions

Pairing
Place the TX and RX into the charging case simultaneously. The devices will pair automatically. A "√" symbol on the screen indicates successful pairing, while "X" indicates failure.
Charging
Place the TX and RX into the charging case. The indicator on the TX will turn orange when charging. When fully charged, the devices enter sleep mode. The charging case indicator turns red if the battery level is below 10%.
Recording Modes
- Mono Mode: Both left and right channels output the audio from the TX.
- Safety Track Mode (ST): Both channels output audio, but the right channel is 6dB lower than the left to ensure a safe backup volume.
- Stereo Mode: Left and right channels output audio from their respective TX units.
Technical Specifications
- Frequency Bandwidth: 2.4GHz AFH
- Transmission Latency: 5ms
- Battery Life: TX: 4.5h, RX: 7.5h
- Polar Pattern: Omnidirectional
- Maximum Input SPL: 100dB SPL (1KHz@1m)
Practical help
Common problems
Pairing failed
Place both TX and RX into the charging case at the same time to trigger automatic pairing.
Low battery indicator
If the power indicator or battery icon on the RX screen is red, place the devices in the charging case.
Interference
Reorient or relocate the receiving antenna, increase separation between equipment and receiver, or consult a technician.
Before use
- Charge the TX, RX, and charging case.
- Ensure TX and RX are paired (check for '√' on screen).
- Select the desired recording mode (Mono, ST, or Stereo).
- Connect the RX to the camera using the 3.5mm TRS cable.
- Check battery levels on the RX display.
Specs in practice
- Battery Life
- TX lasts 4.5 hours; RX lasts 7.5 hours on a full charge.
- Polar Pattern
- Omnidirectional, capturing sound from all directions.
Images and diagrams
- The charging case slots are labeled for TX and RX placement.
- The RX display shows battery status, signal strength, and input volume for both channels.
- The TX interface includes a power/mute button and link indicator.
Model compatibility
- Compatible with cameras via 3.5mm TRS cable.
- Firmware upgrades require a PC connection.

Manual page author
David Miller
Documentation analyst
Organizes user manual content into clear summaries, with attention to model details, product context, and everyday usability.