Garden / Seasonal Decorations
Home Accents Holiday 120in 440 Light LED Nativity Scene Assembly Guide
Quick assembly and setup guide for the Home Accents Holiday 120in 440 Light LED Nativity Scene. Includes step-by-step installation instructions, parts list, and safety guidelines.
Table of contents
Quick guide from the manual
This guide provides instructions for assembling the 120in 440 Light LED Nativity Scene. Assembly may require more than one person. Before starting, ensure all parts are present and undamaged. Do not attempt assembly if any parts are missing or damaged. Contact customer service at 1-877-527-0313 or return the item to the place of purchase.
Parts List
The set includes various components, including the Star, Stable sections, Support Bars, Base Stands, and figures (Mary, Joseph, Baby). Hardware includes Cotter Pins, Bolts & Wingnuts, Ground Stakes, Anchoring Strings, Plastic Ties, Spare Fuses, and Spare Bulbs. Refer to the diagram in the manual to identify each part by its letter code.
Assembly Instructions
- Support Bars and Base Stands: Stack and lock two segments of Support Bars (D2) together. Insert the ends with the L-shaped rod into the Base Stands (D3) and lock with Cotter Pins (T).
- Left & Right Columns of Stables: Connect the top and bottom columns (C) using the connection loop and secure with Bolt & Wingnuts (U). Insert the bottom rods into the Base Stands (D3), lock with Cotter Pins (T), and secure with Plastic Ties (X).
- Top of Stable: Attach the Top of Stable (B) to the columns. Ensure the front side is facing out. Secure the connection loops with Bolt & Wingnuts (U) and use Plastic Ties (X) to secure the metal frames.
- Top of Stable Stabilizing Bar and Star: Insert the Stabilizing Bar (D1) into the back of the Top of Stable (B). Insert the Star (A) into the front holes.
- Mary's Head, Hair and Arm to Body: Assemble the Support of Mary (D4) to the Head/Body (F) and Base Stand (D3), locking with Cotter Pins (T). Attach Mary's Hair (E) and Arm (G) to the body.
- Joseph's Head, Hair, Arm to Body, Oil Lamp and Candy Cane: Assemble Joseph's Head/Body (I) to the Lower Body (J) using Plastic Ties (X). Attach the Support of Joseph (D5) to the Head/Body and Base Stand (D3), locking with Cotter Pins (T). Attach Hair (H), Arms (L, M), and hang the Oil Lamp (N) and Cane (K).
- Baby and Bed: Assemble the Quilt & Head of Bed (Q, R) to the Body of Bed (S). Attach Baby's Hair (O) to the Head/Body (P). Secure the Support of Baby's Bed (D6) to the bed assembly with Cotter Pins (T).
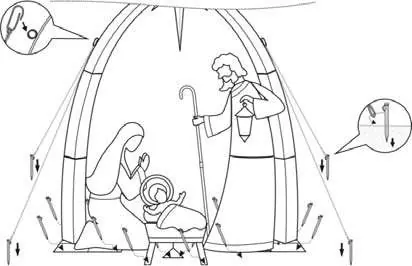
- Securing the Nativity Scene to the Ground: Hook the Anchoring Strings (W) to the Top of Stable (B) and secure to the ground using Ground Stakes (V). Secure the Stable, Mary, Baby, and Joseph to the ground using the remaining Ground Stakes (V).
Care and Cleaning
- Carefully remove the product from its location to avoid strain on connections and wires.
- If placed off the ground, ensure it is well-secured and stable.
- Wipe the unit with a damp cloth and allow it to dry completely before storing.
- Store in a cool, dry location protected from sunlight.
Safety Warnings
- Grasp the plug to insert or remove from the power source; do not pull on the cord.
- The lighting string is rated at 44.4 Watts (0.37 Amps). Do not overload.
- Do not connect to another lighting string, decorative outfit, or other electrical products.
- Inspect the product carefully before use or re-use. Discard or return if there are cuts, damage, frayed wire insulation, cracks in socket enclosures, loose connections, or exposed copper wire.
Warranty
The product is intended for residential seasonal use for 90 days per year. It is covered by a 90-day limited guarantee due to defects in material and workmanship. This warranty does not cover commercial use, normal wear and tear, unauthorized repairs, or damage caused by shipping, misuse, or accidents.
Manufacturer information
Home Accents Holiday
Practical help
Common problems
Missing or damaged parts
Do not attempt assembly. Contact customer service or return the item to the place of purchase with the receipt.
Damaged lighting string or frayed wires
Do not use the product. Discard or return it to the place of purchase.
Overloading the circuit
Do not connect to another lighting string, decorative outfit, or other electrical products.
Before use
- Inspect the lighting string for cuts, damage, or frayed insulation.
- Check socket enclosures for cracks.
- Ensure there are no loose connections or exposed copper wire.
- Verify all parts are present according to the parts list.
- Ensure the assembly area is a flat surface.
- Confirm you have assistance, as assembly may require more than one person.
Specs in practice
- Electrical Rating
- 44.4 Watts (0.37 Amps).
- Usage Duration
- Intended for residential seasonal use for 90 days per year.
Images and diagrams
- The manual provides detailed assembly diagrams for each step, illustrating the connection of rods, use of cotter pins, bolts, wingnuts, and plastic ties.
- Diagrams show the specific orientation of figures and stable components.
Model compatibility
- Intended for residential seasonal use only.
- Do not connect to other lighting strings or electrical products.

Manual page author
Michael Turner
Technical manual editor
Reviews PDF manuals for structure, safety notes, and practical product details so readers can find the right information quickly.