Garden / Seasonal Decorations
Assembly Instructions for Home Accents Holiday 2.5ft Yuletide Lane LED Husky
A complete assembly and care guide for the Home Accents Holiday 2.5ft Yuletide Lane LED Husky. Includes step-by-step installation instructions, parts list, safety precautions, and troubleshooting tips.
Quick answers from the manual
Quick answer
- This guide provides assembly instructions for the 2.5ft Yuletide Lane LED Husky. It covers parts identification, step-by-step assembly, safety precautions, and troubleshooting. p. 1, 2
Key actions
- Assemble the body, legs, head, and tail by inserting connecting rods into holes and securing with plastic ties. p. 2
- Secure the product to the ground using the provided ground stakes at each paw. p. 2
First start
- Inspect the product for damage before use. Ensure all cords are plugged in correctly. p. 1
Problems and fixes
Item does not light
Check for loose or broken bulbs, ensure all cords are connected, and check the fuse in the plug.
p. 1Maintenance and reset
- Wipe the unit with a damp cloth and allow to dry before storing in a cool, dry location. p. 1
Technical specifications
| Parameter | Value | Meaning | Pages |
|---|---|---|---|
| Power Rating | 4.8 Watts (0.04 Amps) | Maximum load for the lighting string. | p. 1 |
Where to find it in the PDF
- Assembly and Care Guide p. 1
- Assembly Steps p. 2
Table of contents
Important Information
This guide provides instructions for the assembly and maintenance of the 2.5ft Yuletide Lane LED Husky. Before beginning assembly, inspect all parts for damage. Do not attempt to assemble if parts are missing or damaged. The product is intended for residential seasonal use only (maximum 90 days per year). Do not overload the lighting string (rated at 4.8 Watts / 0.04 Amps) or connect it to other lighting strings.
Parts List
- A: Hat / Head (1)
- B: Half of Body (2)
- C: Tail (1)
- D: Leg (4)
- E: Collar (1)
- F: Spare Fuse (2)
- G: Spare Bulb (2)
- H: Plastic Tie (15)
- I: Ground Stake (4)
Assembly Instructions
It is recommended to assemble the product while laying flat on the ground or a table. Assembly may require more than one person.
1. Assembling the Body
Align the two Halves of Body (B) with each other. Insert the connecting rods on one half into the connecting holes on the other half and fasten at the connecting loops using Plastic Ties (H).
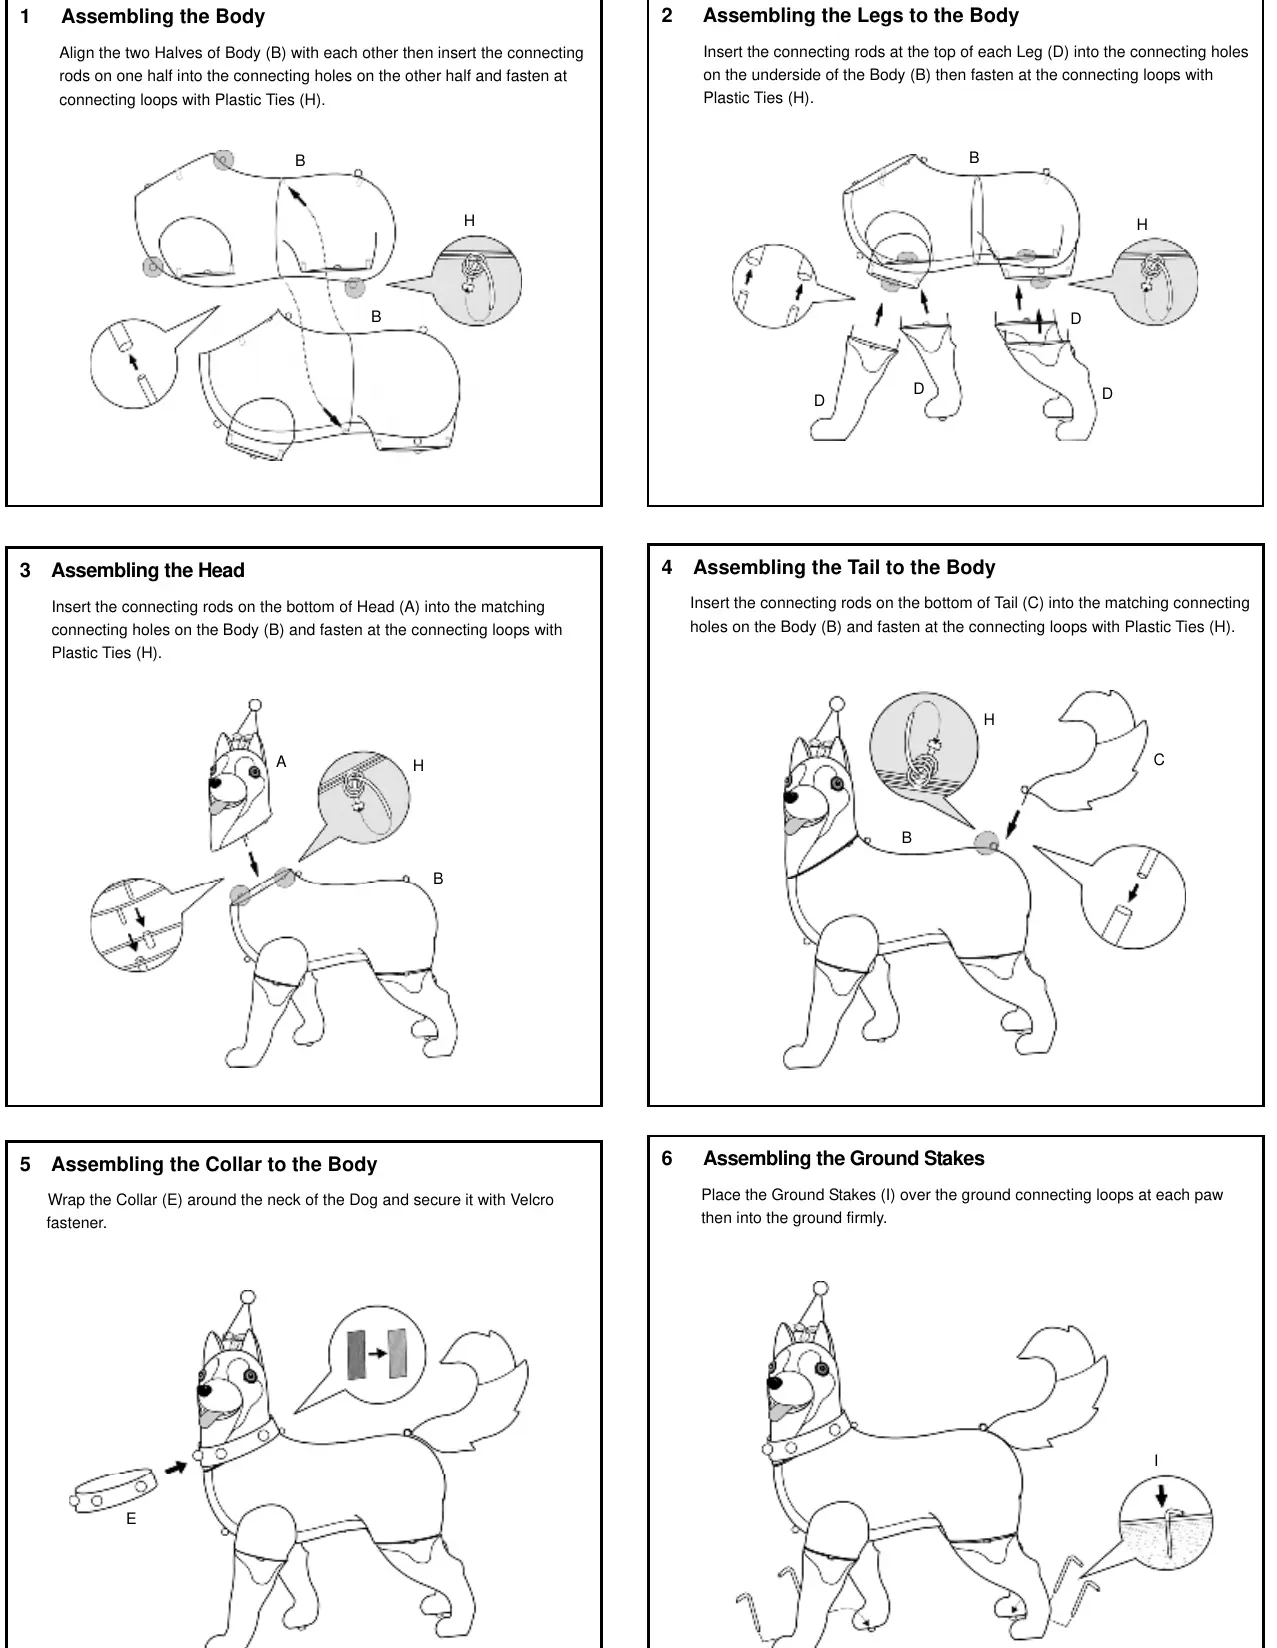
2. Assembling the Legs to the Body
Insert the connecting rods at the top of each Leg (D) into the connecting holes on the underside of the Body (B). Fasten securely at the connecting loops with Plastic Ties (H).
3. Assembling the Head
Insert the connecting rods on the bottom of Head (A) into the matching connecting holes on the Body (B) and fasten at the connecting loops with Plastic Ties (H).
4. Assembling the Tail to the Body
Insert the connecting rods on the bottom of Tail (C) into the matching connecting holes on the Body (B) and fasten at the connecting loops with Plastic Ties (H).
5. Assembling the Collar to the Body
Wrap the Collar (E) around the neck of the dog and secure it using the Velcro fastener.
6. Assembling the Ground Stakes
Place the Ground Stakes (I) over the ground connecting loops at each paw and push them firmly into the ground.
Care and Cleaning
- Carefully remove the product from its display location to avoid strain on connections and wires.
- If the product is placed somewhere other than the ground, ensure it is well-secured, flat, and stable.
- Disassemble the unit carefully, taking caution not to cut any electrical wires.
- Wipe the unit with a damp cloth and allow it to dry completely before storing.
- Store the product in a cool, dry location protected from sunlight.
Troubleshooting
- Item does not light: Check for loose or broken bulbs, ensure all cords are plugged in correctly, and check for a broken or burned-out fuse in the plug.
- General issues: Ensure the floor or surface is flat and level, and verify that all parts are assembled properly according to the manual.
- Electrical: Do not plug into other electrical items. If the item has multiple light string cords, ensure all are plugged in.
Manufacturer information
Home Accents Holiday
Practical help
Common problems
Item does not light
Check for loose or broken bulbs, ensure all cords are plugged in, and check the fuse in the plug.
Parts missing or damaged
Do not attempt assembly; contact customer service or return to the place of purchase.
Before use
- Inspect the product for cuts, frayed wire insulation, or cracks in socket enclosures.
- Ensure the surface is flat and level.
- Identify all parts against the parts list.
- Do not pull on the cord to unplug.
Specs in practice
- Power Rating
- 4.8 Watts (0.04 Amps). Do not overload.
Images and diagrams
- Diagrams illustrate the connection points for the body, legs, head, tail, and collar using plastic ties.
Model compatibility
- For residential seasonal use only.
- Do not connect to other lighting strings or decorative outfits.

Manual page author
Emily Carter
User documentation editor
Prepares concise manual descriptions and highlights the most useful setup, operation, and maintenance information for readers.