Garden / Seasonal Decorations
User Manual for anko 2.13M Flocked Pine Pre Lit Christmas Tree
Quick guide for the anko 2.13M Flocked Pine Pre Lit Christmas Tree. Includes assembly instructions, branch shaping tips, safety warnings, and storage guidelines for your pre-lit tree.
Quick answers from the manual
Quick answer
- This manual provides assembly, safety, and storage instructions for the anko 2.13M Flocked Pine Pre Lit Christmas Tree. p. 1, 2
Key actions
- Assemble the tree by inserting the bottom section into the stand, followed by the middle and top sections. p. 2
- Connect the light set to the adaptor and plug into a power outlet. p. 2
First start
- Unfold the metal stand, assemble the tree sections, shape the branches, and connect the light set to the power supply. p. 2
Problems and fixes
Difficulty separating tree poles
Apply lubricant at the joint and rotate the upper pole in both directions.
p. 2Maintenance and reset
- Disassemble by reversing the assembly steps, do not detach factory pre-plugged lights, and store in a dry place. p. 2
Technical specifications
| Parameter | Value | Meaning | Pages |
|---|---|---|---|
| Adaptor Model | JT-DC31V3.6W-H5 | Required adaptor for LED modules | p. 3 |
Where to find it in the PDF
- Assembly and Storage p. 2
- Safety Instructions p. 3
- Adaptor Warning p. 4
Table of contents
Manual images
Click an image to enlargeQuick guide from the manual
This document provides essential instructions for the assembly, safe operation, and storage of the anko 2.13M Flocked Pine Pre Lit Christmas Tree. The tree is designed for indoor use only. Ensure the adaptor is kept away from weather and direct heat sources. The light set uses non-replaceable bulbs and must be operated only with the supplied adaptor (Model No. JT-DC31V3.6W-H5).
Assembly instructions
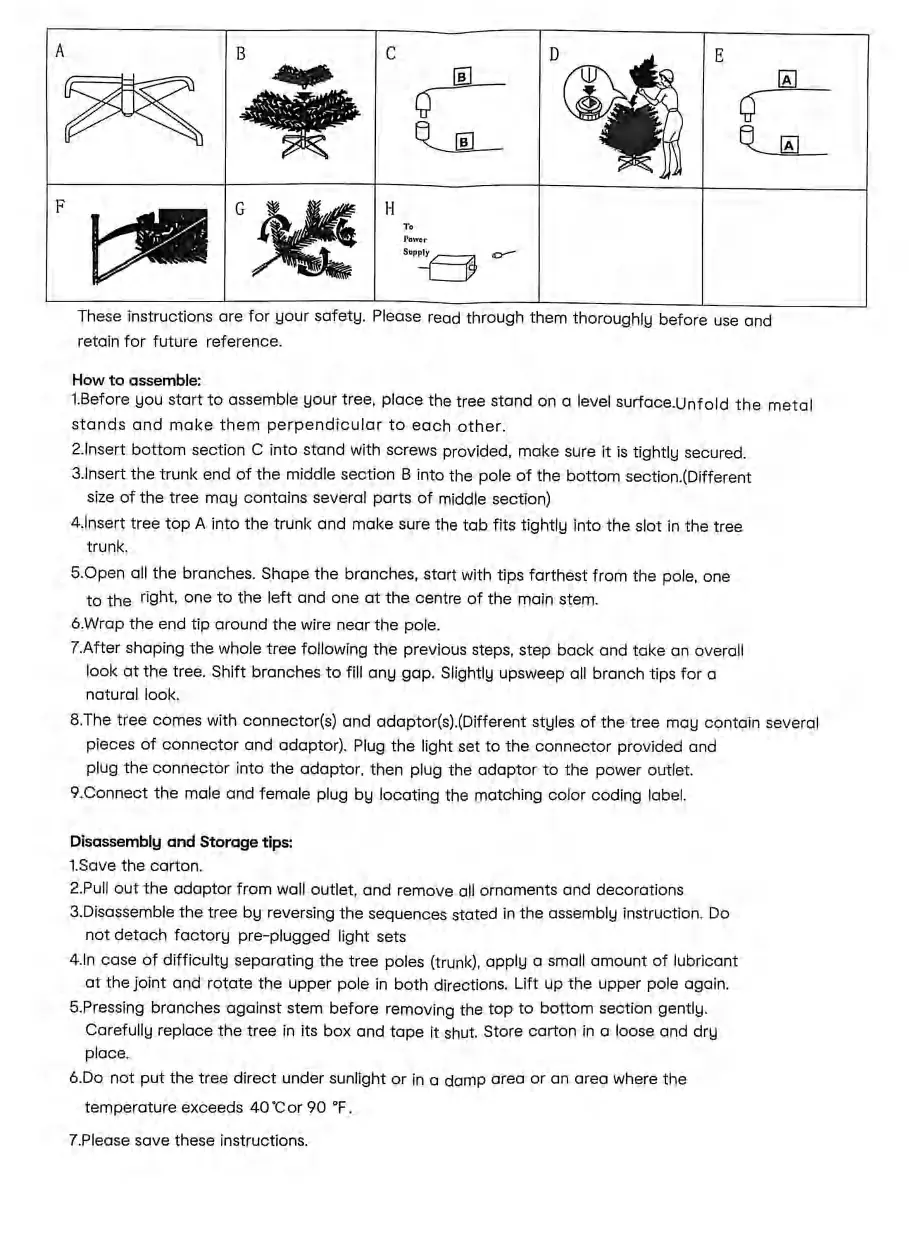
- Prepare the stand: Place the tree stand on a level surface and unfold the metal legs until they are perpendicular to each other.
- Install the base: Insert the bottom section (C) into the stand and secure it tightly with the provided screws.
- Assemble the trunk: Insert the middle section (B) into the pole of the bottom section. Then, insert the tree top (A) into the trunk, ensuring the tab fits tightly into the slot.
- Shape the branches: Start with the tips farthest from the pole. Shape one tip to the right, one to the left, and one at the center of the main stem. Wrap the end tip around the wire near the pole.
- Final adjustments: Step back to check the overall look. Shift branches to fill any gaps and slightly upsweep all branch tips for a natural appearance.
- Connect lights: Plug the light set into the provided connector and adaptor, then connect the adaptor to the power outlet. Match the male and female plugs using the color-coding labels.
Disassembly and storage
- Preparation: Unplug the adaptor from the wall outlet and remove all ornaments and decorations.
- Disassembly: Reverse the assembly sequence. Do not detach the factory pre-plugged light sets.
- Storage: If the poles are difficult to separate, apply a small amount of lubricant at the joint and rotate the upper pole in both directions. Press branches against the stem before removing the top section. Store the tree in its carton in a loose, dry place.
- Temperature limit: Do not store in areas where the temperature exceeds 40°C (90°F).
Safety warnings
- Indoor use only: The adaptor must be installed indoors away from weather.
- Heat sources: Do not position the tree near heaters or other direct sources of heat.
- Electrical safety: Do not overload power sockets or extension leads. Do not pierce the cable when bending or standing on the tree.
- Children and pets: Position cables so they do not pose a hazard. Keep the product out of reach of children.
- Interconnection: Do not interconnect parts of this lighting chain with other manufacturers' lighting chains.
Manufacturer information
Anko
Practical help
Common problems
Difficulty separating tree poles during disassembly
Apply a small amount of lubricant at the joint and rotate the upper pole in both directions before lifting.
Lights not functioning
Ensure the adaptor is plugged into a power outlet and that the male and female plugs are connected by matching the color-coding labels.
Before use
- Ensure the tree stand is placed on a level surface.
- Verify that the tree is not placed near heaters or direct heat sources.
- Check that the power cable is positioned to avoid hazards to children or pets.
- Ensure the adaptor is suitable for indoor use.
- Confirm that the tree is not covered by other items like curtains or bedding.
Specs in practice
- Adaptor Model
- JT-DC31V3.6W-H5 (Required for LED modules)
- System Wattage
- 3.6W total when all 3 sections are connected.
Images and diagrams
- The assembly diagram illustrates the sequence of inserting the stand, lower body, middle body, and top section.
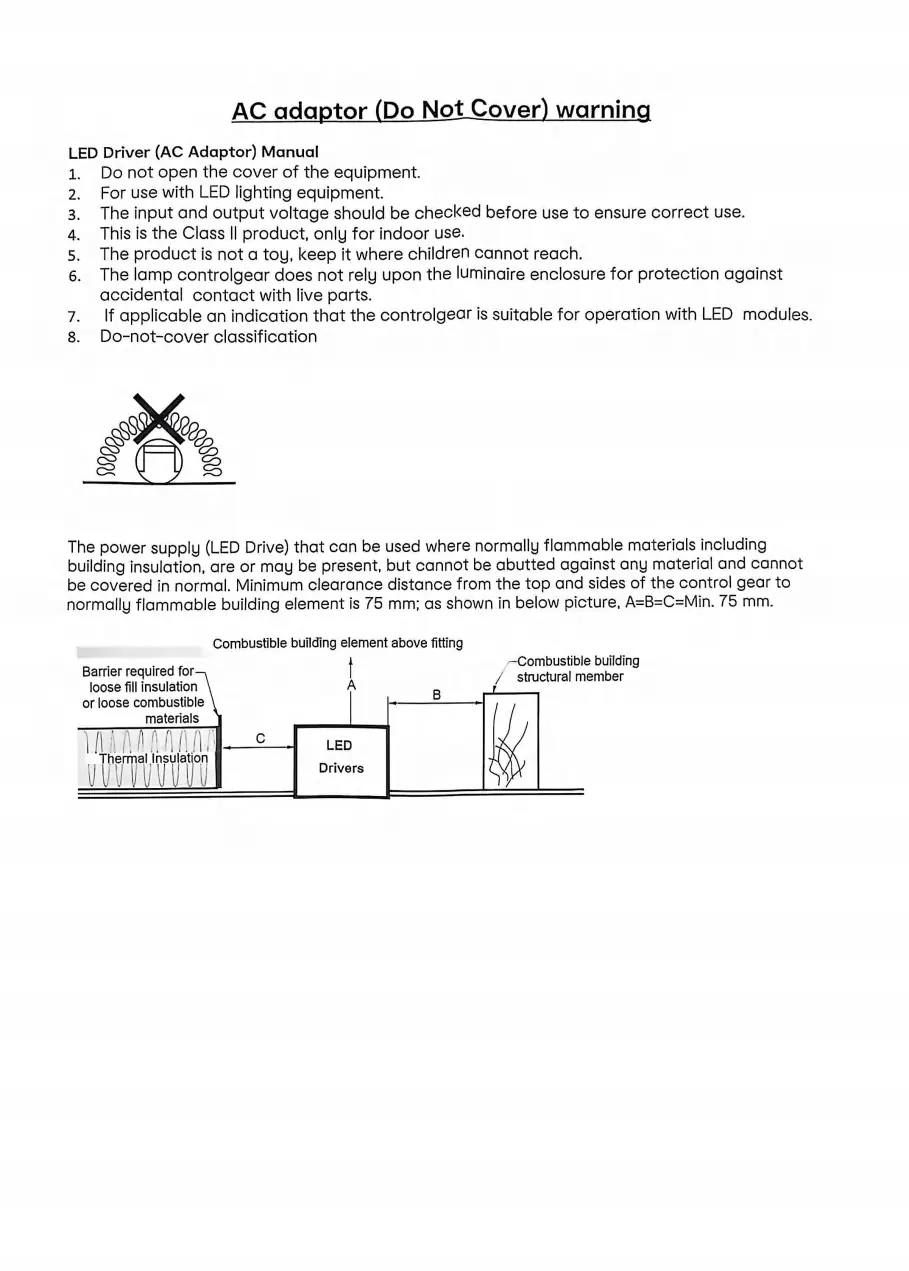
- The adaptor diagram shows the required 75mm clearance from combustible materials and building insulation.
Model compatibility
- Suitable for indoor use only.
- Do not interconnect with lighting chains from other manufacturers.
- Only use the supplied adaptor.

Manual page author
David Miller
Documentation analyst
Organizes user manual content into clear summaries, with attention to model details, product context, and everyday usability.