Furniture / TV Stands
User Manual for Home Decorators Collection 1557FM-33-242 Electric Fireplace TV Stand
Quick guide for the Home Decorators Collection 1557FM-33-242 electric fireplace TV stand. Includes assembly instructions, operating procedures, remote control setup, and troubleshooting steps.
Table of contents
Manual images
Click an image to enlargeQuick guide from the manual
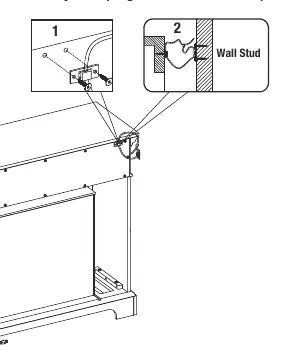
This manual provides instructions for the assembly, operation, and maintenance of the Home Decorators Collection 1557FM-33-242 electric fireplace TV stand. Before beginning, ensure all parts are present and you have a Phillips screwdriver. The unit requires a 120V, 15A grounded circuit. Important: Always install the included tip restraint hardware to prevent the unit from tipping over, which could cause serious injury or death.
Assembly
The assembly process takes approximately 50 minutes. Follow these key steps:
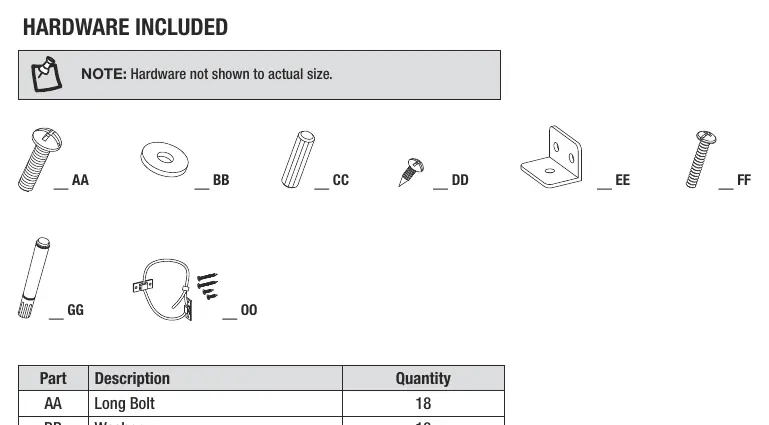

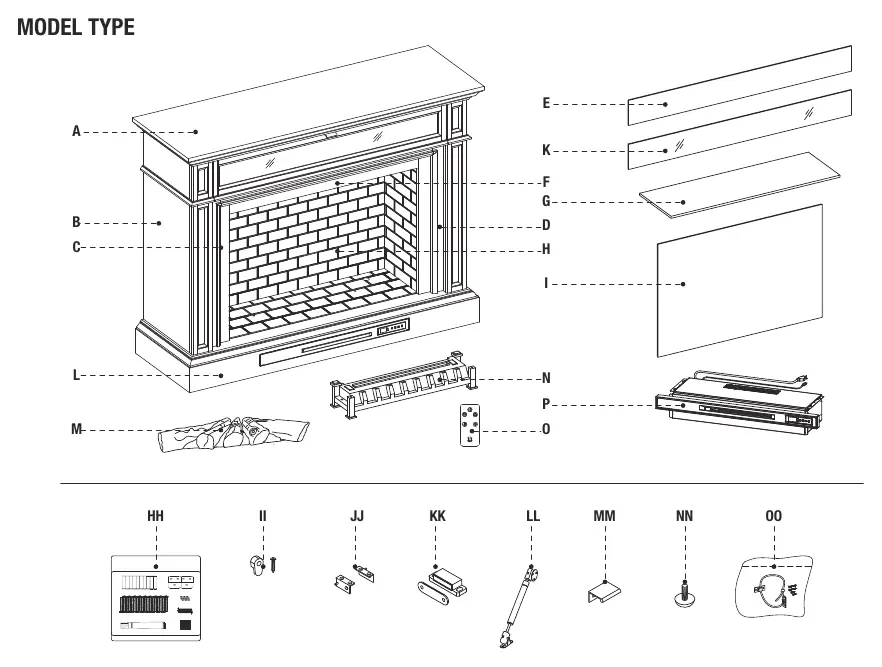
- Panel Assembly: Attach the front panels (C, D) to the outer walls (B) using washers (BB) and long bolts (AA).
- Base Attachment: Secure the side assemblies to the base (J) using wooden dowels (CC), washers (BB), and long bolts (AA).
- Center Panel: Install the center panel (F) between the front panels.
- Top Installation: Attach the top (A) to the outer walls (B).
- Fireplace Components: Install the glass front (I), fireplace grate (N), and fire log (M). Ensure the USB cable from the heater is connected to the port behind the fireplace grate.
- Final Steps: Install the L-brackets (EE) and heater top panel (G). Adjust the levelers on the base to ensure the unit is stable.
Operating Instructions
The fireplace can be controlled via the control panel on the unit or the included remote control. To use the remote, remove the plastic tab from the battery compartment.
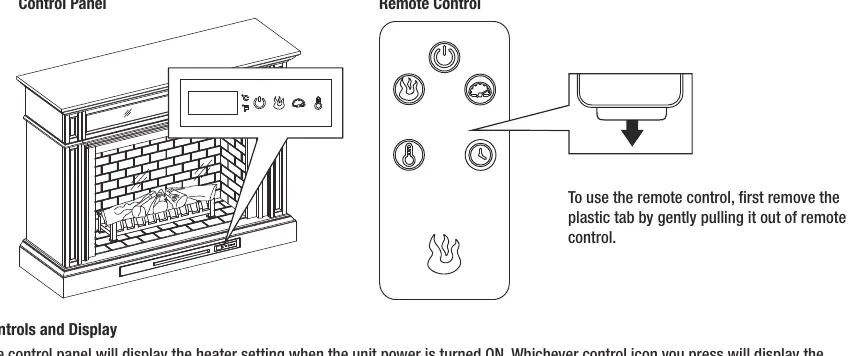
- Power: Press the POWER icon to turn the unit on or off. The unit has a 40-second cool-down cycle when powered off.
- Flame Settings: Use the FLAME BRIGHTNESS and FLAME SPEED icons to adjust the visual effects.
- Heater: Use the HEATER icon to cycle through heat settings. The thermostat range is 65°F (18°C) to 90°F (43°C).
- Timer: Use the TIMER icon on the remote to set a countdown for automatic shutdown (30 minutes to 9 hours).
- Heater Override: To prevent accidental activation, you can disengage the heater by turning the power off, then pressing and holding the POWER icon for 20 seconds until "E3" is displayed.
Care and Maintenance
Always ensure the unit is unplugged and cool before cleaning. Clean metal trim with a water-dampened soft cloth; do not use brass polish. Periodically vacuum the air intake/output vents. If the remote control stops working, replace the CR2025 battery.
Troubleshooting
If you encounter issues, check the following:
- Error E1/E2: The overheat or thermostat sensor has been engaged. Unplug the unit for 15-20 minutes to reset.
- Error E3: Heater override is engaged. See the Heater Override section to re-engage.
- No Power: Ensure the unit is plugged into a 120V outlet and powered on.
- No Flame Effect: Check that the flame effect is not set to OFF and the USB cable is connected to the fireplace grate.
Manufacturer information
Home Decorators Collection
Practical help
Common problems
Error E1 or E2 displayed
The overheat or thermostat sensor is engaged. Unplug the unit for 15-20 minutes to allow the sensor to reset.
Error E3 displayed
The heater override function is active. Follow the instructions in the manual to disengage the override.
Remote control not working
Replace the CR2025 battery or ensure you are within 20 feet of the unit.
No flame effect
Ensure the flame effect is not set to OFF and the USB cable is securely connected to the port behind the fireplace grate.
Before use
- Verify all parts are present using the package contents list.
- Ensure you have a Phillips screwdriver.
- Check that the outlet is a grounded 120V, 15A circuit.
- Install the tip restraint hardware to prevent tipping.
- Remove the plastic tab from the remote control battery compartment.
Specs in practice
- Electrical Requirement
- 120V, 60Hz, 15A circuit required.
- Max Load (Top)
- 80 lbs (36.36 kg) maximum for TV.
- Max Load (Shelf)
- 50 lbs (22.7 kg) maximum.
- Thermostat Range
- 65°F (18°C) to 90°F (43°C).
Images and diagrams
- Assembly steps show panel alignment and bolt placement.
- Wiring diagram/USB connection shows how to connect the heater to the grate.
- Control panel layout identifies power, flame, and heater icons.
Model compatibility
- Fits most plasma and LCD TVs up to 56 inches.
- Not for use in bathrooms, laundry areas, or outdoors.

Manual page author
Emily Carter
User documentation editor
Prepares concise manual descriptions and highlights the most useful setup, operation, and maintenance information for readers.