Furniture / Bathroom Furniture
Assembly Instructions for Home Decorators Collection Gillinger 24 in. Wall Cabinet
Quick assembly guide for the Home Decorators Collection Gillinger 24 in. Wall Cabinet. Includes installation steps, hardware list, safety warnings, and maintenance tips.
Quick answers from the manual
Quick answer
- This document provides assembly instructions for the Gillinger 24 in. Wall Cabinet. It covers wall bracket installation, cabinet mounting, shelf placement, and handle customization. p. 1, 6, 7, 8
Key actions
- Install wall bracket p. 6
- Mount cabinet p. 7
First start
- Ensure all parts are present and verify tools required before starting assembly. p. 4
Problems and fixes
Missing parts
Contact The Home Depot customer service.
p. 2, 11Maintenance and reset
- Dust regularly with a soft, non-lint cloth. Clean with a gentle, non-abrasive household cleaner. Dry immediately. p. 9
Technical specifications
| Parameter | Value | Meaning | Pages |
|---|---|---|---|
| Assembly Time | 20 minutes | Estimated time to assemble | p. 4 |
Where to find it in the PDF
- Assembly Instructions p. 1
- Safety Information p. 2
- Installation p. 6, 7, 8
- Care and Maintenance p. 9
Table of contents
Manual images
Click an image to enlargeQuick guide from the manual
This document provides assembly instructions for the Gillinger 24 in. Wall Cabinet. The estimated assembly time is 20 minutes. Before starting, ensure all parts are present and verify that you have the necessary tools. The cabinet must be mounted to wall studs for safety.
Safety Information
- Danger: Keep small parts away from children during assembly.
- Warning: Adult assembly is required. Use only on a flat, level surface. Do not over-tighten connectors to avoid product damage. Do not stand, step, or climb on the unit.
- Caution: Check all packing materials for small parts that may have come loose. Do not use abrasive cleansers on the surface.
Pre-Installation
Before beginning, compare parts with the package contents list. If any part is missing or damaged, do not attempt to assemble the product.
Tools Required
- Phillips screwdriver
- Utility knife
- Power drill with drill bit
- Measuring tape
- Level
Hardware Included
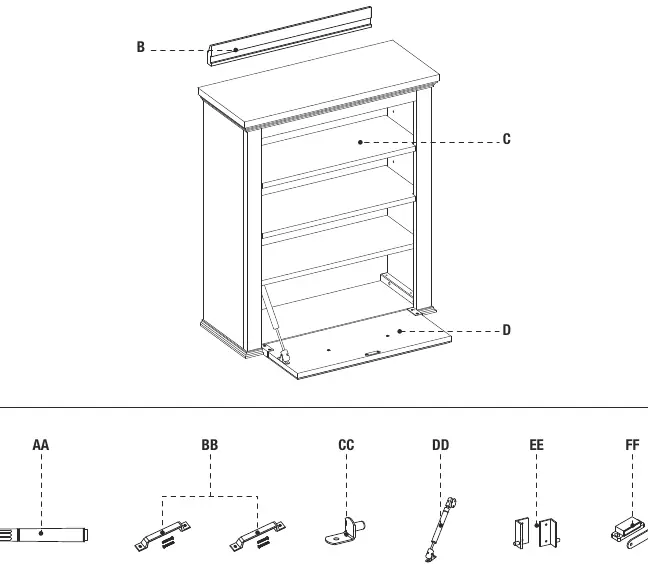
- Touch Up Pen (AA)
- Handle (Options) (BB)
- Shelf Pin (CC)
Installation
1. Installing wall bracket
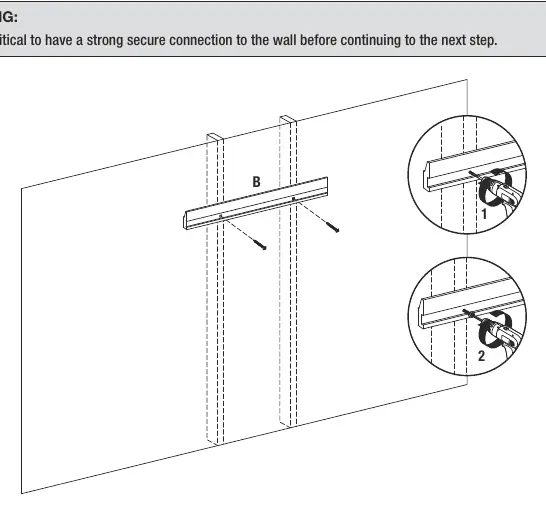
Locate and mark wall stud locations where the cabinet will be placed. Center the wall bracket (B) at the desired level and secure it to the wall, preferably into 2 wall studs, using appropriate hardware (not included) such as cabinet screws or toggle bolts. Ensure the bracket is level.
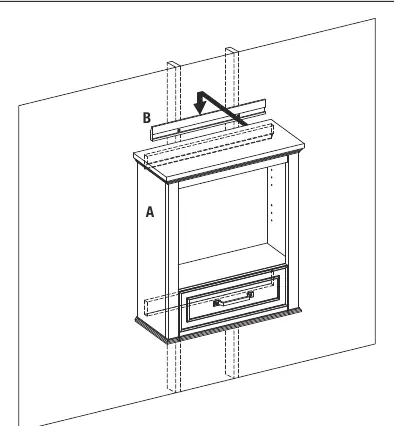
2. Installing cabinet
With the help of another adult, carefully lower the cabinet (A) down onto the wall bracket (B). Ensure the cabinet is secure to the wall before letting go.
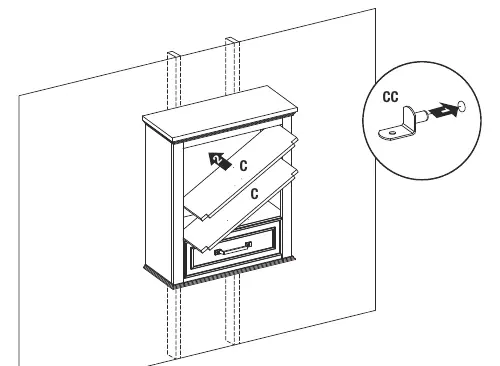
3. Installing the shelf
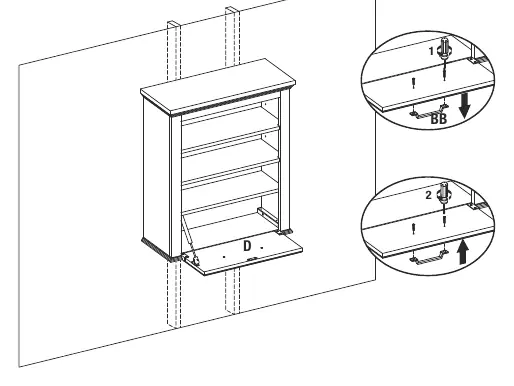
Insert shelf pins (CC) at the desired height, ensuring they are level. Place the shelf (C) on top of the shelf pins.
4. Change the handle (optional)
The cabinet comes with two handle options. If you wish to switch, remove the existing handle and attach the other finish provided in the box.
Care and Maintenance
- Dust the cabinet regularly with a soft, non-lint producing cloth.
- Clean with a gentle, non-abrasive household cleaner.
- Dry the wood immediately with a soft cloth or towel.
- For scratches, use the included touch-up pen (AA), stroking in the direction of the scratch and rubbing off excess colorant promptly.
Service Parts
If parts are missing or damaged, contact Home Decorators Collection Customer Service at 1-800-998-7021. Replacement parts include the wall bracket, shelves, flip-down door, touch-up pen, handles, shelf pins, piston, hinges, and door catch.
Manufacturer information
Home Decorators Collection
Practical help
Common problems
Missing parts
Contact The Home Depot customer service at 1-800-998-7021 to obtain missing parts.
Scratches on surface
Use the included touch-up pen (AA), stroking in the direction of the scratch and wiping off excess colorant.
Before use
- Check all packing materials for small parts.
- Verify all parts listed in the package contents are present.
- Ensure you have a Phillips screwdriver, utility knife, power drill, measuring tape, and level.
- Ensure the wall is flat and level.
- Locate wall studs for secure mounting.
Specs in practice
- Assembly Time
- Estimated 20 minutes
Images and diagrams
- The wall bracket must be secured to wall studs.
- The cabinet hooks onto the wall bracket.
- Shelf pins support the adjustable shelves.
Model compatibility
- Designed for wall mounting.
- Requires wall studs for secure installation.

Manual page author
Emily Carter
User documentation editor
Prepares concise manual descriptions and highlights the most useful setup, operation, and maintenance information for readers.