Lighting / Fixtures
User Manual for Home Decorators Collection 2-Light Pendant
A comprehensive installation and care guide for the Home Decorators Collection 2-Light Pendant (HDY19558P). Includes step-by-step assembly, wiring instructions, bulb requirements, and troubleshooting tips.
Quick answers from the manual
Quick answer
- This manual provides installation and maintenance instructions for the Home Decorators Collection 2-Light Pendant (HDY19558P). It covers safety precautions, step-by-step installation, wiring, and troubleshooting. p. 1, 5, 7
Key actions
- Install the crossbar assembly to the outlet box. p. 5
- Connect electrical wires using wire connectors. p. 7
First start
- Install two 60W maximum medium base (E26) type 'A' or 9W maximum LED bulbs. p. 3, 8
Problems and fixes
The light(s) will not turn on.
Replace the light bulb, ensure power is on, test/replace switch, or check wiring.
p. 9Maintenance and reset
- Clean with a dry, soft cloth. Disconnect power before cleaning. p. 9
Technical specifications
| Parameter | Value | Meaning | Pages |
|---|---|---|---|
| Bulb Base | E26 | Medium base | p. 3 |
| Max Wattage | 60W | Maximum wattage per bulb | p. 3 |
Where to find it in the PDF
- Installation p. 5, 6, 7, 8
- Troubleshooting p. 9
Table of contents
Manual images
Click an image to enlargeQuick Guide from the Manual
This document provides instructions for the installation and maintenance of the Home Decorators Collection 2-Light Pendant. Before beginning, ensure you have all necessary tools and that the power is disconnected at the circuit breaker. This fixture requires two 60W maximum medium base (E26) type "A" bulbs or 9W maximum medium base (E26) self-ballasted LED bulbs.
Pre-Installation
Before starting, inspect the wire insulation for any cuts, abrasions, or exposed copper. Do not attempt installation if defects are found. Place the fixture on a soft, non-abrasive surface to prevent damage.
Tools Required
- Screwdrivers
- Pliers
- Wire Stripper
- Ladder
- Safety Goggles
- Electrical Tape
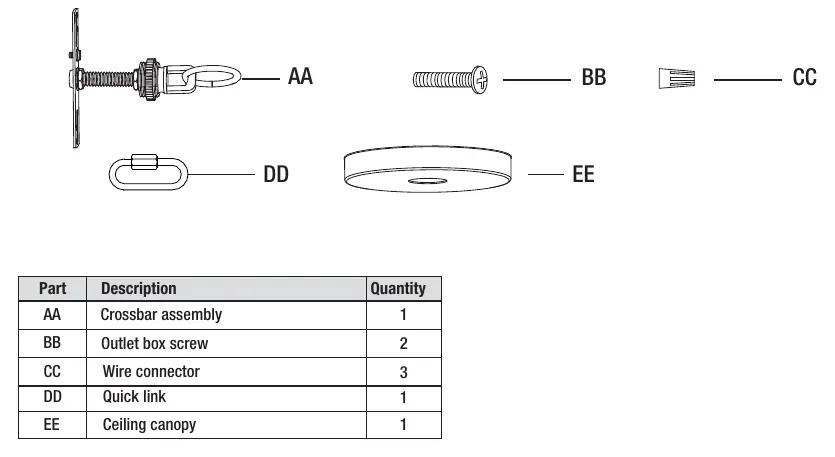
Hardware Included
- Crossbar assembly (AA)
- Outlet box screws (BB)
- Wire connectors (CC)
- Quick link (DD)
- Ceiling canopy (EE)
Installation
- Installing the crossbar assembly: Secure the crossbar assembly (AA) to the outlet box using the outlet box screws (BB). Ensure the threaded tube protrudes outward.
- Testing the ceiling canopy fit: Temporarily attach the ceiling canopy (EE) to the crossbar assembly to ensure a snug fit against the ceiling. Adjust the threaded tube length if necessary.
- Installing the rods and fixture loop: Assemble the rods (B/C) to the desired length. Pass the supply and ground wires through the rod assembly. Attach the rod assembly to the fixture body (D) and thread the fixture loop (A) to the top.
- Assembling the fixture body to the outlet box: Connect the fixture loop (A) to the fixture chain on the crossbar assembly using the quick link (DD).
- Pulling the supply wires: Push the supply and ground wires through the canopy chain loop and into the outlet box.
- Trimming the excess fixture wire: Trim the wire, leaving at least 6 inches hanging out of the outlet box. Strip 1/2 inch of insulation from the ends.
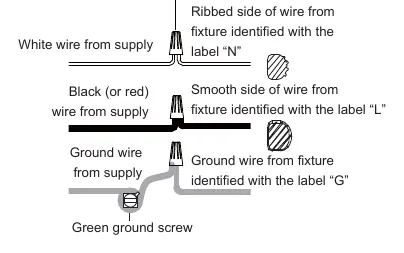
- Making the electrical connections: Connect the ground wire to the green ground screw and the fixture ground wire using a wire connector. Connect the house white wire to the ribbed fixture wire (N) and the house black/red wire to the smooth fixture wire (L) using wire connectors. Secure with electrical tape.
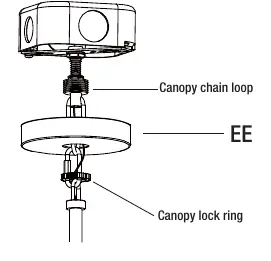
- Installing the ceiling canopy: Attach the ceiling canopy (EE) back over the canopy chain loop and secure it with the canopy lock ring.
- Installing the light bulbs: Install the correct bulbs (not included) referring to fixture markings for maximum wattage.
Care and Cleaning
Do not use cleaners with chemicals, solvents, or harsh abrasives. Use only a dry, soft cloth to dust or wipe the fixture carefully. To clean, always disconnect power by turning off the circuit breaker or removing the fuse.
Troubleshooting
If the light will not turn on, check if the bulb is burned out, ensure the power supply is on, test the switch, or check the wiring connections. If the fuse blows or the circuit breaker trips, discontinue use and check for crossed wires or grounding issues.
Manufacturer information
Home Decorators Collection
Practical help
Common problems
The light(s) will not turn on.
Replace the light bulb, ensure the power supply is turned on, test or replace the switch, or check the wiring connections.
The fuse blows or the circuit breaker trips when the light is turned on.
Discontinue use of the light, check the wire connections, or contact a qualified electrician.
Before use
- Inspect wire insulation for cuts, abrasions, or exposed copper.
- Ensure power is turned off at the circuit breaker or fuse box.
- Verify you have the required tools: screwdrivers, pliers, wire stripper, ladder, safety goggles, and electrical tape.
- Purchase two 60W max medium base (E26) type 'A' or 9W max LED bulbs.
- Place the fixture on a soft, non-abrasive surface during assembly.
Images and diagrams
- Wiring diagram illustrates connecting house white wire to ribbed fixture wire (N) and house black/red wire to smooth fixture wire (L).
- Rod assembly diagram shows the sequence of passing wires through the rods before attaching to the fixture body.
Model compatibility
- Requires two bulbs (not included).
- Compatible with standard E26 medium base bulbs.

Manual page author
Michael Turner
Technical manual editor
Reviews PDF manuals for structure, safety notes, and practical product details so readers can find the right information quickly.