Garden / Gazebos & Canopies
User Manual for UV Air Sanitizer
Quick guide for the UV Air Sanitizer. Learn how to clean and replace the filter, replace the UVC lamp, and troubleshoot common issues like reduced airflow or unit operation problems.
Table of contents
Quick Guide for UV Air Sanitizer
This guide provides essential maintenance and troubleshooting steps for your UV Air Sanitizer. Always disconnect the power before performing any service or cleaning to prevent electric shock or injury. Never operate the unit without a filter or with a damaged filter.
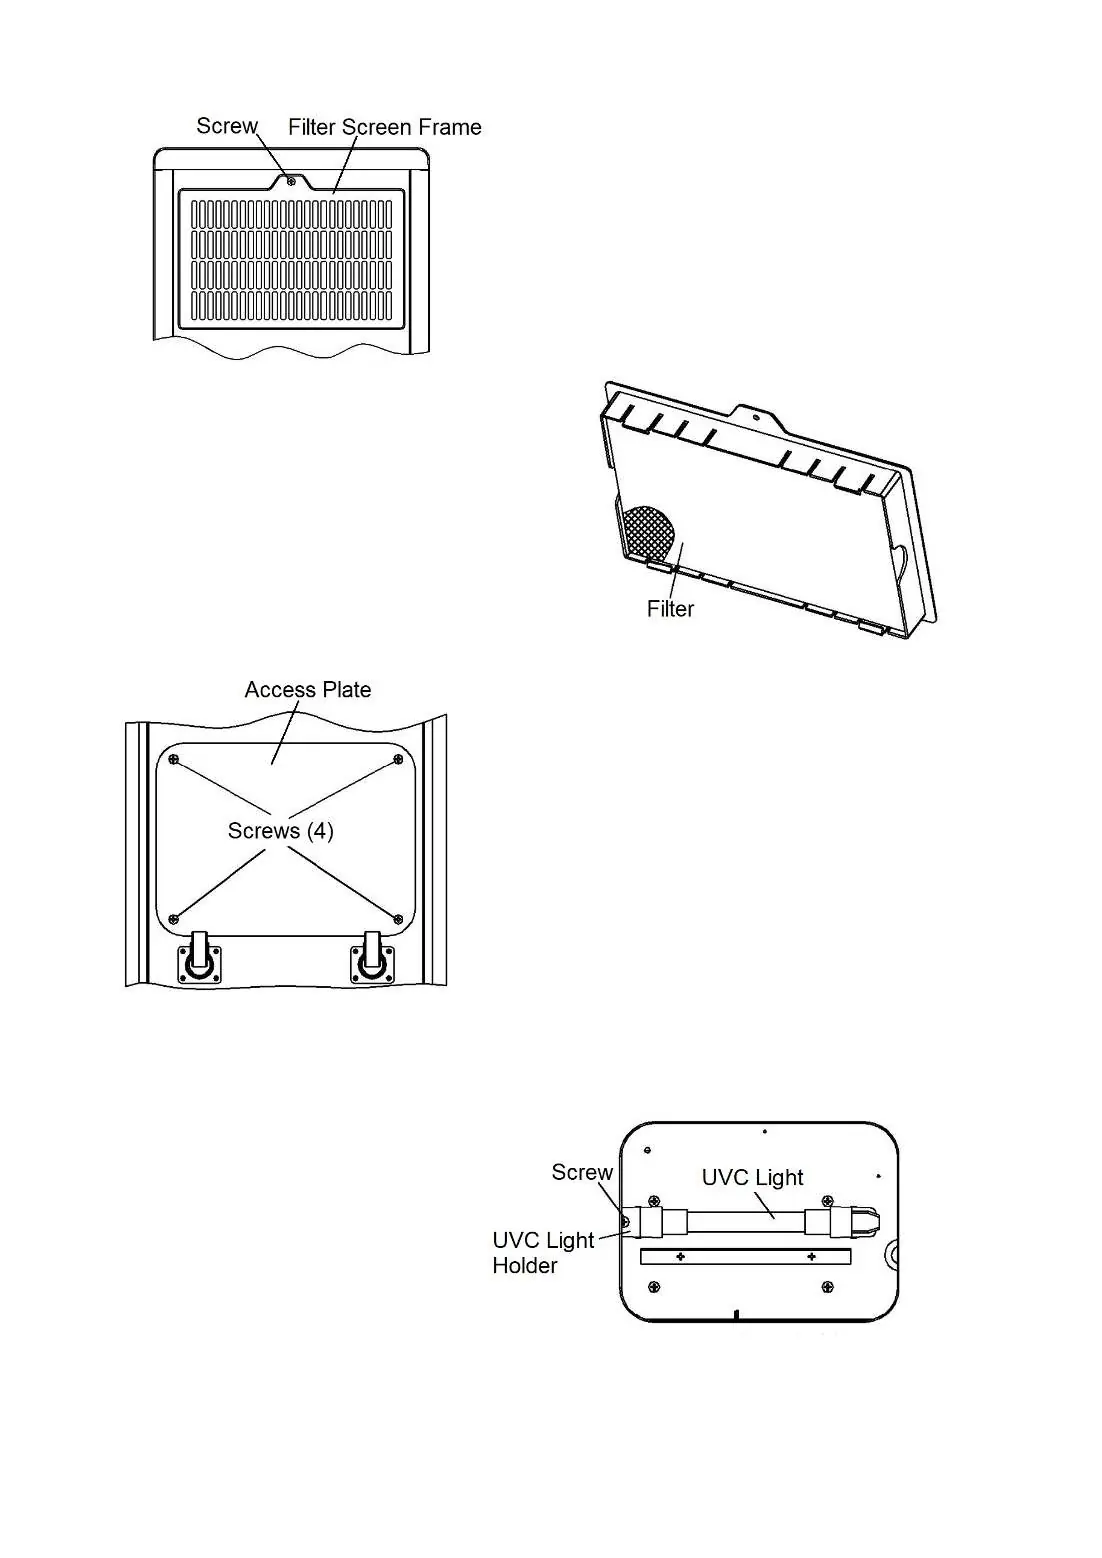
Cleaning and Replacing the Filter
For optimal performance, the filter should be cleaned at least once every month. More frequent cleaning may be required depending on environmental conditions. Replacement Filter No.: UV150F.
- Ensure the unit is unplugged.
- Locate the filter in the back of the unit.
- Remove the screw securing the Filter Screen Frame and slide the frame out.
- Pull the filter from the Screen Frame to clean or replace. Use a vacuum brush attachment to remove lint and dirt. If necessary, wash the filter in warm water with mild dish detergent.
- Ensure the filter is completely dry before reinserting it into the Screen Frame.
- Screw the Screen Frame back into place securely.
Replacing the UVC Lamp
The UVC lamp functions for up to 12 months (8,000 hours) of continuous operation. After this, effectiveness is reduced. Replacement Lamp No.: UV150L.
Warning: UV light is harmful to skin and eyes. Never look directly at the lamp while illuminated. Do not touch the glass part of the lamp with bare fingers, as oils can decrease effectiveness.
- Unplug the unit.
- Remove the Bottom Access Plate by removing the four Phillips head screws.
- Remove the screw securing the UVC Lamp Holder and carefully unplug the old UVC lamp.
- Carefully plug in the new UVC lamp and resecure the Lamp Holder.
- Screw the Bottom Access Cover back into place securely.
Cleaning the Cabinet
Always unplug the unit before cleaning. Clean the outer surface with a slightly dampened towel using a light water and dishwashing soap solution. Do not allow water to enter the unit, as this could cause damage or electric shock. Ensure the unit is completely dry before using.
Troubleshooting
If you encounter issues, check the following:
- Unit does not operate: Ensure the power switch on the back is turned on and the unit is plugged into a properly grounded outlet.
- Airflow reduced or sanitizing effect unsatisfactory: Ensure the air inlet and outlet are not blocked. Check if the filter is blocked with lint, dust, or pet hair and clean or replace it if necessary.
- Increase in noise level: Ensure the air inlet and outlet are not blocked. Check if the filter is blocked and clean or replace it if necessary.
For further assistance, contact customer service at [email protected].
Manufacturer information
The Home Depot
Practical help
Common problems
Unit does not operate
Ensure the power switch on the back is turned on and the power cord is plugged into a properly grounded outlet.
Airflow reduced or sanitizing effect unsatisfactory
Check that the air inlet and outlet are not blocked. Inspect the filter for blockages and clean or replace it if necessary.
Increase in noise level
Check for blockages at the air inlet/outlet and inspect the filter for dust, lint, or pet hair buildup.
Before use
- Ensure the unit is unplugged before performing any maintenance.
- Wear gloves when replacing the filter or UVC lamp.
- Do not touch the glass part of the UVC lamp with bare fingers.
- Ensure the unit is completely dry after cleaning before plugging it back in.
- Never operate the unit without a filter or with a damaged filter.
Specs in practice
- Replacement Filter
- UV150F (Clean monthly, replace as needed).
- Replacement UVC Lamp
- UV150L (Replace annually or after 8,000 hours of use).
Images and diagrams
- Fig 3 & 4: Shows the location of the filter, the filter screen frame, and the screw to be removed for filter access.
- Fig 5: Shows the location of the four screws on the bottom access plate.
- Fig 6: Shows the UVC lamp holder and screw location for lamp replacement.

Manual page author
Michael Turner
Technical manual editor
Reviews PDF manuals for structure, safety notes, and practical product details so readers can find the right information quickly.