HVAC / Thermostats & Controls
Homematic IP HmIP-eTRV-F Radiator Thermostat – flex User Manual
Quick guide for the Homematic IP Radiator Thermostat – flex (HmIP-eTRV-F). Includes installation, pairing, configuration, battery replacement, and troubleshooting steps.
Table of contents
Manual images
Click an image to enlargeQuick guide from the manual
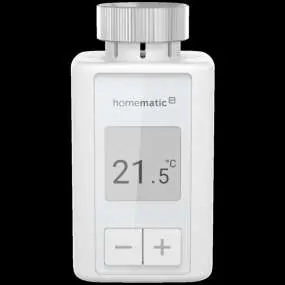
The Homematic IP Radiator Thermostat – flex (HmIP-eTRV-F) is a smart heating control device. This guide provides essential information for installation, pairing, and daily operation. For full system integration, it is recommended to use the Homematic IP Access Point and the free smartphone app.
Device Overview
The device features an e-paper display and three main buttons for local control:
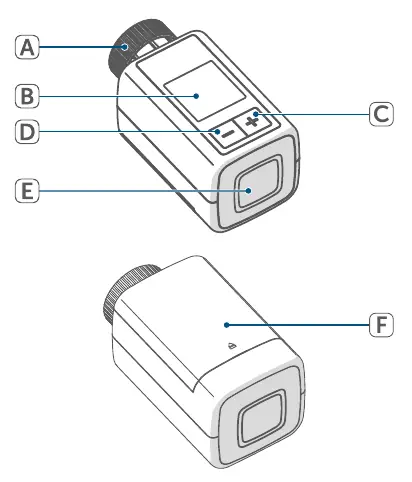
- (A) Metal nut: For mounting on the radiator valve.
- (B) E-paper display: Shows temperature and status.
- (C) Plus button: Adjust settings.
- (D) Minus button: Adjust settings.
- (E) System/Menu/Boost button: Access configuration, pairing, and boost function.
- (F) Battery compartment: Located at the rear.
Installation
The thermostat is easy to install without draining heating water or special tools.
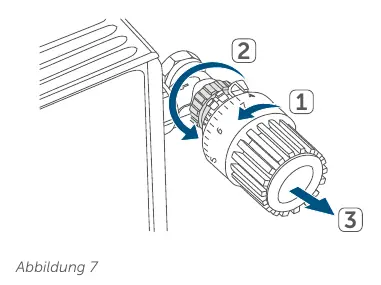
- Remove old thermostat: Rotate the old head to the maximum value to release pressure, then unscrew or detach it.
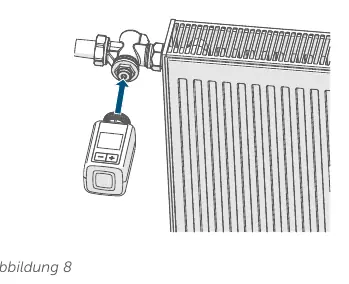
- Mount new thermostat: Place the HmIP-eTRV-F with the metal nut (A) onto the valve and tighten.
- Adapters: If needed, use the included support ring or Danfoss adapters (RA, RAV, RAVL) for specific valve types.
- Adjustment run: After inserting batteries, the device performs an automatic adjustment run. If an error (F1, F2, F3) occurs, press the System/Menu/Boost button (E).
Pairing
You can pair the device in two ways:
- Direct pairing: Pair directly with other Homematic IP devices (e.g., Window/Door Contact, Wall Thermostat).
- Via Access Point: Pair with the Homematic IP Access Point or Home Control Unit for app-based control.
To pair, open the battery compartment, remove the insulation strip, and follow the pairing instructions in the app or the device menu.
Configuration and Operation
Use the configuration menu (accessed by holding the System/Menu/Boost button) to set:
- Manual/Automatic mode: Control temperature manually or via heating profiles.
- Eco mode: Maintain a fixed temperature for a set period.
- Offset temperature: Adjust for temperature measurement differences (±3.5 °C).
- Display mode: Rotate display or change between reduced/functional modes.
- Operating lock: Prevent accidental changes.
Boost function: Briefly press the System/Menu/Boost button (E) to quickly heat the room.
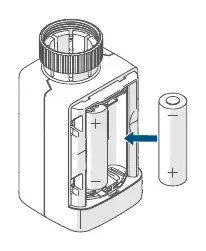
Battery Replacement
When the empty battery symbol appears, replace the two 1.5 V LR6/Mignon/AA batteries. Observe correct polarity.
Troubleshooting
If the device displays an error code:
- F1: Valve drive sluggish. Check if the valve pin is stuck.
- F2: Adjustment range too large. Check if the thermostat is fitted tightly.
- F3: Adjustment range too small. Check if the valve pin is stuck.
- Antenna symbol crossed out: Communication fault. Check connection to Access Point.
Practical help
Common problems
F1 Error code
Valve drive is sluggish. Check if the valve pin is stuck.
F2 Error code
Adjustment range too large. Check if the thermostat is fitted tightly to the valve.
F3 Error code
Adjustment range too small. Check if the valve pin is stuck.
Command not confirmed
Check for radio interference or ensure the receiver is within range.
Before use
- Check valve compatibility (M30 x 1.5 mm standard)
- Ensure batteries are inserted with correct polarity
- Perform pairing with Access Point or other devices
- Wait for the automatic adjustment run to complete
Specs in practice
- Supply voltage
- 2x 1.5 V LR6/Mignon/AA batteries
- Battery life
- 3 years (typical)
- Typical range
- 250 m in open space
Images and diagrams
- Figure 1: Device overview showing buttons and display components
- Figure 7: Removing the old thermostatic head
- Figure 8/9: Mounting the new radiator thermostat
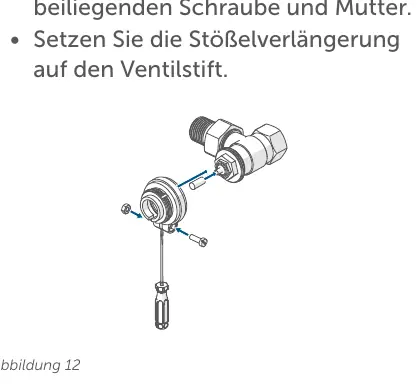
- Figure 11/12/13: Installing Danfoss adapters
Model compatibility
- Compatible with M30 x 1.5 mm valves from most popular manufacturers
- Includes adapters for Danfoss RA, RAV, and RAVL valves

Manual page author
Emily Carter
User documentation editor
Prepares concise manual descriptions and highlights the most useful setup, operation, and maintenance information for readers.