Electronics / RFID Barcode Scanners
Quick Start Guide for Honeywell Granit 1981i Industrial Wireless Scanner
A comprehensive quick start guide for the Honeywell Granit 1981i industrial wireless area-imaging scanner. Includes setup instructions, connection diagrams for USB, RS232, and Keyboard Wedge, scanning techniques, and configuration barcodes.
Quick answers from the manual
Quick answer
- To set up the scanner, turn off your computer, connect the base to the computer, power on the computer, and place the scanner in the base to establish a link. p. 2
Key actions
- Reset to defaults p. 6
- Unlink a scanner p. 8
First start
- Connect base and dock scanner p. 2
Problems and fixes
Scanner beeps 3 times
Link not established.
p. 5Maintenance and reset
- Reset to standard defaults p. 6
Where to find it in the PDF
- Getting Started p. 2
- Connection Diagrams p. 3, 4
- Reading Techniques p. 5
Table of contents
Manual images
Click an image to enlargeQuick Start Guide
This guide provides essential instructions for setting up and configuring the Honeywell Granit 1981i industrial wireless scanner. For detailed maintenance and advanced configuration, please refer to the full user guide available at www.honeywellaidc.com.
Getting Started
Follow these steps to prepare your scanner for use:
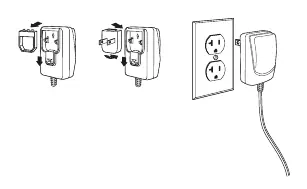
- Power Down: Turn off your computer's power before connecting the base.
- Connect Base: Connect the base to the computer using the appropriate cable (USB, Keyboard Wedge, or RS232).
- Power Up: Power on the computer once the base is fully connected.
- Link Scanner: Place the scanner into the base. The green LED on the base will flash to indicate the scanner's battery is charging and a link is being established.
Connecting the Base
The scanner supports multiple connection types. Ensure the correct cable is used for your interface:
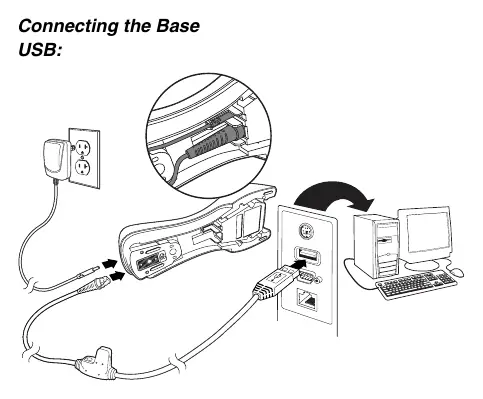
- USB: Connect the USB cable to the base and the computer's USB port.
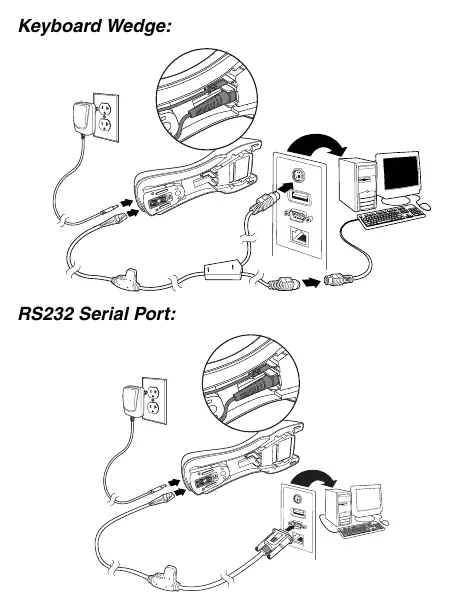
- Keyboard Wedge: Connect the cable between the base, the computer's keyboard port, and the keyboard.
- RS232 Serial Port: Connect the serial cable to the base and the computer's serial port.
Reading Techniques
The scanner is designed for both near and far distance scanning:
- Near Distance (less than 11.8 inches / 30 cm): Use the red lighting and center the box over the bar code. The laser aimer will appear to the right of the center.
- Far Distance (up to 50 feet / 15.2 meters): Use the laser aimer and aim at the center of the bar code. The red lighting may not be visible at this distance.
- Reflective Bar Codes: If the bar code is laminated or highly reflective, tilt the scanner at an angle to improve readability.
Configuration and Programming
You can configure the scanner by scanning specific bar codes provided in this guide:
- Standard Product Defaults: Scan the "Standard Product Defaults" bar code to reset all settings.
- USB Modes: Scan "USB Serial" to emulate an RS232 COM port or "USB PC Keyboard" for standard keyboard input.
- Keyboard Country: To change the keyboard layout, scan "Program Keyboard Country," then the numeric code for your country (found on page 13), and finally "Save."
- Suffixes: You can add a carriage return (CR) or a tab after the scanned data by scanning the corresponding "Add Suffix" bar code.
Locked Link Mode
If you want to prevent other scanners from accidentally linking to your base, use the "Locked Link Mode" bar code. To use a different scanner with the base, you must first scan the "Unlink Scanner" bar code.
Technical Assistance
For additional features, configuration software (EZConfig-Scanning), or technical support, visit www.honeywellaidc.com.
Official resources from the manual
Manufacturer information
Honeywell International Inc.
Practical help
Common problems
Scanner beeps 3 times when scanning
The link between the scanner and the base has not been established.
Scanner beeps once when scanning
The link has been successfully established.
Scanner not linking to base
Ensure the scanner is not in Locked Link mode or that the previous scanner has been unlinked.
Before use
- Turn off computer power before connecting the base
- Connect the base to the computer
- Power up the computer
- Place the scanner in the base to establish a link and charge
Specs in practice
- Near Distance Scanning
- Less than 11.8 inches / 30 cm
- Far Distance Scanning
- Up to 50 feet / 15.2 meters
Images and diagrams
- Connection diagrams for USB, Keyboard Wedge, and RS232 interfaces
- Programming chart for numeric configuration codes
Model compatibility
- USB Serial mode requires a driver download for Windows PCs
- Apple Macintosh computers recognize USB Serial as a USB CDC class device automatically

Manual page author
David Miller
Documentation analyst
Organizes user manual content into clear summaries, with attention to model details, product context, and everyday usability.