Electronics / RFID Barcode Scanners
Quick Start Guide for Honeywell Voyager XP 1472g Series Scanner
Quick start guide for the Honeywell Voyager XP 1472g cordless area-imaging scanner. Includes setup, connection instructions (USB, RS232, RS485), reading techniques, and configuration barcodes.
Table of contents
Manual images
Click an image to enlargeQuick Start Guide
This guide provides essential instructions for setting up and configuring the Honeywell Voyager XP 1472g cordless area-imaging scanner. For detailed cleaning instructions or advanced settings, please refer to the full user guide available at www.honeywellaidc.com.
Getting Started
Before connecting the base, ensure the computer's power is turned off. Once the base is fully connected, power up the computer. Place the scanner in the base to establish a link. A flashing green LED on the base indicates that the scanner's battery is charging.
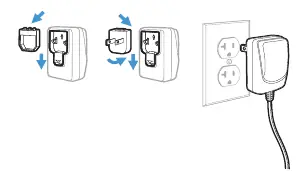
Power Supply Assembly
If a power supply is included, assemble it as shown in the diagram. Note that the power supply must be ordered separately if it is not included in your package.
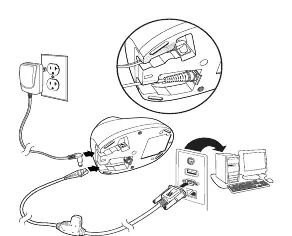
Connecting the Scanner
The scanner supports various connection types. Ensure the correct cable is used for your specific interface:
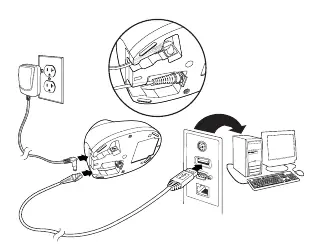


- USB Connection: Connects directly to the computer's USB port.
- Keyboard Wedge Connection: Connects via the keyboard port.
- RS232 Serial Port Connection: Connects via the serial port.
- RS485 Connection: Connects via the RS485 interface.
Reading Techniques
The scanner projects an aiming dot to assist with scanning. Center the dot over the barcode. The dot size changes based on distance: hold the scanner closer for smaller barcodes and farther away for larger ones. If the barcode is reflective (e.g., laminated), tilt the scanner at an angle. A single beep confirms a successful link; a "razzing" sound indicates the link has not been established.
Configuration and Settings
The scanner can be configured using specific barcodes provided in this guide:
- Standard Product Defaults: Resets all settings to factory defaults.
- Interface Selection: Includes barcodes for RS485, USB Serial, and USB PC Keyboard.
- Keyboard Country: Scan the appropriate country code to set the keyboard layout.
- Trigger Modes: Switch between Manual Trigger (default) and Presentation Mode.
- Suffixes: Add a carriage return (CR) or tab after the barcode, or remove suffixes.
Advanced Configuration
For advanced data formatting, use the provided "Enter Data Format" barcode and follow the steps outlined in the guide. Additional features can be accessed using the EZConfig-Scanning software tool available on the Honeywell website.
Support
For technical support, knowledge base articles, or to report a problem, visit www.hsmcontactsupport.com. For warranty information, visit www.honeywellaidc.com and navigate to Get Resources > Product Warranty.
Official resources from the manual
Manufacturer information
Honeywell International Inc.
Practical help
Common problems
Scanner makes a 'razzing' sound when scanning
The link between the scanner and the base has not been established. Ensure the scanner is properly placed in the base.
Scanner does not link to the base
If the base is in Locked Link Mode, you may need to scan the 'Unlink Scanner' barcode before linking a new scanner.
Cannot read PDF or 2D barcodes
Verify your model. Model 1472g1D cannot read PDF or 2D barcodes; only model 1472g2D supports them.
Before use
- Turn off the computer's power before connecting the base.
- Connect the base to the computer.
- Power up the computer.
- Place the scanner in the base to establish a link.
- Check for a flashing green LED on the base to confirm charging.
Specs in practice
- Manual Trigger - Normal Mode
- The scanner requires the user to press the trigger to initiate a scan.
- Presentation Mode
- The scanner activates automatically when it detects a barcode in its field of view.
Images and diagrams
- USB Connection: Shows the cable connecting the base to a USB port on the PC.
- Keyboard Wedge Connection: Shows the cable connecting the base to the keyboard port.
- RS232 Serial Port Connection: Shows the cable connecting the base to a serial port.
- RS485 Connection: Shows the cable connecting the base to an RS485 interface.
Model compatibility
- PDF and 2D bar codes are only supported by model 1472g2D.
- Model 1472g1D does not support PDF or 2D bar codes.

Manual page author
Michael Turner
Technical manual editor
Reviews PDF manuals for structure, safety notes, and practical product details so readers can find the right information quickly.