Computers / Printers
Troubleshooting Guide for HP 150NW Printer
Comprehensive troubleshooting guide for the HP 150NW printer. Learn how to resolve offline status, configure manual IP connections, set up TCP/IP ports, and use HP diagnostic tools to fix common connectivity issues.
Table of contents
Manual images
Click an image to enlargeQuick Troubleshooting Guide
Before performing advanced network configurations, ensure your printer is ready to print by following these basic checks:
- Ensure the printer is powered on and not in Sleep mode.
- Verify that paper is loaded correctly in the input tray with width guides resting against the stack.
- Check that ink or toner cartridges are installed and have sufficient supplies.
- Ensure there are no error messages or blinking lights on the control panel.
- If errors persist, restart the printer by turning it off, waiting 30 seconds, and turning it back on.
Using HP Smart for Diagnostics
If the printer shows an 'offline' status, use the HP Smart app to diagnose and fix the connection.
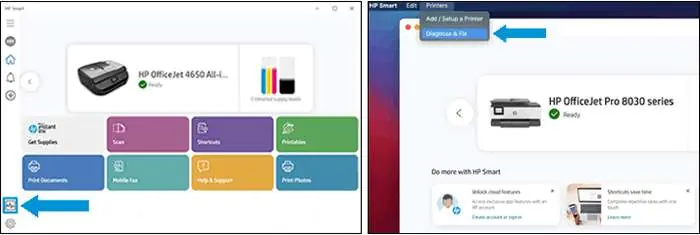
- Open the HP Smart app on your computer.
- Select the 'Diagnose & Fix' option. On Windows, this is typically in the bottom-left corner. On macOS, select your printer, go to the Printers menu, and choose 'Diagnose & Fix'.
- Click 'Start' and follow the on-screen instructions. Do not close the app while the troubleshooter is running.
Using HP Print and Scan Doctor
For Windows users, the HP Print and Scan Doctor is a dedicated tool for connection issues.
- Ensure the printer is on and paper is loaded.
- Download and run the HP Print and Scan Doctor tool.
- On the welcome screen, click 'Start' to select your printer.
- If your printer is not detected, click 'My product is not listed' and follow the prompts.
Setting the Default Printer
To ensure print jobs are sent to the correct device:
- In Windows, search for and open 'Printers & scanners'.
- Ensure the option 'Let Windows manage my default printer' is unchecked.
- Select your printer from the list, click 'Manage', and then click 'Set as default'.
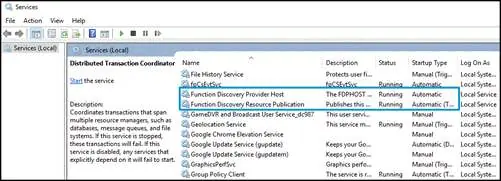
Checking Windows Function Discovery Services
If the printer is not appearing correctly, verify that Windows services are running:
- Open 'Control Panel' and go to 'View devices and printers'.
- Right-click your printer and select 'Printer Properties', then go to the 'Ports' tab.
- If a WSD port is present, ensure it is selected.
- Search for 'Services' in Windows.
- Locate 'Function Discovery Provider Host' and 'Function Discovery Resource Publication'.
- Ensure the status is 'Running' and the startup type is 'Automatic'. If not, right-click the service, select 'Properties', and update these settings.
Configuring a Manual IP Connection
If wireless connection issues persist, you may need to set a manual IP address.
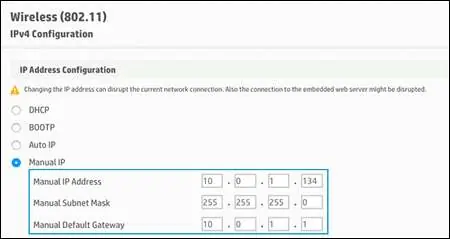
- Print a 'Network Configuration' or 'Wireless Network Test Results' report from your printer.
- Locate the IP Address, Subnet Mask, and Default Gateway on the printout.
- Open an internet browser on a computer connected to the same network and enter the printer's URL (found on the report) to access the Embedded Web Server (EWS).
- Navigate to the 'Network' or 'Networking' tab, then 'Wireless', and select 'IPv4 Configuration'.
- Select 'Manual IP' and enter the information from your network report. Click 'Apply'.
Creating a TCP/IP Port
If you need to manually add a port in Windows:
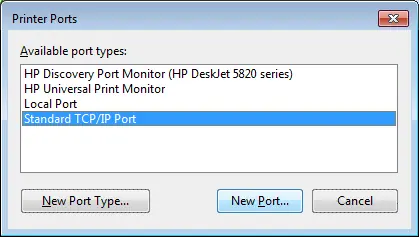
- Open 'Printers & scanners' in Windows, select your printer, and click 'Manage'.
- Click 'Printer Properties' and go to the 'Ports' tab.
- Click 'Add Port', select 'Standard TCP/IP Port', and click 'New Port'.
- Enter the printer's IP address and follow the prompts to complete the setup.
Manufacturer information
HP Inc.
Practical help
Common problems
Printer shows 'offline' status
Run the HP Smart 'Diagnose & Fix' tool or the HP Print and Scan Doctor to reset the connection.
Printer not found on network
Check if Function Discovery services are running in Windows and ensure the printer is on the same network as the computer.
WSD port missing
Print a Network Configuration page, create a manual IP connection in the EWS, and add a Standard TCP/IP port in Windows.
Before use
- Ensure the printer is powered on.
- Verify paper is loaded in the input tray.
- Check for sufficient ink or toner.
- Ensure no error lights are blinking on the control panel.
- Confirm the printer is connected to the network.
Specs in practice
- Default Gateway
- The router address that allows the printer to communicate with other networks.
Images and diagrams
- The HP Smart interface shows the 'Diagnose & Fix' button for automated troubleshooting.
- The Windows 'Services' window allows you to verify that 'Function Discovery' services are set to 'Automatic'.
- The 'IPv4 Configuration' screen in the EWS allows for manual IP address entry.
- The 'Printer Ports' dialog in Windows is used to add a 'Standard TCP/IP Port' for stable connectivity.
Model compatibility
- Troubleshooting steps for 'offline' status apply to Windows and macOS.
- Manual IP configuration requires access to the printer's Embedded Web Server (EWS) via a web browser.
- Some steps, such as 'Standard TCP/IP Port' creation, are specific to Windows environments.

Manual page author
David Miller
Documentation analyst
Organizes user manual content into clear summaries, with attention to model details, product context, and everyday usability.