Power / Solar Inverters
Quick Guide for Huawei SUN2000-196KTL-H3 Solar Inverter
Quick installation and operation guide for the Huawei SUN2000-196KTL-H3 series solar inverter. Includes mounting instructions, cable connection procedures, app setup, and troubleshooting.
Quick answers from the manual
Quick answer
- The Huawei SUN2000-196KTL-H3 is a grid-tied solar inverter. Installation requires mounting the bracket, connecting PE, AC, DC, and communication cables, and configuring the system via the SUN2000 app. p. 1, 4, 18, 20
Key actions
- Install mounting bracket p. 4, 5
- Connect cables p. 8, 11, 12, 13
- Power on system p. 18
First start
- Turn on AC switch, then DC switch 1. After LED1 is steady green, turn on DC switches 2 and 3. p. 18
Problems and fixes
DC switch turns off automatically
Check fault on app, rectify, press RESET, turn on.
p. 3Maintenance and reset
- Press the RESET button for the DC switch after rectifying the fault. p. 3, 22
Technical specifications
| Parameter | Value | Meaning | Pages |
|---|---|---|---|
| Mounting torque | 45 N·m | For M12 bolts | p. 4 |
Where to find it in the PDF
- Product Overview p. 2
- Installation p. 4, 5, 6
- Cable Installation p. 7, 8, 9, 10
- Powering On p. 18
- App Setup p. 20, 21
Table of contents
Manual images
Click an image to enlargeQuick guide from the manual
This document provides essential instructions for the installation, electrical connection, and commissioning of the Huawei SUN2000-196KTL-H3, 200KTL-H3, and 215KTL-H3 series solar inverters. It is intended for qualified electrical technicians.
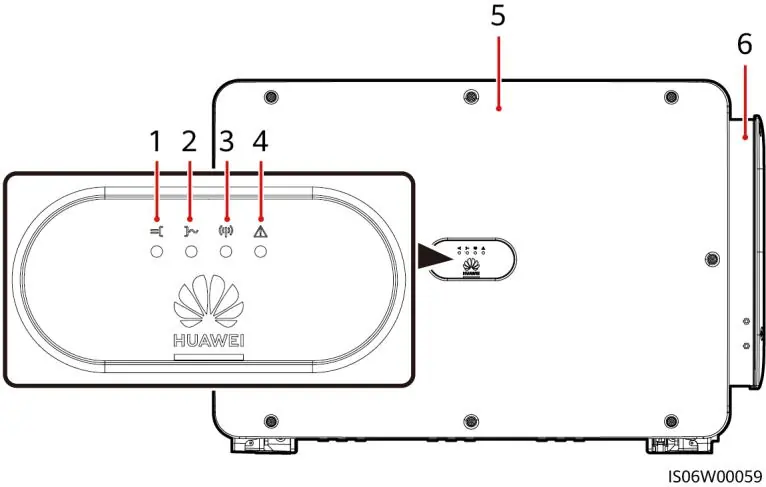
Product Overview
The inverter features a front panel with status indicators (PV, Grid, Communication, Alarm/Maintenance) and a maintenance compartment. The bottom of the unit contains DC switches, reset buttons, communication ports, and cable entries.
Installation Requirements
- Environment: If installed in areas with vegetation, harden the ground with cement or gravel.
- Angle: Ensure the inverter is installed at an appropriate angle (refer to diagrams).
- Space: Maintain sufficient clearance (at least 600mm on sides, 200mm top, 600mm bottom) for ventilation and cable bending radius.
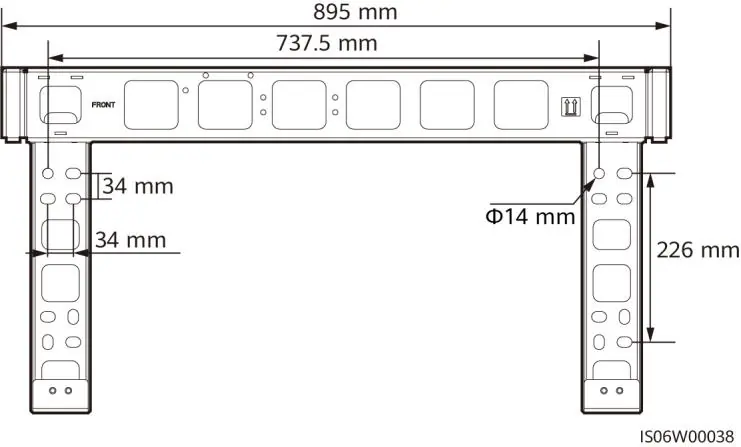
Installing the SUN2000
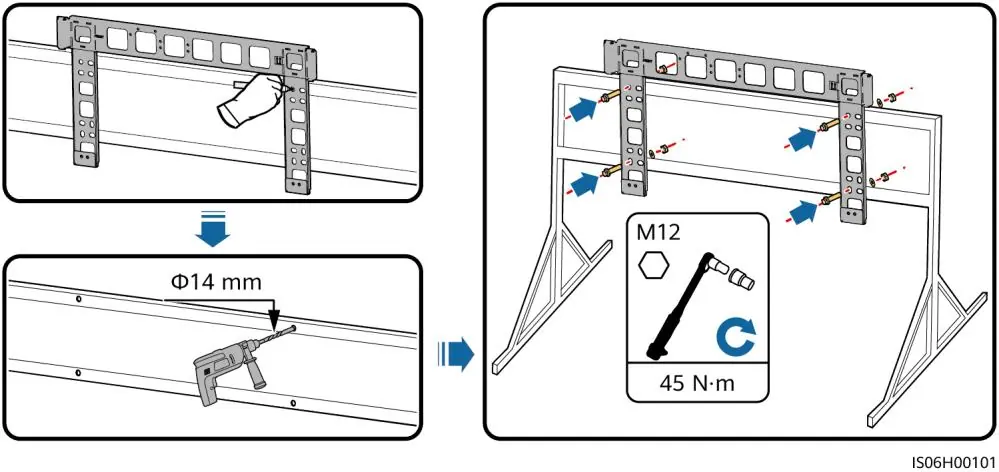
- Install the mounting bracket using M12 bolts (torque 45 N·m).
- Unpack the inverter and mount it onto the bracket.
- Adjust handle positions if necessary.
Installing Cables
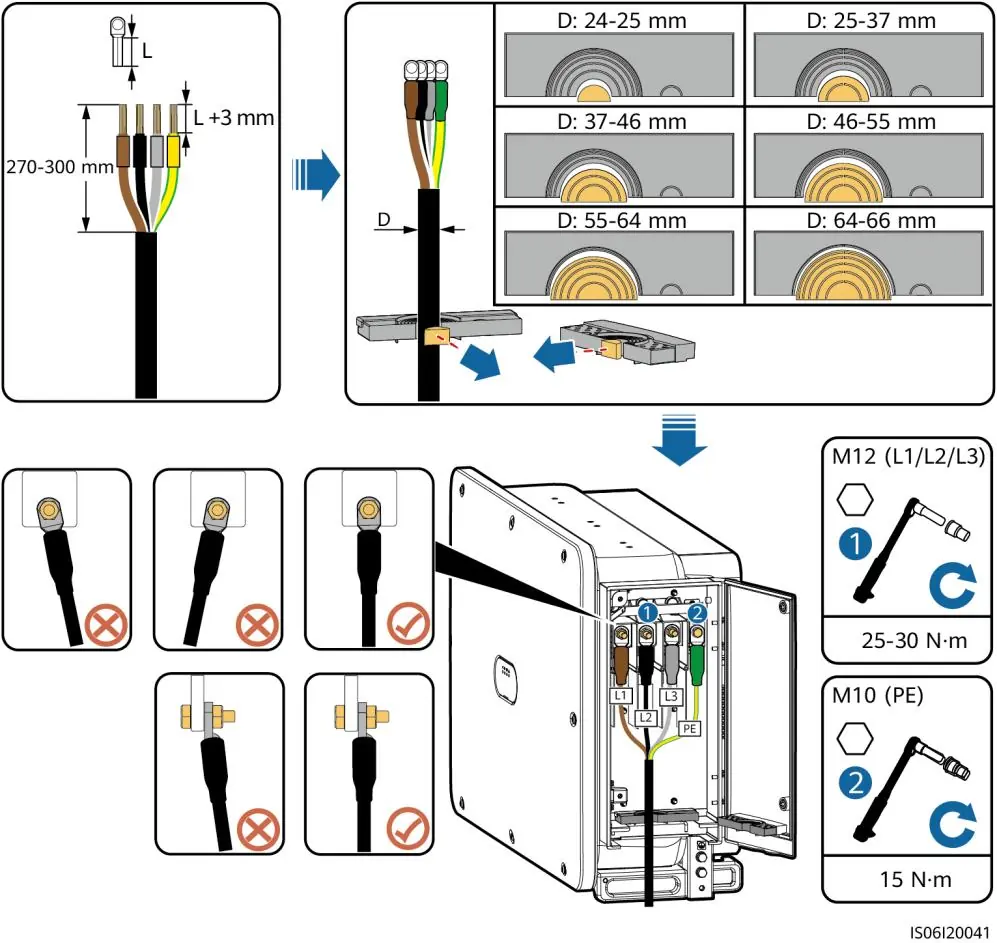
- PE Cable: Connect to a nearby PE point.
- AC Output Power Cables: Select appropriate terminals based on cable type (copper/aluminum) and diameter. Ensure firm connections.
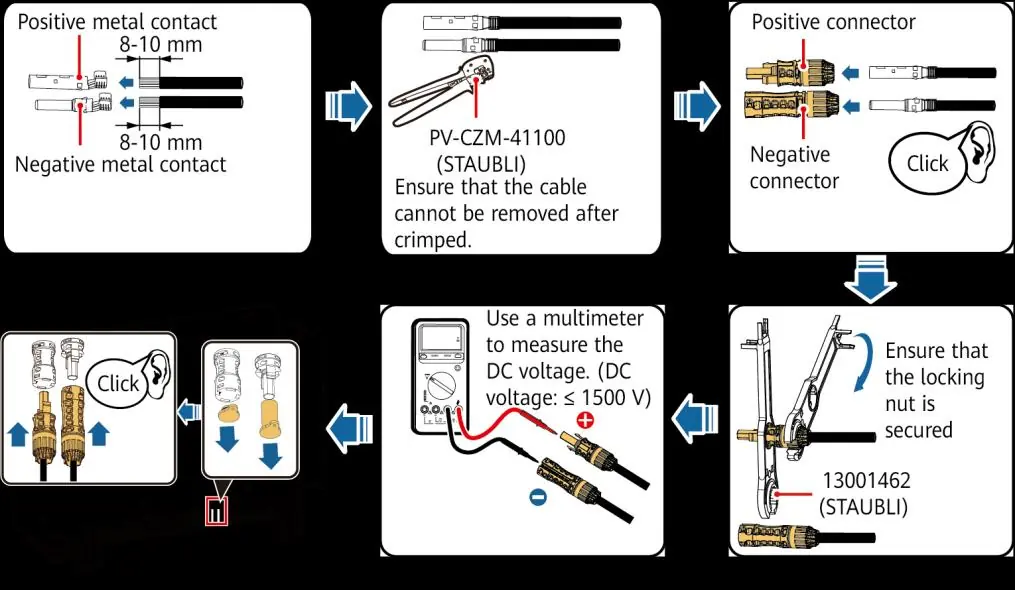
- DC Input Power Cables: Use MC4 EVO2 connectors. Ensure correct polarity. Do not connect individual PV strings in parallel.
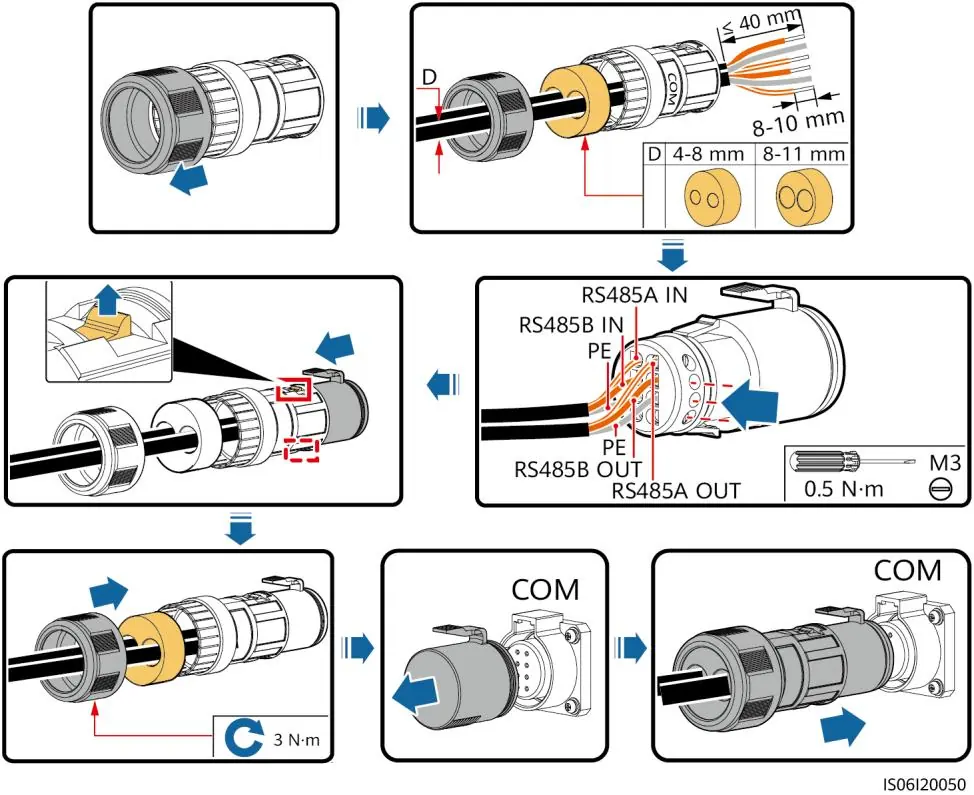
- RS485 Communications Cable: Separate from power cables to prevent interference.
Powering On the System
- Turn on the AC switch between the inverter and the grid.
- Switch on DC SWITCH 1.
- Check LED1 status. If steady green, switch on DC SWITCH 2 and DC SWITCH 3.
SUN2000 App
The app allows for local monitoring and maintenance. Connect via WLAN, Bluetooth, or USB data cable. The initial login password for all user levels is 00000a. Change this password immediately upon first login.
FAQ
If a DC switch automatically turns off due to a fault, check the fault type on the app. After rectifying the fault, press the RESET button and then turn the switch back to ON.
Manufacturer information
Huawei Technologies Co., Ltd.
Practical help
Common problems
DC switch automatically turns off
Check the fault type on the mobile app. After the fault is rectified, press the RESET button and then turn on the switches.
Inverter not connecting to grid
Check LED indicators. Ensure AC switch is ON and AC voltage is within range.
Before use
- Ensure the installer is a qualified electrical technician.
- Use insulated tools and wear proper PPE.
- Verify AC voltage is within the specified range.
- Check cable polarities before connecting DC inputs.
- Ensure the mounting surface is stable and prepared.
Specs in practice
- M12 Bolt Torque
- 45 N·m
- M6 Bolt Torque
- 5 N·m
- RS485 Cable Diameter
- 4-11 mm
Images and diagrams
- Front view showing LED indicators and maintenance compartment.
- Mounting bracket dimensions and installation steps.
- Cable stripping and crimping instructions.
- DC switch reset procedure.
Model compatibility
- Compatible with SUN2000 app (Android).
- Requires MC4 EVO2 PV connectors.
- Supports RS485 or MBUS communication.

Manual page author
David Miller
Documentation analyst
Organizes user manual content into clear summaries, with attention to model details, product context, and everyday usability.