Lighting / Fixtures
Installation Guide for Hunter Doherty 18-Inch 4-Light Chandelier
Comprehensive installation guide for the Hunter Doherty 18-Inch 4-Light Chandelier (Models 19404, 19405). Includes step-by-step wiring, assembly, and maintenance instructions.
Quick answers from the manual
Quick answer
- This manual provides installation instructions for the Hunter Doherty 18-Inch 4-Light Chandelier, covering assembly, wiring, and mounting procedures. p. 1
Key actions
- Assemble rods and thread wires p. 1
- Connect fixture wires to power supply p. 1
- Secure canopy to ceiling p. 1
Problems and fixes
No ground wire in junction box
Stop installation and consult a qualified electrician.
p. 1Show 3 more answers Show less
Maintenance and reset
- Regular cleaning with a lint-free cotton or microfiber cloth. p. 1
Technical specifications
| Parameter | Value | Meaning | Pages |
|---|---|---|---|
| Weight | 12.9 lbs | Fixture weight | p. 1 |
Where to find it in the PDF
- Installation Instructions p. 1, 2
Table of contents
Manual images
Click an image to enlargeQuick guide from the manual
This document provides instructions for installing the Hunter Doherty 18-Inch 4-Light Chandelier. Key steps include preparing the junction box, assembling the rods to the desired height, wiring the fixture to the power supply, and securing the canopy to the ceiling. Ensure power is turned off at the circuit breaker before beginning.
Preparation for installation
Carefully remove all contents from the carton. Shut off the power at the circuit breaker and remove the old fixture from the ceiling, including the old mounting bracket. Ensure the junction box is ready for the new mounting bracket assembly.
Assembling the fixture
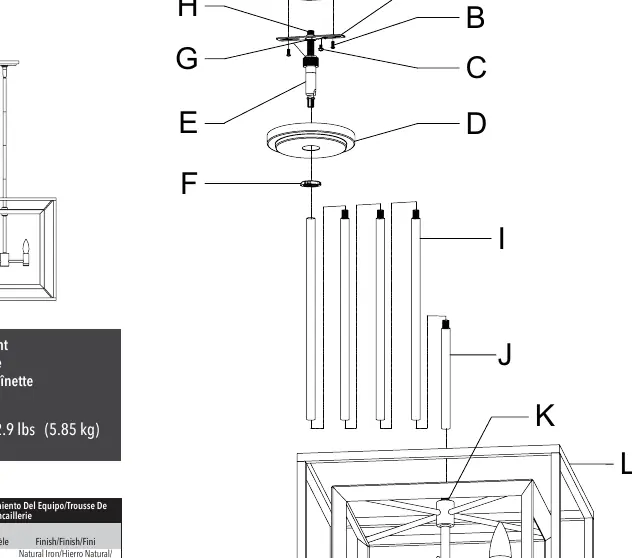
The fixture includes 4 x 12-inch rods and 1 x 6-inch rod. Determine the correct number of rods needed for the desired hanging height. To lengthen the fixture, add additional rods; to shorten, trim the wires to the desired length, leaving at least 8 to 10 inches of wire. Thread the wires through the rods and pull them taut before connecting the rods together. Screw the rod onto the threaded post on the fixture.
Connecting the wires
Attach the fixture wires to the power supply wires from the junction box:
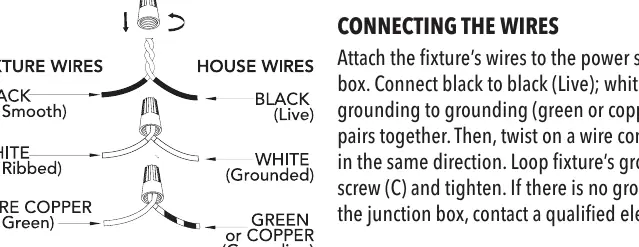
- Black to Black: Live wire
- White to White: Grounded wire
- Grounding to Grounding: Green or copper wire
Twist the ends of the wire pairs together and secure with a wire connector. Loop the fixture's ground wire around the grounding screw and tighten. If there is no ground wire from the junction box, contact a qualified electrician.
Finishing the installation
Place the canopy flush to the ceiling and slide the canopy loop ring up beneath the canopy. Tightly screw the canopy loop ring onto the canopy loop to secure the canopy in place. Install light bulbs (not included) in accordance with the fixture's specifications. Do not exceed the recommended wattage.
Cleaning tips
Treat the fixture gently. For regular cleaning, turn off the light and wipe down the fixture with a clean lint-free cotton or microfiber cloth. Never spray cleaner directly onto the fixture.
Practical help
Common problems
No ground wire present in the junction box
Stop installation immediately and consult a qualified electrician.
Difficulty passing wires through downrods
Twist or tape wire ends together to make it easier to pass them through. The threaded post may also be removed for easier wire access.
Before use
- Shut off power at the circuit breaker
- Remove old fixture and mounting bracket
- Verify presence of ground wire
- Ensure you have a ladder, pliers, wire strippers, and a screwdriver
- Determine desired hanging height and rod configuration
Show more Show less
Specs in practice
- Fixture weight
- 12.9 lbs (5.85 kg)
- Rods included
- 4 x 12-inch rods and 1 x 6-inch rod
Images and diagrams
- The assembly diagram illustrates the connection of the mounting bracket, canopy, and rods.
- The wiring diagram shows the correct connection of black, white, and ground wires.
Model compatibility
- Bulbs are not included
- Requires a ground wire for safe installation

Manual page author
David Miller
Documentation analyst