Lighting / Fixtures
Installation Guide for Hunter Sunjai 9-Light Chandelier
Installation guide for the Hunter Sunjai 9-Light Chandelier (Models 19520, 19521). Includes step-by-step mounting, wiring instructions, assembly procedures, and maintenance tips.
Quick answers from the manual
Quick answer
- This document provides installation instructions for the Hunter Sunjai 9-Light Chandelier (Models 19520, 19521), covering mounting, wiring, and assembly. p. 1
Key actions
- Mounting the bracket p. 1
- Wiring the fixture p. 1
First start
- Install light bulbs and test p. 1
Show 3 more answers Show less
Maintenance and reset
- Cleaning p. 1
Technical specifications
| Parameter | Value | Meaning | Pages |
|---|---|---|---|
| Weight | 13.67 lbs (6.20 kg) | Fixture weight | p. 1 |
Where to find it in the PDF
- Installation Instructions p. 1
Table of contents
Manual images
Click an image to enlargeQuick Guide
This document provides instructions for installing the Hunter Sunjai 9-Light Chandelier. Before beginning, ensure the power is turned off at the circuit breaker and that your junction box is capable of supporting the fixture's weight of 13.67 lbs (6.20 kg). If you are unfamiliar with electrical wiring, consult a qualified electrician.
Preparation for Installation
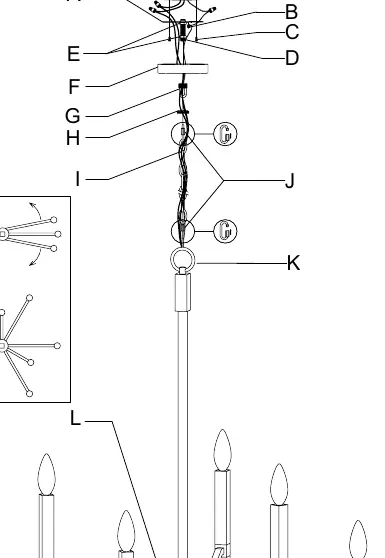
Carefully remove all contents from the carton. Shut off the power at the circuit breaker and remove the old fixture and mounting bracket. Prepare the new mounting bracket (A) by attaching the threaded post (D) with the hex nut (E). Adjust the position of the threaded post (D) so that the canopy (F) will sit flush against the ceiling when installed. Tighten the hex nut (E) to secure the post in place.
Assembling the Fixture
Thread the wires through the rod with the top loop (K) and screw it onto the fixture (L). Determine the required hanging height and adjust the chain (I) length using pliers to remove excess links. Attach a quick-connect link (J) to each end of the chain. Connect the chain to the hanging ring (K) and the canopy loop (G). Feed the fixture wires up through the chain, pulling them taut. Slide the canopy loop ring (H) and canopy (F) onto the chain/wire assembly.
Connecting the Wires
Connect the fixture wires to the power supply wires from the junction box:
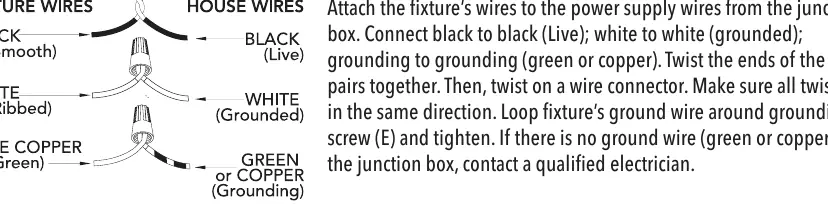
- Black to Black: Connect the live wires.
- White to White: Connect the grounded wires.
- Grounding: Connect the green or copper ground wire to the grounding screw (E) on the mounting bracket.
Twist the ends of the wire pairs together and secure them with wire connectors, ensuring all twists are in the same direction.
Finishing the Installation
Slide the canopy (F) flush to the ceiling and secure it by screwing the canopy loop ring (H) onto the canopy loop (G). Adjust the lamp arms so they are evenly distributed. Install candle finials (M) and light bulbs (not included) according to the fixture's specifications. Do not exceed the recommended wattage. Turn on the power to test the fixture.
Cleaning and Maintenance
Treat the fixture gently. For regular cleaning, turn off the light and wipe the fixture with a clean, lint-free cotton or microfiber cloth. Never spray cleaner directly onto the fixture.
Practical help
Common problems
Fixture is not flush with the ceiling
Adjust the position of the threaded post (D) on the mounting bracket (A) by loosening the hex nut (E) and moving the post until the canopy sits flush.
Fixture is too long
Measure the desired height and remove excess chain links using pliers. Trim the wires, leaving at least 8 to 10 inches of extra wire for connections.
Before use
- Turn off power at the circuit breaker
- Verify the junction box can support the fixture weight (13.67 lbs)
- Ensure a ground wire is present in the junction box
- Have a helper available to support the fixture weight during installation
- Check that you have the necessary tools: ladder, pliers, wire strippers, screwdriver
Show more Show less
Specs in practice
- Fixture Weight
- 13.67 lbs (6.20 kg). Ensure the ceiling junction box is rated to support this weight.
Images and diagrams
- The wiring diagram illustrates connecting black-to-black (live), white-to-white (grounded), and green/copper-to-ground.
- The assembly diagram shows the sequence of the mounting bracket, canopy, chain, and fixture body.
Model compatibility
- Requires light bulbs (not included). Do not exceed recommended wattage.
- Must be installed in accordance with national and local electrical codes (ANSI/NFPA 70).

Manual page author
Emily Carter
User documentation editor