Lighting / Fixtures
Installation Instructions for Hunter Lochemeade 2-Light Vanity
A comprehensive installation guide for the Hunter Lochemeade 2-Light Vanity. Includes step-by-step wiring instructions, mounting procedures, and safety warnings for models 19778, 19779, and 19780.
Quick answers from the manual
Quick answer
- To install the Hunter Lochemeade 2-Light Vanity, turn off the power, mount the bracket to the junction box, connect the black, white, and ground wires, secure the backplate with cap nuts, and attach the glass and covers to the sockets. p. 1
Key actions
- Connect the fixture ground wire to the junction box ground wire. p. 1
- Secure the backplate using cap nuts. p. 1
Problems and fixes
No ground wire present
Stop installation and consult a qualified electrician.
p. 1Show 3 more answers Show less
Maintenance and reset
- Clean the fixture with a clean lint-free cotton or microfiber cloth. p. 1
Technical specifications
| Parameter | Value | Meaning | Pages |
|---|---|---|---|
| Fixture weight | 2 lbs (1.60 kg) | Weight of the fixture. | p. 1 |
Where to find it in the PDF
- Installation Instructions p. 1
Table of contents
Manual images
Click an image to enlargeQuick guide from the manual
This document provides instructions for installing the Hunter Lochemeade 2-Light Vanity. Before beginning, ensure the power is turned off at the circuit breaker. The installation requires basic tools including pliers, wire strippers, and a ladder. Always ensure the fixture is properly grounded.
Preparing for installation
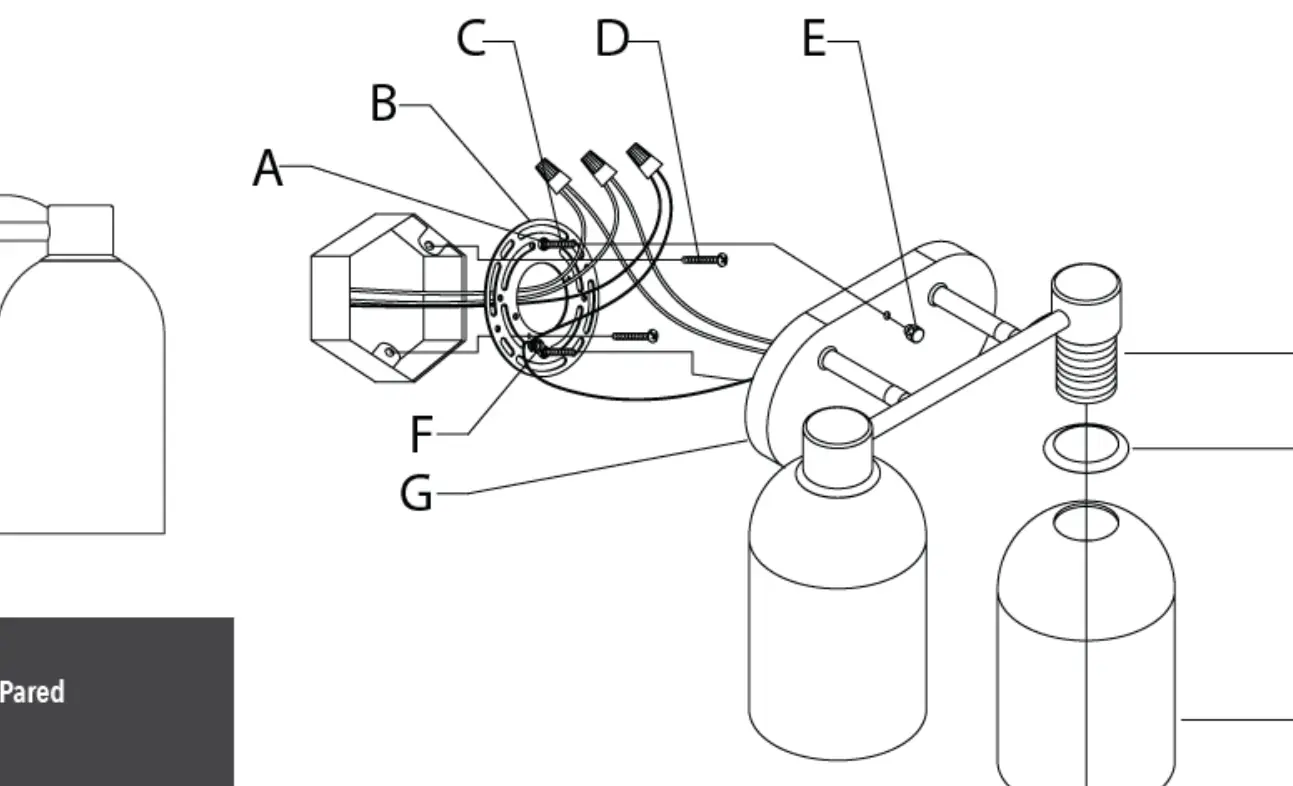
Carefully remove all contents from the carton. Shut off the power at the circuit breaker and remove the old fixture, including the old mounting bracket. Remove the new mounting bracket assembly from the bag. Remove the mounting screws (C) from the mounting screws (C) to allow the mounting plate (B) to be adjusted to the junction box. Ensure the mounting screws (C) are positioned so the backplate will sit flush against the wall.
Connecting the wires
Have a helper support the fixture's weight while completing the wiring. Connect the wires as follows:
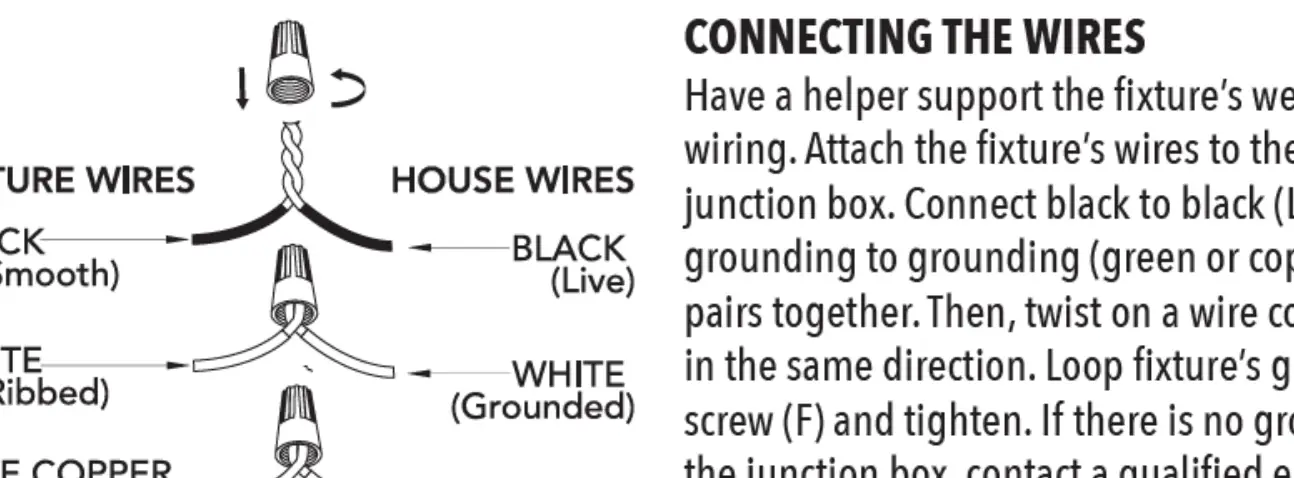
- Black (Live) wire: Connect to the black wire from the junction box.
- White (Neutral) wire: Connect to the white wire from the junction box.
- Ground wire: Connect the fixture's ground wire (bare copper or green) to the green or bare copper ground wire from the junction box.
Twist the ends of the wires together and secure them with a wire connector. Ensure all twists are in the same direction. If there is no ground wire in the junction box, contact a qualified electrician.
Finishing the installation
Once the wiring is secure, place the fixture's backplate (G) over the mounting screws (C) so the threads protrude through the holes. Tightly screw the cap nuts (E) onto the mounting screws (C) until the backplate is snug against the wall. Secure the cover (I), glass (J), and cover (K) onto the socket (H) by screwing the socket ring (L) tight. Install the light bulbs (not included) according to the fixture's specifications.
Cleaning tips
Treat the fixture gently. Regular cleaning will reduce the need for deep cleaning. Turn off the light and wipe down the fixture with a clean lint-free cotton or microfiber cloth. Never spray cleaner directly onto the fixture.
Safety warnings
To avoid possible electrical shock, disconnect the power at the circuit breaker before installation. If the fixture ground wire is not present at the installation site, stop installation and consult a qualified electrician. All wiring must be in accordance with national and local electrical codes.
Practical help
Common problems
No ground wire in the junction box
Do not proceed with installation; contact a qualified electrician.
Fixture not sitting flush against the wall
Adjust the mounting screws (C) by loosening or tightening them to ensure the backplate sits flush.
Before use
- Turn off power at the circuit breaker.
- Remove the old fixture and mounting bracket.
- Ensure you have pliers, wire strippers, and a ladder.
- Verify the junction box is ready for the new mounting plate.
- Have a helper available to support the fixture weight during wiring.
Show more Show less
Specs in practice
- Fixture weight
- The fixture weighs approximately 2 lbs (1.60 kg).
Images and diagrams
- The wiring diagram illustrates the correct connection of fixture wires to house wires using wire connectors.
- The assembly diagram shows the sequence of parts (A-L) including the mounting plate, backplate, glass, and socket rings.
Model compatibility
- Compatible with models 19778, 19779, and 19780.
- Ensure light bulbs used do not exceed the recommended wattage.

Manual page author
Emily Carter
User documentation editor