HVAC / Thermostats & Controls
User Guide for Ideal Halo 2-Zone Upgrade Kit
A comprehensive user guide for the Ideal Halo 2-Zone Upgrade Kit. This manual covers system operation, scheduling, mode selection, battery replacement, and troubleshooting for your wireless heating control system.
Quick answers from the manual
Quick answer
- The Ideal Halo 2-Zone Upgrade Kit is a wireless heating control system that allows you to manage your central heating zones independently. It uses a battery-powered thermostat, a Smart Interface, and a Smart Wiring Centre to provide flexible scheduling, manual overrides, and energy-efficient heating control. p. 2
Key actions
- Change operating mode p. 2
- Replace batteries p. 7
- Adjust heating schedule p. 4
First start
- Ensure the Smart Interface is installed in the boiler and the Halo unit is paired. p. 4, 7
Problems and fixes
CF01 Fault (Wireless connection lost)
Check battery level, power indicator on smart interface, and distance between units.
p. 7, 8
CF02 Fault (Wiring centre communication)
Check power and distance between smart wiring centre and boiler smart interface.
p. 7, 8Maintenance and reset
- To remove child lock, press and hold the left and right hand buttons at the same time. p. 5
Where to find it in the PDF
- Introduction and Modes p. 2
- Scheduling and Interface p. 4
- Wiring Centre and Additional Features p. 5
- Troubleshooting and Batteries p. 7, 8
Table of contents
Manual images
Click an image to enlargeQuick Guide from the Manual
The Ideal Halo 2-Zone Upgrade Kit is a wireless heating control system designed to manage central heating zones independently. It consists of a battery-powered thermostat, a Smart Interface (installed in the boiler), and a Smart Wiring Centre. The system supports Auto, Manual, and Off modes, allowing for flexible temperature control and energy efficiency.
Understanding the Display
The Halo display provides real-time information about your heating system:
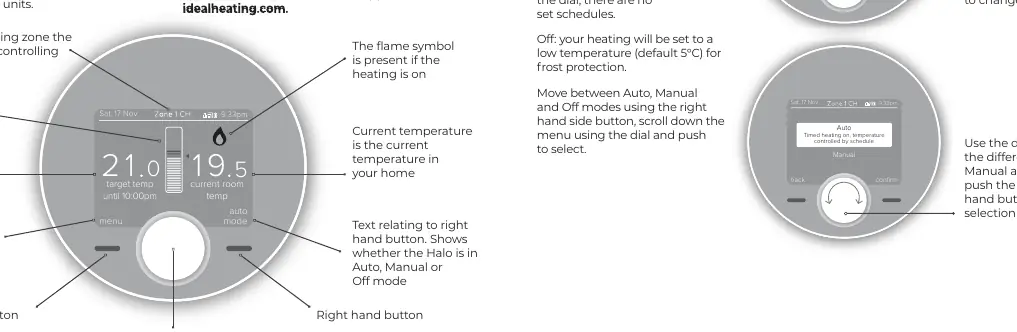
- Flame Symbol: Indicates heating is currently on.
- Target Temperature: The desired temperature you have set.
- Current Temperature: The actual room temperature.
- Mode Indicator: Shows whether the system is in Auto, Manual, or Off mode.
- Override Icon: Appears when a temporary temperature adjustment is active.
Operating Modes
You can switch between modes using the right-hand button and the dial:
- Auto: Runs heating according to pre-set scheduled times and temperatures.
- Manual: Allows you to control the temperature manually by turning the dial.
- Off: Sets the heating to a low temperature (default 5°C) for frost protection.
Scheduling
The Halo allows you to program up to 6 heating events per day. You can customize schedules for different days of the week to suit your lifestyle. To edit a schedule, navigate to the 'timed heating schedule' section in the main menu. You can also use the 'copy day' feature to apply schedules to multiple days.
Override and Plus Hours
If you need to temporarily adjust your heating:
- Override: Turn the dial to adjust the temperature. This will remain active until the next scheduled change.
- Plus Hours: Press the dial while in Auto mode to extend the current heating setting for a specific duration.
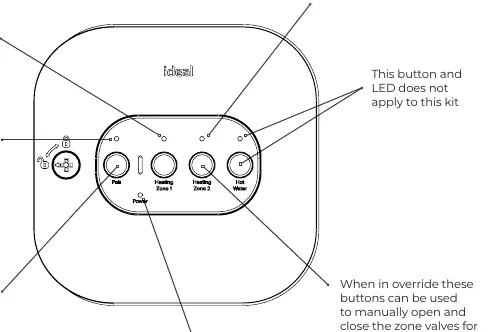
Halo Smart Interface and Wiring Centre
These components communicate wirelessly with your Halo control. Under normal circumstances, you do not need to interact with them. However, they feature LED indicators that help diagnose technical issues. Both units include a Failsafe/Override feature to manually operate the boiler or zone valves if wireless communication is lost.

Maintenance and Battery Replacement
When the battery symbol on the display turns red, the batteries need to be replaced:
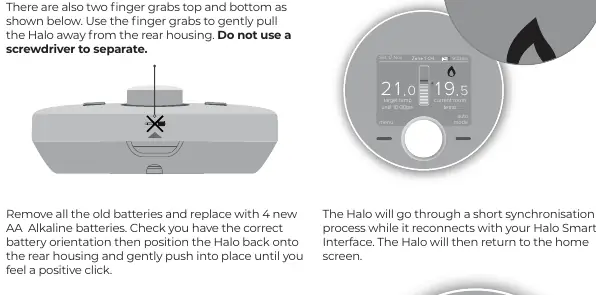
- Gently pull the Halo unit away from the rear housing using the finger grabs (do not use a screwdriver).
- Remove the old batteries and insert 4 new AA Alkaline batteries, ensuring correct orientation.
- Push the unit back onto the rear housing until you feel a click.
- The system will perform a short synchronization process.
Troubleshooting
If you encounter issues such as 'CF01 Fault' (Halo not communicating with Smart Interface) or 'CF02 Fault' (Smart Wiring Centre not communicating), check the following:
- Ensure the batteries in the Halo are fresh.
- Check the power indicator on the Smart Interface.
- Verify the distance between the Halo, Smart Interface, and Smart Wiring Centre.
- If you use a Zigbee booster, ensure it is powered on.
Practical help
Common problems
Halo not communicating with Smart Interface (CF01 Fault)
Check battery level, power indicator on the smart interface, and distance between units. Ensure any Zigbee booster is turned on.
Smart Wiring Centre not communicating (CF02 Fault)
Check power supply and distance between the smart wiring centre and the boiler's smart interface.
Lost pairing between Halo and Smart Interface
Follow the re-pairing instructions found in the Halo Combi installation guide.
Before use
- Ensure 4 AA Alkaline batteries are installed correctly
- Verify the Smart Interface is installed in the boiler
- Check that the boiler has power
- Confirm the date and time are set correctly on the Halo
- Ensure the system is not in 'Off' mode if heating is required
Specs in practice
- Enhanced Load Compensation
- Balances radiator temperature to maintain target room temperature efficiently.
Images and diagrams
- Halo display icons for temperature, mode, and status
- Smart Interface LED indicators for Power, Boiler, Connectivity, and Zigbee
- Smart Wiring Centre LED indicators for Power, Heating Zone 1, Heating Zone 2, and Pair status
Model compatibility
- Applicable to both Halo Combi RF and Halo Combi Wi-Fi control systems
- Each Halo unit controls a separate central heating zone independently

Manual page author
Michael Turner
Technical manual editor
Reviews PDF manuals for structure, safety notes, and practical product details so readers can find the right information quickly.