HVAC / Thermostats & Controls
User Manual for Emerson Blue Easy Set 1H/1C Thermostat
Comprehensive user guide for the Emerson Blue Easy Set 1H/1C thermostat. Includes installation instructions, wiring diagrams, configuration settings, and troubleshooting steps.
Quick answers from the manual
Quick answer
- The Emerson Blue Easy Set 1H/1C is a non-programmable thermostat featuring Home, Sleep, and Away temperature presets. It is designed for low voltage NEC Class II systems. p. 1
Key actions
- Reset the thermostat p. 6
- Change temperature presets p. 3
First start
- Installation steps p. 4
Problems and fixes
No Heat
Set System Switch to Heat, verify wiring, and check if the thermostat clicks within 5 minutes.
p. 6Maintenance and reset
- Reset operation p. 6
Technical specifications
| Parameter | Value | Meaning | Pages |
|---|---|---|---|
| Electrical Rating | 20 to 30 VAC | Operating voltage range | p. 8 |
| Setpoint Range | 45° to 90°F | Temperature control range | p. 8 |
Where to find it in the PDF
- Getting to know your thermostat p. 2
- Using your thermostat p. 3
- Installation p. 4
- Configuration Menu p. 5
- Troubleshooting p. 6
- Technical Data p. 7, 8
Table of contents
Manual images
Click an image to enlargeQuick guide from the manual
The Emerson Blue Easy Set 1H/1C is a non-programmable thermostat designed for low voltage NEC Class II systems. It features three temperature presets (Home, Sleep, Away) for quick adjustments. Important: Do not use this thermostat with line voltage systems. If you are unsure about your wiring type, consult a professional.
Getting to know your thermostat
The thermostat interface includes:
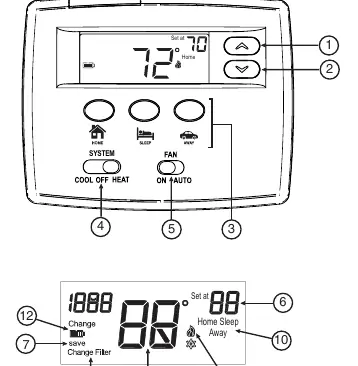
- Buttons: Up/Down arrows for temperature adjustment, and dedicated buttons for Home, Sleep, and Away presets.
- Switches: System switch (COOL, OFF, HEAT) and Fan switch (ON, AUTO).
- Display: Shows current temperature, desired temperature, system mode, and battery status.
Using your thermostat
You can customize the temperature presets for your comfort:
- Move the SYSTEM switch to HEAT.
- Use the arrow buttons to set your desired temperature.
- Press and hold the Home, Sleep, or Away button for 3 seconds to save the setting.
- Repeat for other presets.
Additional features:
- Sleep Timer: Automatically switches from Sleep to Home temperature after a set number of hours (1-12 hours).
- Change Filter Reminder: Displays a reminder to change your air filter based on a set number of hours (25-1975 hours).
- Cool Savings: Adjusts cooling during high demand to save energy.
Installation
Warning: Turn off power to the heating and cooling system before starting installation.
- Remove the old thermostat cover and disconnect wires one by one, ensuring they do not fall back into the wall.
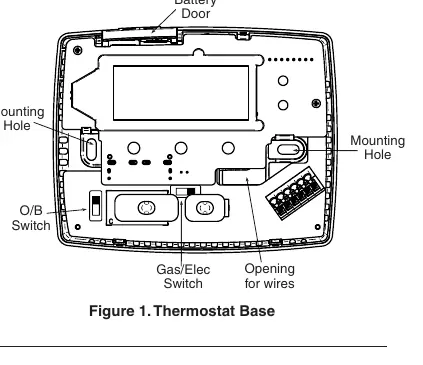
- Mark mounting holes, drill, and secure the new base.
- Connect wires to the corresponding terminals (R, C, O/B, W, Y, G).
- Set the Gas/Elec switch and O/B terminal switch according to your system requirements.
Configuration menu
To enter the configuration menu, press and hold the arrow buttons for 3 seconds. Use the Home button to navigate and the Away button to go back. You can configure settings such as:
- System type (Single Stage or Heat Pump).
- Sleep Timer duration.
- Cool Savings feature.
- Compressor Lockout (5-minute delay).
- Display backlight settings.
- Temperature scale (Fahrenheit or Celsius).
Troubleshooting
If the display is blank or the thermostat behaves erratically due to a voltage spike or static discharge, perform a reset:
- Ensure the System Switch is in Cool or Heat.
- Simultaneously press the Up and Down arrow buttons for approximately 10 seconds until the display goes blank.
If you experience "No Heat" or "No Cool" issues, verify that the system switch is set correctly, wiring is secure, and the furnace power is ON.
Technical data
The thermostat operates on 20 to 30 VAC. The setpoint range is 45° to 90°F (7° to 32°C). It is designed for single-stage heating/cooling systems or single-stage heat pumps without auxiliary heat.
Practical help
Common problems
No Heat/No Cool/No Fan
Check for a blown fuse, tripped circuit breaker, or furnace power switch set to OFF. Ensure the furnace blower door is properly installed.
Thermostat display blank or erratic
Perform a reset by simultaneously pressing the Up and Down arrow buttons for 10 seconds.
Heat, Cool, or Fan runs constantly
Check for shorted wiring or bare wires touching under terminal screws. Ensure the Fan switch is not set to ON.
Before use
- Verify your system is a low voltage NEC Class II system (do not use with line voltage).
- Turn off power to the heating and cooling system.
- Identify all wires before disconnecting the old thermostat.
- Ensure the Gas/Elec switch is set correctly for your system.
- Check the O/B terminal switch position (factory set to O).
Specs in practice
- Electrical Rating
- 20 to 30 VAC; 1.0 A per terminal, 1.5A maximum total.
- Setpoint Range
- 45° to 90°F (7° to 32°C).
- Operating Humidity
- 90% non-condensing maximum.
Images and diagrams
- Figure 2: Wiring for single transformer, single stage systems.
- Figure 3: Wiring for two transformer, single stage systems with no safety circuits.
- Figure 4: Wiring for two transformer, single stage systems with safety circuits in both systems.
Model compatibility
- Compatible with single stage gas, oil, electric, heat only, cool only, or heat/cool systems.
- Compatible with single stage compressor heat pump systems (no aux heat).
- Not for use with line voltage systems.

Manual page author
Emily Carter
User documentation editor
Prepares concise manual descriptions and highlights the most useful setup, operation, and maintenance information for readers.