Baby / Baby Monitors
User Manual for ieGeek Baby 1T Video Monitor
Quick guide for the ieGeek Baby 1T video monitor. Learn how to set up the camera, connect to the monitor and app, adjust settings, and troubleshoot common issues.
Table of contents
Manual images
Click an image to enlargeQuick guide from the manual
This guide provides essential instructions for setting up and operating your ieGeek Baby 1T video monitor. For technical support, you can visit the online support center at http://www.iegeek.com or contact the after-sale mailbox at [email protected].
Overview
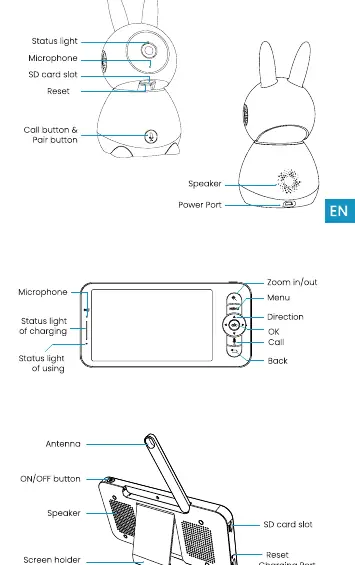
The system consists of a camera and a monitor. The camera features a status light, microphone, SD card slot, reset button, and a call/pair button. The monitor includes a screen, zoom, menu, direction, OK, call, and back buttons, along with an antenna, power button, speaker, and SD card slot.
Connecting the Camera to the App
To connect the camera to the ieGeek Cam app:
- Ensure your Wi-Fi network is 2.4 GHz (5 GHz is not supported).
- Download the ieGeek Cam app and register an account.
- Use a needle to reset the camera for 5 seconds until you hear the 'BOOGU' beep.
- Wait 10-20 seconds for the second beep and a slowly blinking red light.
- Follow the in-app instructions to add the camera and scan the QR code.
Connecting the Camera to the Monitor
The camera and monitor typically connect automatically. If they do not:
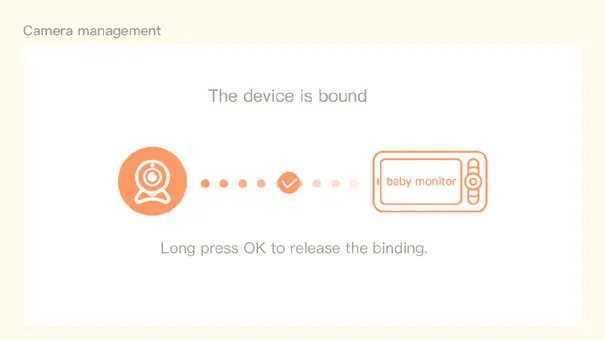
- Disconnect: Press Menu on the monitor, select Camera, and long-press the OK button to release the binding.
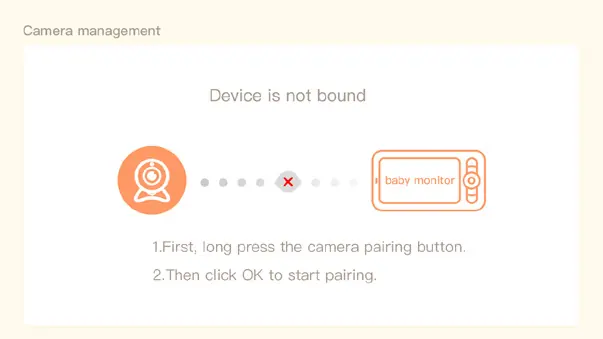
- Reconnect: Press Menu, select Camera, long-press the camera's pairing button until you hear a tone, then press OK on the monitor to start pairing.
- Note: Ensure the distance between the camera and monitor is no more than 300m.
General Settings
Access the menu on the display screen to adjust the following:
- Volume & Brightness: Use the Menu button and adjust with direction buttons.
- Date and Time: Set via Menu > Date and Time.
- Language: Select your preferred language in the settings menu.
- Sleep Mode: Configure to 1, 5, 10, 30, 60 minutes, or off to save battery.
- SD Card: View capacity and format the card via SD card management. Note: Do not hot-swap the SD card; insert/remove only when powered off.
Troubleshooting
- Monitor not previewing: Ensure the camera is paired with the monitor.
- Cannot find pairing button: It is the call button on the camera; hold for 3 seconds.
- Screen stuck: Reset the monitor with a needle and hold the power button to restart.
- Bee sound: The monitor is too close to the camera; move it at least 1 meter away.
Official resources from the manual
Manufacturer information
ieGeek
Practical help
Common problems
Monitor does not display video
Check if the monitor is connected to the camera. If not, perform the pairing procedure.
Cannot find the pairing button
The pairing button is the call button on the camera. Long press it for 3 seconds.
Monitor screen is frozen/unresponsive
Reset the monitor using a needle, then long-press the power button to restart.
Monitor makes a 'bee' sound
The monitor is too close to the camera. Move it at least 1 meter away.
Before use
- Ensure your Wi-Fi network is 2.4 GHz (5 GHz is not supported).
- Insert the SD card before powering on the device.
- Charge the monitor fully.
- Ensure the camera and monitor are within 300m of each other.
Specs in practice
- 2.4 GHz Wi-Fi
- Required frequency for app connectivity; 5 GHz networks are not supported.
- No hot-swapping
- You must power off the device before inserting or removing the SD card.
Images and diagrams
- Camera: Status light, Microphone, SD card slot, Reset button, Call/Pair button, Speaker, Power port.
- Monitor: Zoom, Menu, Direction, OK, Call, Back, Antenna, Power button, Speaker, Screen holder, SD card slot, Reset, Charging port.
Model compatibility
- Supports 2.4 GHz Wi-Fi networks only.

Manual page author
Michael Turner
Technical manual editor
Reviews PDF manuals for structure, safety notes, and practical product details so readers can find the right information quickly.